Notice: This material is excerpted from Special Edition Using HTML, 2nd Edition, ISBN: 0-7897-0758-6. This material has not yet been through the final proof reading stage that it will pass through before being published in printed form. Some errors may exist here that will be corrected before the book is published. This material is provided "as is" without any warranty of any kind.
by John Jung
After you've surfed the Web long enough, you may notice some things that appear consistently in Web pages. Obviously, no written law requires you to put these elements in your home pages. But they take up little room, and adding them is just a good idea. In some cases, these conventions are also very useful for the casual user. You learn about what some of the common conventions are and how to put them into your home page.
When you're designing and creating a Web page, you should always remember
that not everybody is using Netscape as his or her browser. Some people
are using old graphical browsers because they're accustomed to them. Others
use proprietary browsers that their Internet Service Providers (ISP) give
them. Some people accessing your ![]() Web
site might even be using a text-only browser. Whatever they're using, however,
you should try to accommodate them as much as possible.
Web
site might even be using a text-only browser. Whatever they're using, however,
you should try to accommodate them as much as possible.
![]() Graphics
and
Graphics
and ![]() imagemaps
are powerful tools for your
imagemaps
are powerful tools for your ![]() Web
page and can be particularly troublesome. The foremost consideration when
putting images in, is letting people with non-graphical browsers see them.
The second important consideration is the file format of the graphic itself.
You want to try to put your image in a format that is supported natively
by as many browsers as possible.
Web
page and can be particularly troublesome. The foremost consideration when
putting images in, is letting people with non-graphical browsers see them.
The second important consideration is the file format of the graphic itself.
You want to try to put your image in a format that is supported natively
by as many browsers as possible.
Imagemaps are basically images that reference different URLs when different
locations of the image are clicked. Unfortunately, with imagemaps, unlike
images, no built-in provision exists for providing a textual alternative.
Your only remedy is to provide ![]() generic
hypertext links that go to the different areas in your
generic
hypertext links that go to the different areas in your ![]() imagemap.
You can get around imagemaps in two basic ways: by putting the generic
hypertext links on the same page or creating a separate page. Regardless
of which method you pick, if you're going to use imagemaps, you should
at least use one of these methods.
imagemap.
You can get around imagemaps in two basic ways: by putting the generic
hypertext links on the same page or creating a separate page. Regardless
of which method you pick, if you're going to use imagemaps, you should
at least use one of these methods.
One of the most common methods of getting around ![]() imagemaps
is to put the
imagemaps
is to put the ![]() generic
links on the same page as the
generic
links on the same page as the ![]() imagemap
(see fig. 8.1). This method is useful for
individuals and companies that are working with limited disk space. By
using generic links with each page of an imagemap, you can easily update
each page. Instead of trying to find the different versions of the same
page, you just have one page to change. Creating this page is easy; you
simply designate a portion of a particular page to having only regular
hypertext links. You may want to use a horizontal rule to specify where
the generic text-only section begins and ends.
imagemap
(see fig. 8.1). This method is useful for
individuals and companies that are working with limited disk space. By
using generic links with each page of an imagemap, you can easily update
each page. Instead of trying to find the different versions of the same
page, you just have one page to change. Creating this page is easy; you
simply designate a portion of a particular page to having only regular
hypertext links. You may want to use a horizontal rule to specify where
the generic text-only section begins and ends.
See Chapter 4 for information on creating hyperlinks.
One way of helping people get around your site without ![]() imagemaps
is to have regular
imagemaps
is to have regular ![]() hypertext
links on the same page.
hypertext
links on the same page.
When you're creating the
generic hypertext links section, be absolutely sure they are generic. Many
For older and text-only browsers, these advanced HTML elements are ignored. As a result, the generic link section is completely inaccessible. So instead of trying to help people out, you're only frustrating them more. If you're still unsure whether or not your generic link is accessible, try it out yourself. Get a text-only Web browser and access your page.
Another method of allowing people to get to different parts of your
![]() Web
site without using
Web
site without using ![]() imagemaps
is to have a separate page that has the same links. That is, you keep two
versions of every page with an imagemap-one with the imagemap and one without.
The advantage of this method is that it almost ensures that you will have
links that are accessible to all. With this, you also can take advantage
of the custom features for each browser. The obvious downside to this method
is that you have to maintain all these pages. If you choose this option,
put in a regular link to the generic page on the page with your imagemap
(see fig. 8.2).
imagemaps
is to have a separate page that has the same links. That is, you keep two
versions of every page with an imagemap-one with the imagemap and one without.
The advantage of this method is that it almost ensures that you will have
links that are accessible to all. With this, you also can take advantage
of the custom features for each browser. The obvious downside to this method
is that you have to maintain all these pages. If you choose this option,
put in a regular link to the generic page on the page with your imagemap
(see fig. 8.2).
Be sure to put the link to your generic Web page in an easily accessible spot.
If you decide to go with the multiple Web page route, you should consider putting in links to the other pages. In other words, on your generic page, put in links to your Netscape and Internet Explorer pages. In your Netscape page, put separate links for the other two. And on the Internet Explorer page, put in links to the Netscape and generic pages.
HTML doesn't force you to, but as a general rule, you should consider telling people where links go in your Web page. This convention isn't always used by individuals, but most sites that deal with lots of information use them. There are two situations when you should tell the user the destination of the links: large collection of various information and widely distributed information. This need to know of where links go and what they contain is the foundation of many Web page databases.
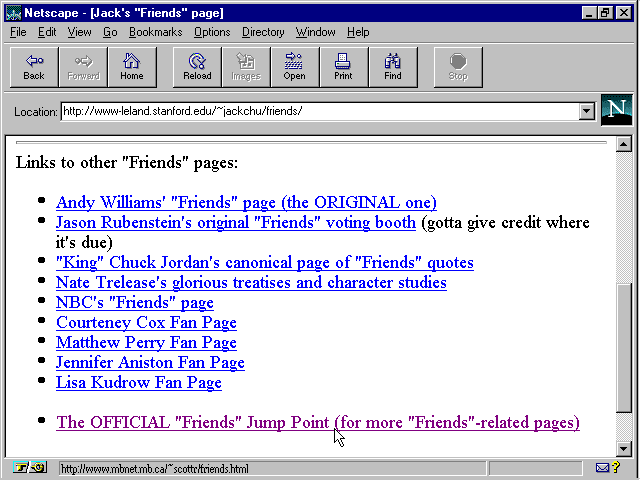
One frequent place that you see the destination of links is in Web pages that refer to many different sources. Usually, fan-based home pages, such as for actors, actresses, models, and TV shows, use this convention. This is especially true if the object of the fan Web page is very popular (see fig. 8.3).
![]() Fans
of the TV show "Friends" can easily access any number of resources
related to it.
Fans
of the TV show "Friends" can easily access any number of resources
related to it.
This central listing of the various Web pages, FTP sites, and mailing lists is invaluable to the fans. To add your own central listing, simply put, either before or after the link, some indication of the destination of that link. Either refer to it by the machine name or the name of that particular Web page author.
When you're distributing information, you also may want to tell users
where links go. Typically, this situation happens when you have information
that either you want many people to have or they are demanding themselves.
Individuals and companies that market very popular products fall into this
category. If the site has numerous customers from all over the world, telling
users where links go will help reduce the load on U.S.-based ![]() FTP
sites.
FTP
sites.
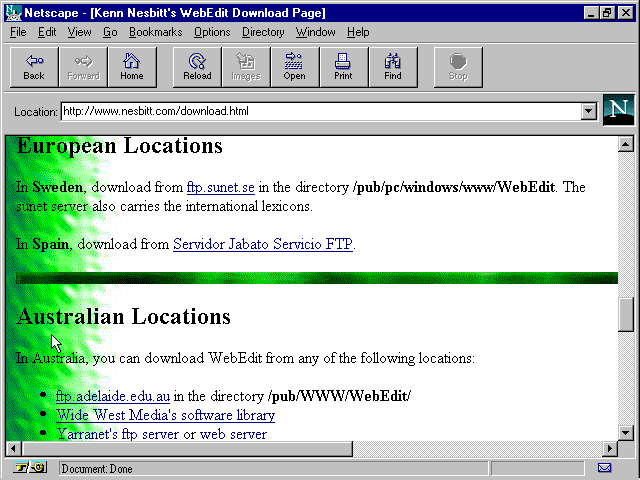
Also, maintainers of ![]() Frequently
Asked Questions (FAQs) may want to have pages that refer to multiple locations,
too (see fig. 8.4). This way, they can lighten
the load of the constant accesses of the FAQs. By following this convention,
especially popular
Frequently
Asked Questions (FAQs) may want to have pages that refer to multiple locations,
too (see fig. 8.4). This way, they can lighten
the load of the constant accesses of the FAQs. By following this convention,
especially popular ![]() FTP
sites will become more accessible to everybody on the Net.
FTP
sites will become more accessible to everybody on the Net.
You can get a copy of this program from whichever location is more convenient for you.
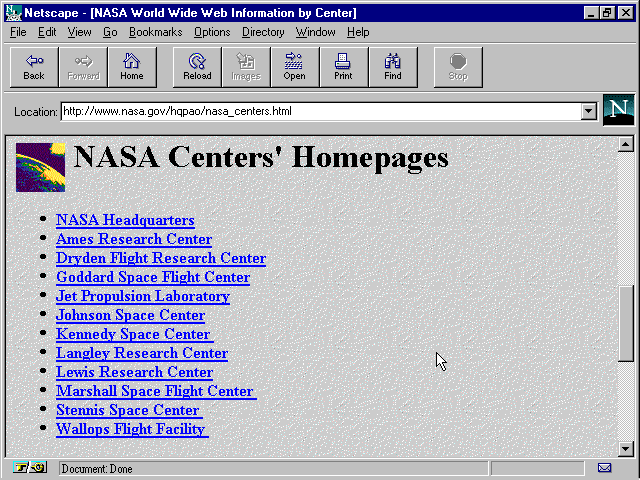
In some cases, you may want to specify the destination of links for related information. If you're building a Web page that is the repository for a wide range of information, you may want to indicate where links go. Most individuals won't encounter this situation, but some companies will. For extremely large companies with many divisions spread out, a centralized page with links to the rest of the company is important (see fig. 8.5).
At the NASA home page, you can easily access any of their facilities.
In this scenario, you don't need to indicate the computer name of each particular piece of information; just give it some distinctive name. Either indicate the region of the country in which it's located or the name of that facility.
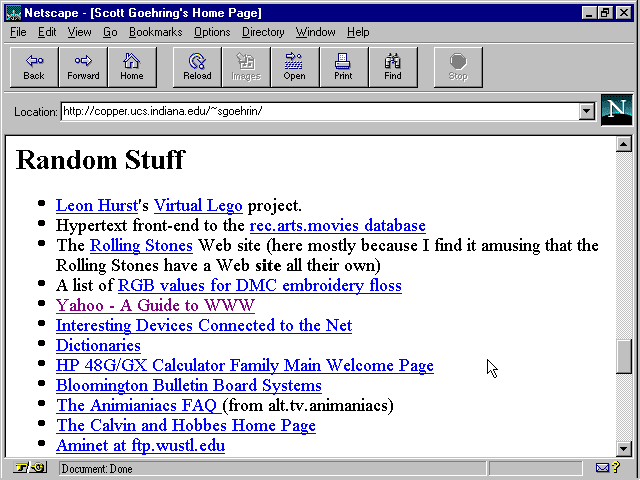
Just as there are Web pages with links to related information, there are the unrelated links. Typically, you'll find these kinds of Web pages for individual people, rather than companies. They just throw together a page with their favorite hobbies and activities on one big page (see fig. 8.6). Occassionally, they'll organize the mess into manageble chunks, but not always. If you're creating a personal Web page, there's nothing wrong with putting in a page with links to your hobbies.
Individuals typically have a ![]() Web
page dedicated to hyperlinks that point to their interests.
Web
page dedicated to hyperlinks that point to their interests.
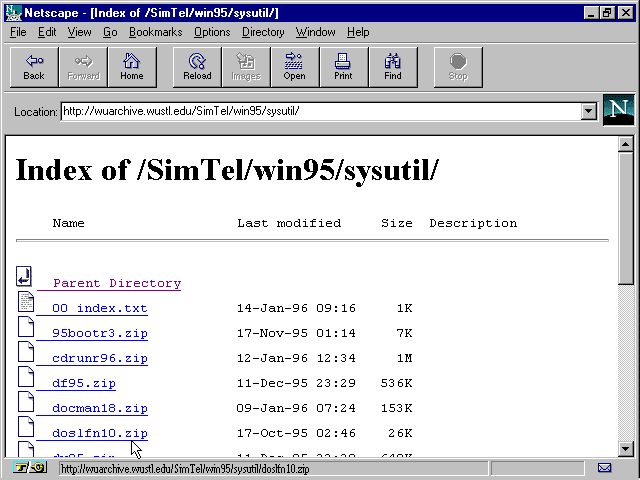
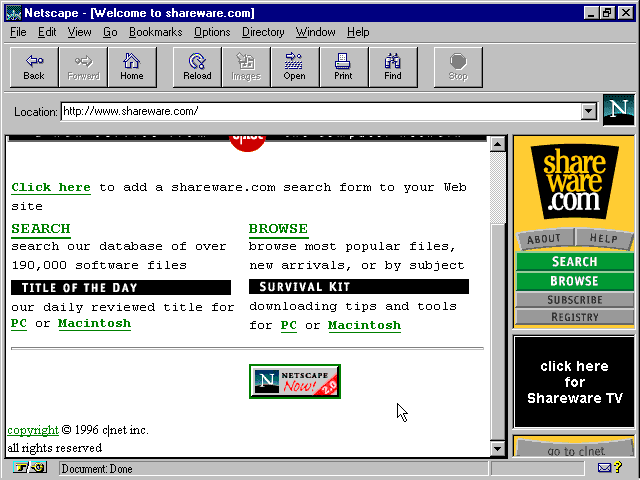
One thing that you may see in many Web pages is the size specifications
of files. This convention is usually used on pages from ![]() shareware
and
shareware
and ![]() commercial
software authors. Often, these people want their products to be used as
much as possible. This common convention provides useful and important
information that each user should know (see
fig. 8.7). If you plan to make any files available on your home page,
be sure to follow their suit.
commercial
software authors. Often, these people want their products to be used as
much as possible. This common convention provides useful and important
information that each user should know (see
fig. 8.7). If you plan to make any files available on your home page,
be sure to follow their suit.
Putting in the size of the ![]() downloadable
files is an easy way to help people out.
downloadable
files is an easy way to help people out.
Putting in the file size for ![]() downloadable
files is just another step in helping users out. By letting people know
ahead of time how big a file is, you let them know roughly how long it
will take to download that file. Because you don't want to get potential
customers angry at you, you want to let them know as much about the file
as possible.
downloadable
files is just another step in helping users out. By letting people know
ahead of time how big a file is, you let them know roughly how long it
will take to download that file. Because you don't want to get potential
customers angry at you, you want to let them know as much about the file
as possible.
Without specifying the file size, you could turn away potential customers. If these users are accessing the Net through their modems, and the file is particularly large, this information would be invaluable. They could be accessing your page at any time and might not have time to download the entire file. Also, many people who access the Net do it from two means, a machine on the Net itself and their modems. If they see your page through a modem, and the file is particularly large, the file size might persuade them to download the file at a later time. They may wait until they get to school or work and then get the file from there.
Two more common conventions you'll see used widely in Web pages are
the Web author's name and the date the page was last modified. Each convention
has a different reason that it should be used, but you shouldn't ignore
them. Dating your ![]() Web
pages allows people to see when new material has been added to it. Companies,
in particular, should date almost every page on their Web sites.
Web
pages allows people to see when new material has been added to it. Companies,
in particular, should date almost every page on their Web sites. ![]() Signing
Web pages tell people who created the
Signing
Web pages tell people who created the ![]() Web
page for any problems or praises. Everybody can find a good use of "signing"
their home pages.
Web
page for any problems or praises. Everybody can find a good use of "signing"
their home pages.
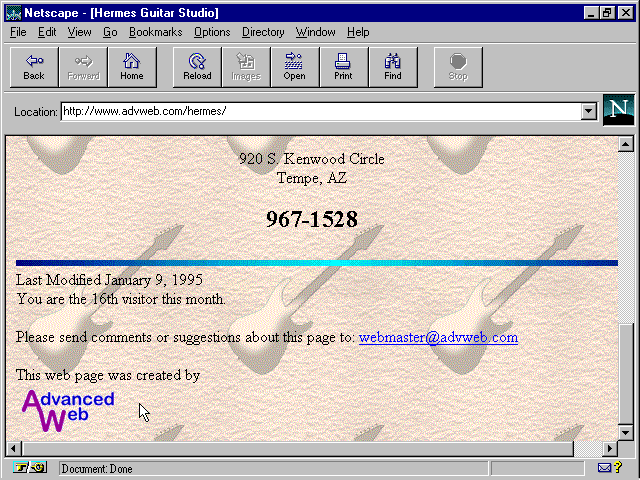
Putting their names on their Web sites isn't particularly useful for most people. However, you can only gain benefits by signing your name on your home page. Simply type in your real name, and possibly put in an e-mail link to yourself (see fig. 8.8). If you sign your home page, users know whom to contact if they have any questions or problems with your page. Also, if you have a particularly cryptic e-mail name, signing the page helps people properly address e-mail to you.
Putting your real name on your ![]() home
page tells people a little about yourself-like who you are.
home
page tells people a little about yourself-like who you are.
People working on ![]() commercial
Web sites should pay special attention to this section. An important element
to put in your corporate Web page is the date you last modified that particular
page (see fig. 8.9). This information is
useful for almost anyone who visits your Web site. This date informs users
whether new information has been added since their last visit. If they're
frequent visitors, the modification date will help them budget their time.
Instead of going through your site looking for new material, they can look
at the date and know exactly what's new. Clearly, most individuals don't
need to date their home pages, but doing so couldn't hurt. This is especially
true considering that some HTML authoring programs have a provision to
put in the current date.
commercial
Web sites should pay special attention to this section. An important element
to put in your corporate Web page is the date you last modified that particular
page (see fig. 8.9). This information is
useful for almost anyone who visits your Web site. This date informs users
whether new information has been added since their last visit. If they're
frequent visitors, the modification date will help them budget their time.
Instead of going through your site looking for new material, they can look
at the date and know exactly what's new. Clearly, most individuals don't
need to date their home pages, but doing so couldn't hurt. This is especially
true considering that some HTML authoring programs have a provision to
put in the current date.
Dating home pages is more important for companies than individuals.
Not all people who have Web pages necessarily created them themselves.
Because ![]() HTML
authoring can be a pretty daunting task, professional
HTML
authoring can be a pretty daunting task, professional ![]() HTML
writers can keep busy. Also, most individuals who have home pages almost
certainly aren't running the computer equipment that runs the Web server
software. In either case, giving credit where credit is due is important.
Somewhere in your Web page, put in references and links to the people who
did the work for you, or tools you used.
HTML
writers can keep busy. Also, most individuals who have home pages almost
certainly aren't running the computer equipment that runs the Web server
software. In either case, giving credit where credit is due is important.
Somewhere in your Web page, put in references and links to the people who
did the work for you, or tools you used.
![]() Professional
HTML writers make part of their living by creating
Professional
HTML writers make part of their living by creating ![]() home
pages. Most of these people write pages in their spare time, but most of
them also keep current with HTML trends. They know what and when new HTML
tags are available, how to create cool special effects, and other things
associated with their job. Many times
home
pages. Most of these people write pages in their spare time, but most of
them also keep current with HTML trends. They know what and when new HTML
tags are available, how to create cool special effects, and other things
associated with their job. Many times ![]() HTML
authors charge a certain amount of money for the work they do for you.
This rate can range anywhere from $50 an hour to over $200 an hour. Each
writer has his or her own design and layout style for his or her Web pages,
and you should look at some samples before hiring that writer.
HTML
authors charge a certain amount of money for the work they do for you.
This rate can range anywhere from $50 an hour to over $200 an hour. Each
writer has his or her own design and layout style for his or her Web pages,
and you should look at some samples before hiring that writer.
After you've found the right person for the job, just tell him or her what you want done. Tell your writer what information you want on your home page and how you've pictured it in your head. He or she will take those ideas and try to make the Web page match your vision. You almost certainly will have to do some tweaking to clean up the page, however. After all this work is done, and you have your home page, you can make one extra addition to it. Somewhere near the bottom of the page before the </HTML> tag, you can add the following:
<H5>This page was created by [name].</H5>
Be sure to replace [name] with the name of the person who created the
page. Some professional ![]() HTML
writers put in this information automatically, so you may not have to do
it (see fig. 8.10). The reason for putting
in this information is obvious-you're giving the
HTML
writers put in this information automatically, so you may not have to do
it (see fig. 8.10). The reason for putting
in this information is obvious-you're giving the ![]() HTML
writer free
HTML
writer free ![]() advertising.
If he or she does a good job and creates an interesting page, many other
people may want to seek out him or her. This name line takes up very little
space on your home page, and by putting it in, you give an extra reward
to the writer.
advertising.
If he or she does a good job and creates an interesting page, many other
people may want to seek out him or her. This name line takes up very little
space on your home page, and by putting it in, you give an extra reward
to the writer.
Putting in the name of the author is an easy way of letting people know who really created your home page.
If you don't want to be the middleman for the HTML author and his or her potential customers, you can get around that, too. Instead of putting in this line:
<H5>This page was created by [name].</H5>put in this line:
<H5>This page was created by <A HREF="mailto:[address]">[name]</A>.</H5>Be sure to replace [address] with the e-mail address of the HTML writer. You should, of course, change [name] to the writer's name. This line of
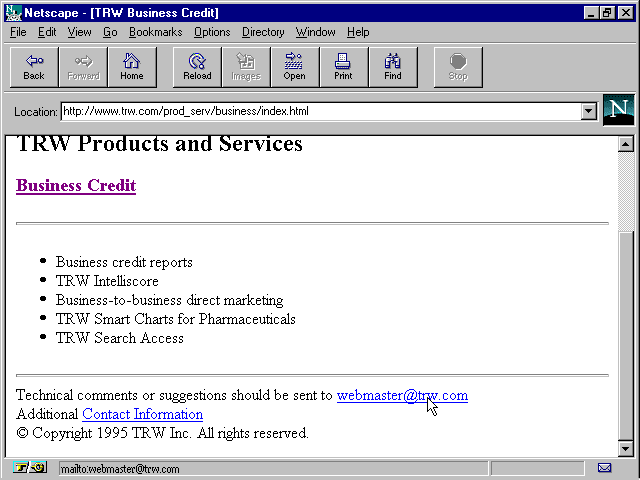
Another important aspect of ![]() Web
pages is the machine that runs the Web server software. Many individuals
have absolutely no control over what machine is their Web server. Also,
a number of technical problems that they can't fix might arise. The only
person who can really fix some of these technical problems is called the
Webmaster. This person is in charge of the computer equipment on
which the Web server is running. If you experience any computer equipment-related
issues with the Web site, you should contact the Webmaster.
Web
pages is the machine that runs the Web server software. Many individuals
have absolutely no control over what machine is their Web server. Also,
a number of technical problems that they can't fix might arise. The only
person who can really fix some of these technical problems is called the
Webmaster. This person is in charge of the computer equipment on
which the Web server is running. If you experience any computer equipment-related
issues with the Web site, you should contact the Webmaster.
To make your Webmaster accessible to people viewing your home page, simply put in the following:
<H5>If you have any technical problems, please contact the <A HREF="mailto:webmaster@[host]">Webmaster</A>.</H5>
Replace [host] with the computer name on which your home page resides.
These lines create an e-mail link that, when clicked on, let people send
e-mail to the Webmaster (see fig. 8.11).
Almost everybody who runs a ![]() Web
site has a
Web
site has a ![]() Webmaster
e-mail address, so you don't have to worry that it doesn't exist. You want
to give some sort of access to the Webmaster so that he or she can resolve
any server-related issues. You don't want to spend your time forwarding
e-mail to him or her, or telling people that you can't help them; that's
what the Webmaster does.
Webmaster
e-mail address, so you don't have to worry that it doesn't exist. You want
to give some sort of access to the Webmaster so that he or she can resolve
any server-related issues. You don't want to spend your time forwarding
e-mail to him or her, or telling people that you can't help them; that's
what the Webmaster does.
Be sure to put in some reference to your Webmaster so that he or she can handle any Web server-related problems.
Perhaps the most difficult aspect of having a link to the Webmaster, is that they might get inappropriate e-mail. Take a look at the problem, and try to decide if it is something for the Webmaster to fix. Or is the problem you're having the fault of the person whose home page you're viewing. Generally speaking, if you're having problems accessing any links or understanding the text, you should e-mail the person who runs the home page. If you're having problems not being able to establish a secure data connection, such as for purchasing products, you should notify the Webmaster. For problems in which imagemaps don't appear to be behaving properly, deciding is a difficult call. It could be either person's problem, but your first choice should not be the Webmaster.
Most ![]() corporate-run
Web sites have a handful of people taking care of their
corporate-run
Web sites have a handful of people taking care of their ![]() Web
sites. In these situations, the Webmaster is often the person in charge
of the site and also the author of the home pages. In such situations,
you should e-mail the Webmaster for any problems related to the Web site
or a particular home page.
Web
sites. In these situations, the Webmaster is often the person in charge
of the site and also the author of the home pages. In such situations,
you should e-mail the Webmaster for any problems related to the Web site
or a particular home page.
Some people creating their ![]() Web
pages feel that their tools were invaluable. Typically, the most commonly
acknowledged tool is the HTML editor itself (see
fig. 8.12). Many
Web
pages feel that their tools were invaluable. Typically, the most commonly
acknowledged tool is the HTML editor itself (see
fig. 8.12). Many ![]() HTML
editors work on simplifying the task of creating
HTML
editors work on simplifying the task of creating ![]() Web
pages. As a result, the
Web
pages. As a result, the ![]() Web
author will put in references to the programs they used in creating their
Web page. If you thought that HTML was confusing and unworkable, but your
Web
author will put in references to the programs they used in creating their
Web page. If you thought that HTML was confusing and unworkable, but your
![]() HTML
editor simplified everything, put in a little note about it. It'll help
the author of the program possibly to get a few more customers.
HTML
editor simplified everything, put in a little note about it. It'll help
the author of the program possibly to get a few more customers.
Useful programs that you use in your Web page should be acknowledged.
There are a number of Web sites that do nothing but look at other Web pages. These "services" typically cost nothing and are useful tools for the Web author. Sometimes they can be used to brag about how good their page is, technically. Other times, these awards can be used to verify that your Web page conforms to the standard. While these awards are certainly not required, they are certainly something to be proud of; if you have them.
See Chapter 19 for more information on common award services.
For those ![]() Web
authors who are more interested in the presentation of their
Web
authors who are more interested in the presentation of their ![]() Web
pages, they can try and get some "awards". These awards are given
out by groups of people who look at the presentation of Web pages. Typically,
someone will recommend a Web page to the committee, and they'll look at
it. If they are impressed with the way you've made your Web page, they'll
let you know. You can then put their award on your Web page and be able
to show it off to others (see fig. 8.13).
As you might guess, this is the sort of thing that people such as graphic
artists are interested in.
Web
pages, they can try and get some "awards". These awards are given
out by groups of people who look at the presentation of Web pages. Typically,
someone will recommend a Web page to the committee, and they'll look at
it. If they are impressed with the way you've made your Web page, they'll
let you know. You can then put their award on your Web page and be able
to show it off to others (see fig. 8.13).
As you might guess, this is the sort of thing that people such as graphic
artists are interested in.
Some people like to put up notices of the awards they've won.
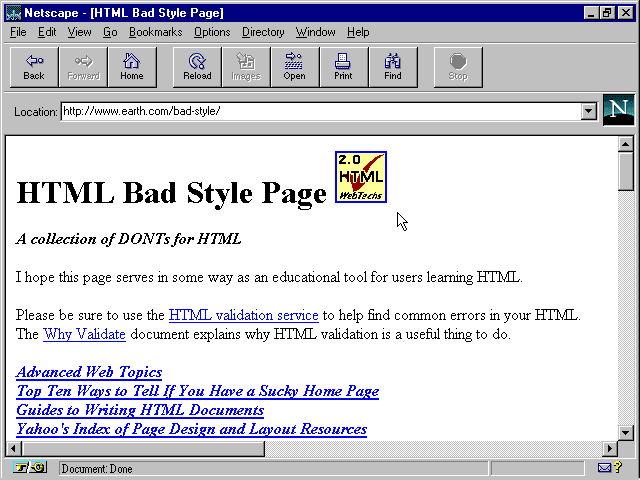
Another common convention is that some people like to get their Web
pages validated. That is, they have somebody else look at their ![]() HTML
source, and determine if it conforms to the
HTML
source, and determine if it conforms to the ![]() HTML
standards (see fig. 8.14). If it doesn't,
then the
HTML
standards (see fig. 8.14). If it doesn't,
then the ![]() Web
author can always go back and revise the page, if he wants. If the page
does conform to the HTML standards, then the
Web
author can always go back and revise the page, if he wants. If the page
does conform to the HTML standards, then the ![]() Web
author can reduce
Web
author can reduce ![]() e-mail
complaints about his page. Should the
e-mail
complaints about his page. Should the ![]() Web
author get any
Web
author get any ![]() e-mail
about how a particular browser doesn't interpret his page, he can ignore
it. After all, his Web page has been certified to conform, so it must the
browser's fault.
e-mail
about how a particular browser doesn't interpret his page, he can ignore
it. After all, his Web page has been certified to conform, so it must the
browser's fault.
Validation services allow a ![]() Web
author to be certain that his page will be visible by all conforming browsers.
Web
author to be certain that his page will be visible by all conforming browsers.
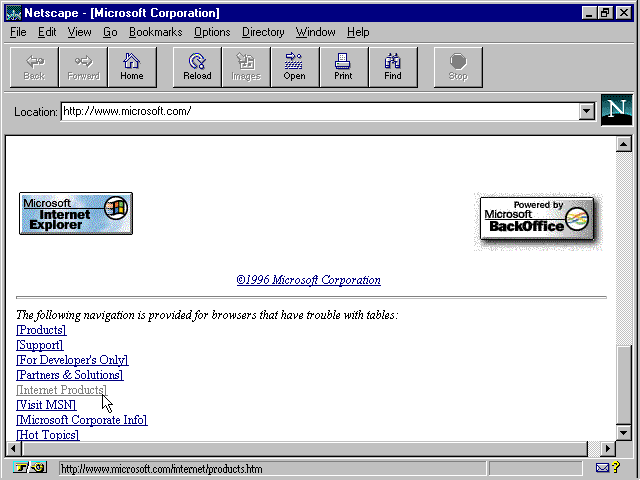
Though not really an award, you'll often come across Web pages that indicate their preferred browser. Typically, this is done by inserting some distinctive (see fig. 8.15). The author went to a lot of effort to make sure the Web page looked great on the recommended browser. Oftentimes, you'll see these notices when the Web page author is exploiting certain features of the particular browser. If you're not using the specified viewer, you might not get the full effect of the Web author's intent.
Some HTML authors like to use some features of certain browsers, and they'll tell you which one.


|


