Notice: This material is excerpted from Special Edition Using HTML, 2nd Edition, ISBN: 0-7897-0758-6. This material has not yet been through the final proof reading stage that it will pass through before being published in printed form. Some errors may exist here that will be corrected before the book is published. This material is provided "as is" without any warranty of any kind.
by John Jung
A number of advanced home pages make use of a feature commonly known
as ![]() imagemaps.
They are just pictures in which well-defined areas are marked to go to
different URLs. In most cases, clicking on a picture is easier than clicking
on plain text hyperlinks.
imagemaps.
They are just pictures in which well-defined areas are marked to go to
different URLs. In most cases, clicking on a picture is easier than clicking
on plain text hyperlinks.
So what is involved in creating imagemaps and putting them on your home page? A lot of work. You also should consider some drawbacks to using imagemaps before including them.
In this chapter, you learn about the following:
Because imagemaps make use of pictures, they let users navigate content-related
links in a friendly fashion. The ![]() World
Wide Web is the first
World
Wide Web is the first ![]() Internet
standard that allows for the easy
Internet
standard that allows for the easy ![]() display
of graphics. This is a sharp contrast to past standards, which were all
text-based, such as Gopher, WAIS, and FTP. Although these older standards
couldn't transport images; I'm just saying that this capability was never
designed into them (see fig. 12.1).
display
of graphics. This is a sharp contrast to past standards, which were all
text-based, such as Gopher, WAIS, and FTP. Although these older standards
couldn't transport images; I'm just saying that this capability was never
designed into them (see fig. 12.1).
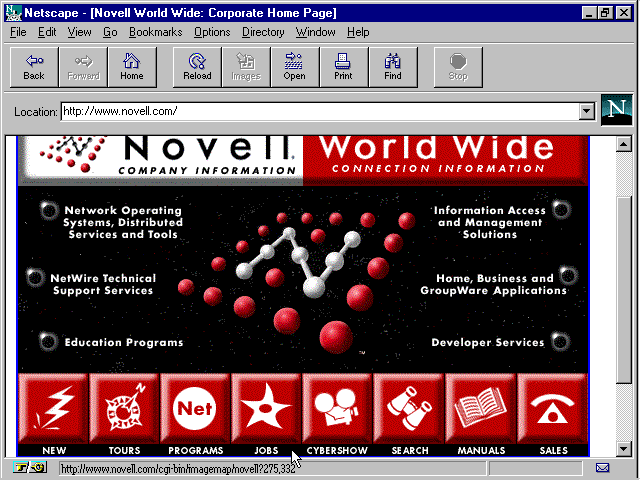
Fig. 12.1
Clicking on pictures is easier than reading text.
Simply put, imagemaps are pictures that have certain defined areas. Each of these defined areas points to different URLs to which a user can go. Because the user has to know where these clickable regions are, borders often appear around each region (see fig. 12.2). These borders are a part of the graphic itself, and not created by the Web server.
Fig. 12.2
For imagemaps to be useful, they should have distinct borders around them.
When a user clicks somewhere in the imagemap, his or her browser sends
the coordinates of the ![]() mouse
pointer to the
mouse
pointer to the ![]() Web
server. The server then looks up the coordinates and determines which clickable
region was accessed. The server finds the corresponding URL and goes there.
Finally, the browser displays the contents of the new URL to the user.
Web
server. The server then looks up the coordinates and determines which clickable
region was accessed. The server finds the corresponding URL and goes there.
Finally, the browser displays the contents of the new URL to the user.
Using ![]() imagemaps
offers obvious benefits, mainly the ease of use for users. But as with
almost everything else on the Net, you can always find a reason not to
use imagemaps. Most of the pluses to using imagemaps are strictly for making
tasks easier and friendlier for the user. The reasons not to use imagemaps
are generally technical.
imagemaps
offers obvious benefits, mainly the ease of use for users. But as with
almost everything else on the Net, you can always find a reason not to
use imagemaps. Most of the pluses to using imagemaps are strictly for making
tasks easier and friendlier for the user. The reasons not to use imagemaps
are generally technical.
In many situations, you should consider using imagemaps instead of hypertext links. Here's a short list of some times when using imagemaps is appropriate:
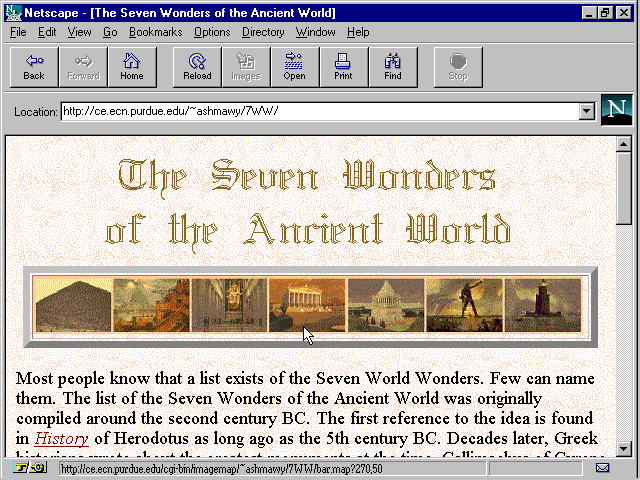
Fig. 12.3
By using imagemaps as a navigational tool for the user, you make getting around your home page easier.
Although imagemaps might be useful in most situations, sometimes you shouldn't use them. Here's a short list of times when you shouldn't use imagemaps:
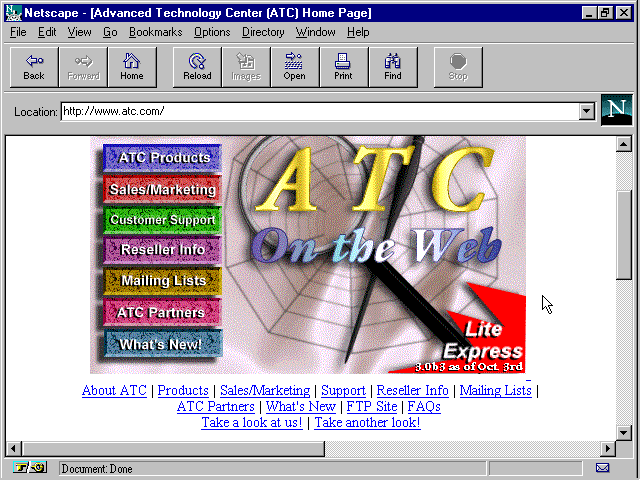
Fig. 12.4
Making textual alternatives for your ![]() imagemaps
is essential.
imagemaps
is essential.
To create an imagemap, you're going to need more than just a pretty
picture and an idea of where the regions are. You're also going to need
an imagemap definition file, which specifies where each particular region
is. You also need a CGI (Common Gateway Interface) program to build the
relation between the picture and the imagemap definition file. (You learn
about ![]() CGI
programs for
CGI
programs for ![]() imagemaps
later in this chapter, and more about
imagemaps
later in this chapter, and more about ![]() CGI
programming in chapter 23, "All about CGI.") In this section,
you focus on the imagemap definition file, which specifies the regions.
CGI
programming in chapter 23, "All about CGI.") In this section,
you focus on the imagemap definition file, which specifies the regions.
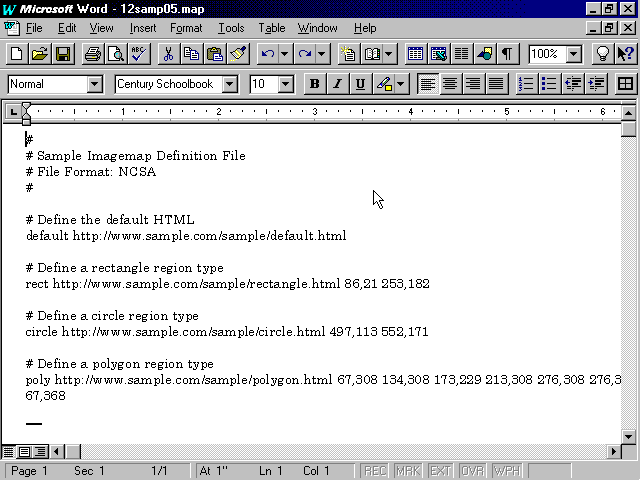
An ![]() imagemap
definition file can come in two forms: CERN and NCSA. Both contain the
same basic information for the clickable regions. Both of them also use
the same region types (see "Imagemap Region Types" later in this
chapter). The coordinates used to define the regions are also the same.
The only difference between the two is the manner that the information
is presented. Because of this incompatibility, you must find out from your
system administrator which format your Web server supports.
imagemap
definition file can come in two forms: CERN and NCSA. Both contain the
same basic information for the clickable regions. Both of them also use
the same region types (see "Imagemap Region Types" later in this
chapter). The coordinates used to define the regions are also the same.
The only difference between the two is the manner that the information
is presented. Because of this incompatibility, you must find out from your
system administrator which format your Web server supports.
Originally, ![]() CERN
(Conseil Europeen pour la Recherche Nucleaire) was founded as a research
group of European physicists. The group slowly expanded their research
into the field of computers. Because they were the ones who first thought
of the idea, they rightfully claim the honor of being "the birthplace
of the Web." When imagemaps were deemed necessary,
CERN
(Conseil Europeen pour la Recherche Nucleaire) was founded as a research
group of European physicists. The group slowly expanded their research
into the field of computers. Because they were the ones who first thought
of the idea, they rightfully claim the honor of being "the birthplace
of the Web." When imagemaps were deemed necessary, ![]() CERN
developed their format for the
CERN
developed their format for the ![]() imagemap
definition file. On
imagemap
definition file. On ![]() Web
servers that follow the
Web
servers that follow the ![]() CERN
format, you can find files that look like this:
CERN
format, you can find files that look like this:
region_type (x1,y1) (x2,y2) ... URL
The horizontal (x) and vertical (y) coordinates must be in parentheses and separated by a comma. Each pair of coordinates means something different for each region type. The ... specifies additional coordinates, such as for the poly region type (see "Imagemap Region Types" later in the chapter). Here's an example of a CERN imagemap definition:
rect (60,40) (340,280) http://www.rectangle.com/
The first wildly popular browser, Mosaic, came from the ![]() University
of Illinois's National Center for
University
of Illinois's National Center for ![]() Supercomputing
Applications (NCSA). When this group heard for the demand of imagemaps,
they came up with their own imagemap definition file format. A typical
entry in one of their files would look like
Supercomputing
Applications (NCSA). When this group heard for the demand of imagemaps,
they came up with their own imagemap definition file format. A typical
entry in one of their files would look like
region_type URL x1,y1 x2,y2 ...
Subtle (but significant) differences distinguish the ![]() CERN
and
CERN
and ![]() NCSA
formats. The URL for the region type comes before the coordinates with
NCSA, not after, like CERN. The coordinates defining the region need to
be separated by commas, but they don't need the parentheses around them.
Here's an example of an NCSA imagemap definition:
NCSA
formats. The URL for the region type comes before the coordinates with
NCSA, not after, like CERN. The coordinates defining the region need to
be separated by commas, but they don't need the parentheses around them.
Here's an example of an NCSA imagemap definition:
rect http://www.rectangle.com/ 60,40 340,280
![]() Netscape
Navigator 2.0 introduced the concept of client-side
Netscape
Navigator 2.0 introduced the concept of client-side ![]() imagemaps.
With these new imagemaps, the
imagemaps.
With these new imagemaps, the ![]() HTML
document being displayed has all the necessary information. The current
page contains the points specifying each region along with the corresponding
URLs. When the user clicks inside a client-side
HTML
document being displayed has all the necessary information. The current
page contains the points specifying each region along with the corresponding
URLs. When the user clicks inside a client-side ![]() imagemap
graphic, Netscape (not the Web server) looks up the region. The browser
then fetches the appropriate home page, without ever talking to the Web
server (see chapter 15, "Netscape-Specific Extensions
to HTML").
imagemap
graphic, Netscape (not the Web server) looks up the region. The browser
then fetches the appropriate home page, without ever talking to the Web
server (see chapter 15, "Netscape-Specific Extensions
to HTML").
Several terms relate to different aspects of using ![]() imagemaps.
In the following sections, you learn some of the terms and what they refer
to.
imagemaps.
In the following sections, you learn some of the terms and what they refer
to.
The first thing the user sees when he or she comes across an imagemap
is the image itself. This picture is typically called the imagemap graphic.
The image can be anything, but it must be in the ![]() GIF
graphics file format; whether it's interlaced or non-interlaced doesn't
matter. The
GIF
graphics file format; whether it's interlaced or non-interlaced doesn't
matter. The ![]() imagemap
graphic is the main interface between the user and the
imagemap
graphic is the main interface between the user and the ![]() imagemap
itself.
imagemap
itself.
An ![]() imagemap
depends on a file to hold the locations of hot spots. This file is known
as the imagemap definition file. This text file, which usually has the
extension .map, holds the coordinates and URLs for each hot spot region.
The regions can be made from any of the standard
imagemap
depends on a file to hold the locations of hot spots. This file is known
as the imagemap definition file. This text file, which usually has the
extension .map, holds the coordinates and URLs for each hot spot region.
The regions can be made from any of the standard ![]() imagemap
region types (see "Imagemap Region Types" later in this chapter).
This file must follow either the
imagemap
region types (see "Imagemap Region Types" later in this chapter).
This file must follow either the ![]() CERN
or
CERN
or ![]() NCSA
file format. Be sure to ask your system administrator which format your
Web server supports.
NCSA
file format. Be sure to ask your system administrator which format your
Web server supports.
Most servers don't have built-in ![]() imagemap
support, which means you have to add the support yourself. You have to
write your own
imagemap
support, which means you have to add the support yourself. You have to
write your own ![]() CGI
program to interpret the
CGI
program to interpret the ![]() mouse-click
location and find the appropriate URL. The CGI program that does all this
work is called the imagemap program. Also, you should ask your Web master
if you can even run CGI programs on your Web server. Some
mouse-click
location and find the appropriate URL. The CGI program that does all this
work is called the imagemap program. Also, you should ask your Web master
if you can even run CGI programs on your Web server. Some ![]() Web
masters, citing a security risk, disallow anybody from running
Web
masters, citing a security risk, disallow anybody from running ![]() CGI
programs.
CGI
programs.
All the previously mentioned components make up the whole ![]() imagemap
concept, which is known as
imagemap
concept, which is known as ![]() imagemap,
image map, area map, or clickable map. Don't let the terms fool you; they
all mean the same thing: a picture that goes to different URLs. Which URL
is dependent on where the user clicked their
imagemap,
image map, area map, or clickable map. Don't let the terms fool you; they
all mean the same thing: a picture that goes to different URLs. Which URL
is dependent on where the user clicked their ![]() mouse
button in the
mouse
button in the ![]() imagemap
graphic.
imagemap
graphic.
Each
imagemap depends on its own
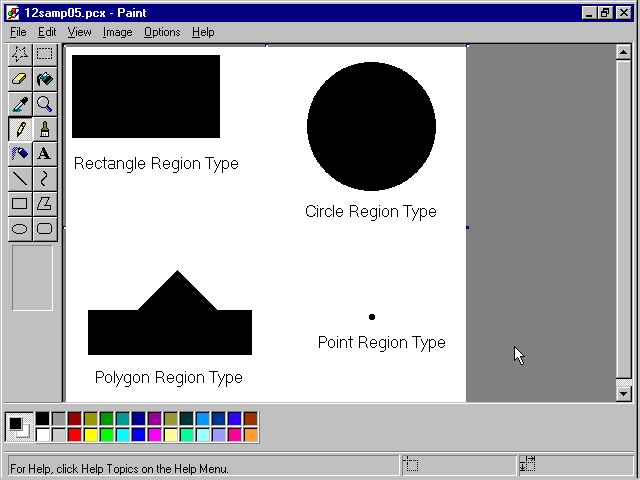
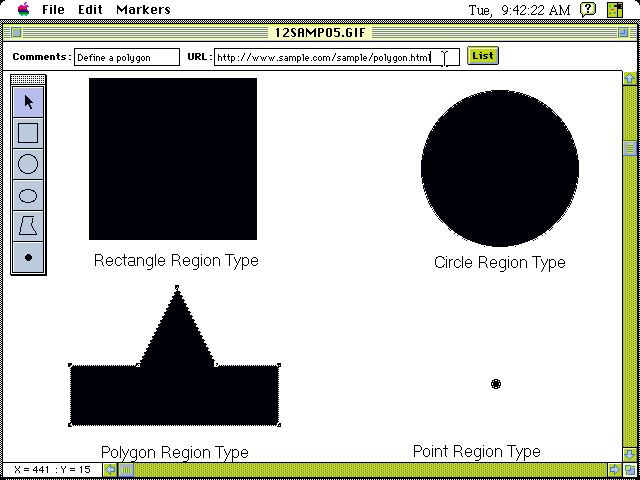
Each entry in the definition file specifies a region type. It also tells the exact points that define the region for that type. The coordinates used by each region type are an offset, in pixels, from the upper-left corner of the imagemap graphic. The available region types are mostly geometric (see fig. 12.5).
Fig. 12.5
You can use any combination of these region types, except for the default type.
To get a hot spot in the shape of a circle, you should use the circle
region type. This element takes in two coordinates, but they are different
values for different Web servers. If your ![]() Web
server is an
Web
server is an ![]() NCSA
imagemap server, the two coordinates specify the coordinates for the center
of the circle and a point on that circle. If your
NCSA
imagemap server, the two coordinates specify the coordinates for the center
of the circle and a point on that circle. If your ![]() Web
server is a
Web
server is a ![]() CERN
imagemap server, you really need only one coordinate and one value. The
coordinates specify the center of the circle, whereas the value defines
its radius. The clickable region of this type is everything enclosed within
the circle.
CERN
imagemap server, you really need only one coordinate and one value. The
coordinates specify the center of the circle, whereas the value defines
its radius. The clickable region of this type is everything enclosed within
the circle.
To specify a geometric shape of an arbitrary number of sides, use the poly region type. This element looks for up to 100 coordinates, each referring to a vertex of the polygon. The active region is the area within the polygon.
To get a clickable rectangle in your imagemap, use the rect region type. This element takes in two coordinates, the upper-left and lower-right corners of the rectangle. Any mouse-clicks inside the rectangle that are within these corners trigger this element.
You can easily create hot spots the size of small circles with the point region type. This element requires just one set of coordinates to specify the center of the circle. The area enclosed within that point is considered the active region.
If the user clicks in an ![]() imagemap
and doesn't activate any region, the default region type is accessed. This
element requires no coordinates.
imagemap
and doesn't activate any region, the default region type is accessed. This
element requires no coordinates.
All entries in the ![]() imagemap
definition file must include the URL to be accessed (see
fig. 12.6). The URL can either be an absolute path or a relative path.
If you're using relative paths to specify a URL, be sure to make them relative
to the directory where the imagemap definition file resides, not where
the imagemap resides. Whenever multiple region types overlap, the first
one with an entry in the
imagemap
definition file must include the URL to be accessed (see
fig. 12.6). The URL can either be an absolute path or a relative path.
If you're using relative paths to specify a URL, be sure to make them relative
to the directory where the imagemap definition file resides, not where
the imagemap resides. Whenever multiple region types overlap, the first
one with an entry in the ![]() imagemap
definition file is accessed.
imagemap
definition file is accessed.
Fig. 12.6
An ![]() imagemap
reference file must contain information specifying the region type, the
coordinates that define the region, and the URL to access.
imagemap
reference file must contain information specifying the region type, the
coordinates that define the region, and the URL to access.
Whenever possible, try to avoid putting in a point alone with a default region type. Because the point region is so small, a user can easily miss it. As a result, the default region will be accessed instead. The user will be frustrated by not getting to the URL he or she wants.
You can use the point and default region types, but you have to overlap some regions. Whenever you put down a point region type, be sure to put down another (larger) region type on top of it. Try not to make the larger region too much larger than the point. Make sure that both region types refer to the same URL. This way, users can access the point region's URL more easily.
An
You can put comments to yourself in an imagemap definition file. Simply put a pound character (#) at the beginning of any line. Everything else on the same line after the pound sign will be ignored by the
The pound sign at the beginning of the line is different than the pound sign in the middle of a URL. When a pound sign is in the middle of a URL, it specifies an internal destination point.
Now that you understand all the parts of the imagemap, you're ready to learn how they all work together. You should now know what components contain what information and how elements relate to each other. But you may not know how everything works together. When you click your mouse anywhere in an imagemap map, the following occurs:
To create an imagemap, you need tools and information; you also need to make some decisions. You need the imagemap graphic and mapping tools and some important information about the Web server.
The first thing you want to look at in building an imagemap is the imagemap
graphics. They are what the user will see and interact with the most. You
should decide what types of graphics you want and how they should look.
If you're building a company Web site, you might want to duplicate the
look and feel of your corporate stationery. Chapter 11, "Handling
Images," has some good information if you're planning to create fresh,
new ![]() graphics
or modify existing ones.
graphics
or modify existing ones.
In choosing your imagemap graphic, you have many considerations. Along with general image considerations (see chapter 10, "Adding Graphics to Your Home Page"), you need to watch out for a number of specific imagemap graphic issues. Here are some things you should do when choosing an imagemap graphic:
When you use
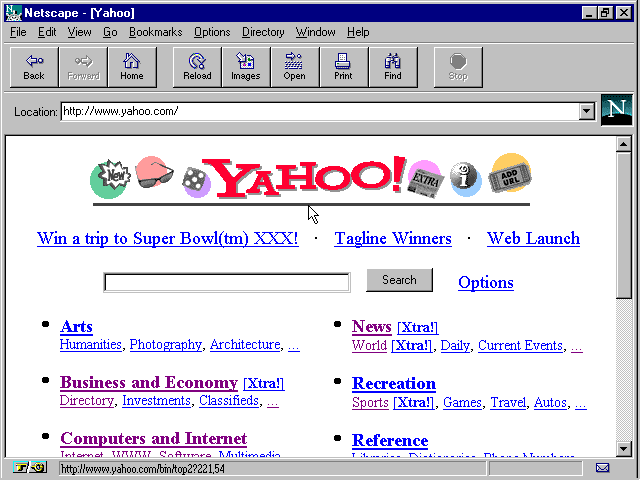
Fig. 12.7
![]() Yahoo's
main masthead is a transparent GIF and the main user
Yahoo's
main masthead is a transparent GIF and the main user ![]() navigational
interface. It's not always obvious when you're in the imagemap and when
you're not.
navigational
interface. It's not always obvious when you're in the imagemap and when
you're not.
The ![]() imagemap
graphic is just part of the whole
imagemap
graphic is just part of the whole ![]() imagemap.
You still need to create an imagemap definition file. Creating the
imagemap.
You still need to create an imagemap definition file. Creating the ![]() imagemap
definition file can be a tiring part of creating the
imagemap
definition file can be a tiring part of creating the ![]() imagemap
for your
imagemap
for your ![]() Web
site. You can create this file in two ways: the easy way and the hard way.
The easy way is to use an
Web
site. You can create this file in two ways: the easy way and the hard way.
The easy way is to use an ![]() imagemap
creation program. This type of program lets you draw
imagemap
creation program. This type of program lets you draw ![]() imagemap
region types on top of an
imagemap
region types on top of an ![]() imagemap
graphic of your choice and specify the appropriate URL.
imagemap
graphic of your choice and specify the appropriate URL.
The hard way of creating the file is to do it by hand. Creating the file this way really isn't as difficult as you might think, but it is dull and repetitious. You need two programs to create an imagemap definition file by hand: a graphics program and a text editor. Before you begin, decide where you want to place clickable regions. Using the graphics program, get the coordinates of the places where you want to put each point of each region type. Write down the region type, pixel coordinates, and appropriate URL using the text editor. Be careful not to actually edit the image itself using the graphics program.
If you choose to have multiple imagemaps using different imagemap graphics, you should organize everything. A good way to do this is to create a separate directory for each group of files for each imagemap. Another way of keeping multiple
Now that you have all the elements in place for an imagemap, you're
ready to actually put it in your home page. You do so by building from
what you learned in chapter 10, "Adding Graphics to Your Home Page."
There, you saw how to make an image ![]() clickable
and go to a certain URL. All you have to do is enclose the <IMG SRC>
tag within an
clickable
and go to a certain URL. All you have to do is enclose the <IMG SRC>
tag within an ![]() anchor
element and have the
anchor
element and have the ![]() anchor
reference point to the appropriate
anchor
reference point to the appropriate ![]() Web
page.
Web
page.
Two steps are needed to make an ![]() imagemap
an integral part of a
imagemap
an integral part of a ![]() home
page on your
home
page on your ![]() Web
site. First, you need to change the anchor element reference from an HTML
document to point to your imagemap definition file. Second, you must add
the attribute ISMAP to the <IMG SRC> tag. For example, say that you've
created an imagemap definition file called my_map.map, and its graphic
is called my_map.gif. To put an imagemap in an HTML document, you use the
following HTML code:
Web
site. First, you need to change the anchor element reference from an HTML
document to point to your imagemap definition file. Second, you must add
the attribute ISMAP to the <IMG SRC> tag. For example, say that you've
created an imagemap definition file called my_map.map, and its graphic
is called my_map.gif. To put an imagemap in an HTML document, you use the
following HTML code:
<A HREF="my_map.map">
<IMG SRC="my_map.gif" ISMAP>
</A>
When the imagemap is selected, the Web server runs the imagemap CGI
program. The program then takes over and processes the ![]() mouse-click
coordinates into a corresponding URL.
mouse-click
coordinates into a corresponding URL.
Be sure to ask your Web master where the imagemap definition file will be stored. These file locations are determined by the configuration of your
You can use the ISMAP attribute with any other image attributes. Just because you're specifying an
As mentioned previously, you can create the imagemap definition file the easy way or the hard way. The easy way is to use one of the many programs that will create the file for you. These programs are called mapping tools, and they let you draw various imagemap region types on top of a specified image.
Many map-editing programs are available for both ![]() Windows
95 and the
Windows
95 and the ![]() Macintosh.
Generally speaking, most map-editing programs have the same basic features.
They all support the three basic geometric region types, rect, poly, and
circle. Some of the more advanced map-editing programs support the point
and default region types. The only thing you should look for in imagemap-editing
programs is how the user interface feels. Because such a wide variety is
available, if one doesn't feel right to you, you don't have to use it.
Macintosh.
Generally speaking, most map-editing programs have the same basic features.
They all support the three basic geometric region types, rect, poly, and
circle. Some of the more advanced map-editing programs support the point
and default region types. The only thing you should look for in imagemap-editing
programs is how the user interface feels. Because such a wide variety is
available, if one doesn't feel right to you, you don't have to use it.
Mapedit is a ![]() shareware,
no frills map-editing program for
shareware,
no frills map-editing program for ![]() Windows
95 and
Windows
95 and ![]() UNIX.
It was written by Thomas Boutell, maintainer of the FAQ (frequently asked
questions) for the World Wide Web. This program allows you to create imagemap
definition files in either CERN or NCSA format. Mapedit provides support
for the basic geometric shapes, although the point region type isn't supported.
A minor drawback is that it can load only GIF graphics files.
UNIX.
It was written by Thomas Boutell, maintainer of the FAQ (frequently asked
questions) for the World Wide Web. This program allows you to create imagemap
definition files in either CERN or NCSA format. Mapedit provides support
for the basic geometric shapes, although the point region type isn't supported.
A minor drawback is that it can load only GIF graphics files.
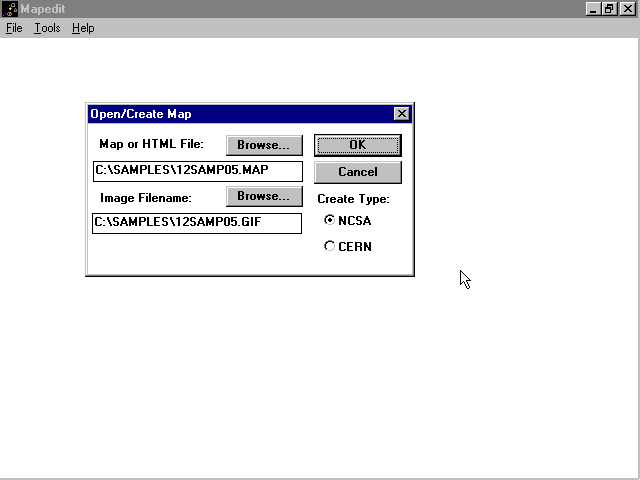
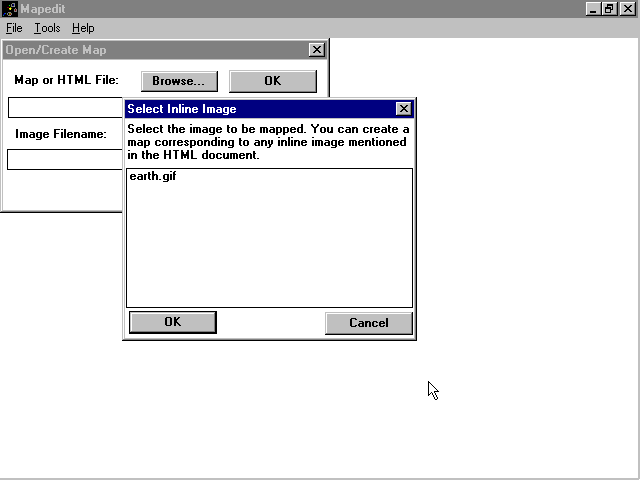
Navigating Mapedit is pretty straightforward. To create a new imagemap
definition file for your imagemap graphic, simply choose File and then
choose Open/Create. Mapedit's Open dialog box then appears. You must have
an existing imagemap graphic, which you can find using the Browse button
under the Image Filename heading. Mapedit supports GIF, JPEG, and the little-used
![]() PNG
(Portable Network Graphics) image format for
PNG
(Portable Network Graphics) image format for ![]() imagemap
graphics.
imagemap
graphics.
To edit an existing imagemap definition file, you can use the Browse button under the Map or HTML File heading (see fig. 12.8). To create a new imagemap definition file, simply type in the file name you want to use. Be sure to also specify whether you want a CERN or NCSA imagemap definition file, using the appropriate radio buttons. Mapedit then asks you to confirm that you want to create a new imagemap.
Fig. 12.8
When you want to create or edit an imagemap file with Mapedit, you have to fill in the information for this dialog box.
After you click the OK button, the shareware notification appears. After
the graphic is loaded, the ![]() shareware
dialog box is dimissed, and the whole image is loaded into Mapedit. If
the image is bigger than the current screen resolution, you can use the
scroll bars to see different parts of the picture.
shareware
dialog box is dimissed, and the whole image is loaded into Mapedit. If
the image is bigger than the current screen resolution, you can use the
scroll bars to see different parts of the picture.
If the colors on the imagemap graphic you specified look a little weird, don't worry. Mapedit isn't concerned with the way the picture looks; it's more concerned with the imagemap region types.
You can create any number of imagemap region types by choosing options
from the Tools menu. You can create circle, polygon, or rectangle region
types. For people accustomed to many ![]() paint
programs, or other
paint
programs, or other ![]() imagemap
creation programs, the region creation interface is counterintuitive (see
table 12.1). Generally speaking, you can create shapes in other programs
by clicking and holding the right mouse button, dragging the shape, and
then releasing the mouse button. Unfortunately, in Mapedit, it's a matter
of clicking and releasing the mouse button, dragging the shape, then re-clicking
and re-releasing the mouse button. After you have created a region type
on the imagemap graphic, you can't delete it using Mapedit.
imagemap
creation programs, the region creation interface is counterintuitive (see
table 12.1). Generally speaking, you can create shapes in other programs
by clicking and holding the right mouse button, dragging the shape, and
then releasing the mouse button. Unfortunately, in Mapedit, it's a matter
of clicking and releasing the mouse button, dragging the shape, then re-clicking
and re-releasing the mouse button. After you have created a region type
on the imagemap graphic, you can't delete it using Mapedit.
Table 12.1 Creating Region Types Using Mapedit
| Region Type | How to Create |
| Circle | Click on the left mouse button to specify the center of the desired circle. Use the mouse to specify the size of the circle. Click on the right mouse button when the circle is the desired size. |
| Rectangle | Click on the left mouse button to specify one corner of the rectangle. Use the mouse to specify the size of the rectangle. Click on the right mouse button to specify the diagonally opposite corner of the first corner. |
| Polygon | Click the left mouse button to specify a corner of the polygon. Move the mouse to the next corner you want to specify. Repeat these steps for each corner of the polygon. When you're back to the first corner, click the right mouse button. |

Mapedit works in very distinct "modes." That is, whatever option you last selected from the Tools menu is still active. If, for example, you just specified a URL for a rectangle region type, the next region type you'll create is a rectangle. If you just selected the Test+Edit menu item, you remain in "Test+Edit" mode until you specify a region type.
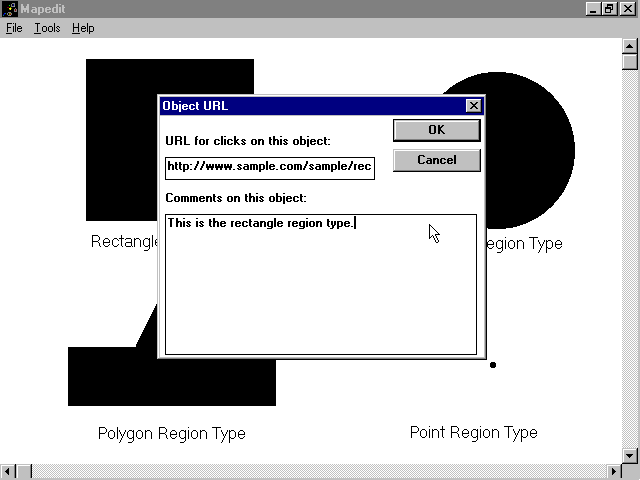
After you create a region type, the Object URL window opens (see
fig. 12.9). Simply type in the URL to associate with the newly created
region. You can define the default URL for the entire ![]() imagemap
graphic by choosing File and then
imagemap
graphic by choosing File and then ![]() Edit
Default URL.
Edit
Default URL.
Fig. 12.9
After you create a region type, Mapedit asks for the URL to which that region should refer.
If you can't see the outline of the region type as you're creating it, don't worry. Mapedit doesn't care about the appearance of the image in its window. To change the color of the outlines for each region type, choose File and then Edit Hotspot Color.
If you make a mistake in the location of the region type, you can cancel its creation in two ways. You can either press Escape while you're specifying the size of the region, or you can click the Cancel button in the Object URL dialog box.
Using Mapedit, you can test the regions you've created. You choose Tools
and then Test+Edit. Using your mouse to move around the imagemap graphic,
whenever you press the left mouse button, the URL for the corresponding
region shows up. This testing capability is a function of Mapedit, and
doesn't require a ![]() Web
browser or server to use.
Web
browser or server to use.
You can save your current imagemap definition file by choosing File and then either Save or Save As.
Mapedit doesn't force any file-name extensions on you. As a result, when you're creating a new imagemap definition file, you need to specify the extension yourself. Most
Mapedit also allows you to easily change the position of hotspot regions. To move any clickable region, simply select the Tools menu heading, followed by the Move menu item. Next click on the region you want to move, and a number of "control points" will show up. By clicking and dragging on any of the control points that bound the region, you can reshape or resize it. If you click and drag the control point in the middle of the region, you'll move the entire region itself. Since Mapedit will still be in the Move mode, you can fine-tune the position of the clickable region.
Polygon regions can also be reshaped by adding or removing points in
Mapedit. Just click the ![]() Tools
menu heading, and choose either the
Tools
menu heading, and choose either the ![]() Add
Points or
Add
Points or ![]() Remove
Points menu items. These two options only work on polygon region types,
and do as their name implies. With the Add Points option, click on the
polygon you want to add a point to, then put your mouse on roughly where
you want the new point to appear. Similarly, for Remove Points, you click
on the polygon to remove a point from, then select the point to remove.
Remove
Points menu items. These two options only work on polygon region types,
and do as their name implies. With the Add Points option, click on the
polygon you want to add a point to, then put your mouse on roughly where
you want the new point to appear. Similarly, for Remove Points, you click
on the polygon to remove a point from, then select the point to remove.
Mapedit can also be used to create client-side ![]() imagemaps.
Instead of loading in a MAP file, you specify an HTML file. Mapedit will
look for any
imagemaps.
Instead of loading in a MAP file, you specify an HTML file. Mapedit will
look for any ![]() HTML
that mentions including a graphic. Whatever images are found, it'll present
a dialog box with the pictures that were found (see
fig. 12.11). Select the picture you want to create a client-side imagemap
for, and click the OK button. The filename for the image is automatically
filled in
HTML
that mentions including a graphic. Whatever images are found, it'll present
a dialog box with the pictures that were found (see
fig. 12.11). Select the picture you want to create a client-side imagemap
for, and click the OK button. The filename for the image is automatically
filled in ![]() Mapedit's
Open dialog box. Once you click the OK button, you'll be taken into Mapedit
as usual. After you've created all the shapes you want, saving the changes
will cause the HTML file to be updated. You can get Mapedit from http://www.boutell.com/mapedit/.
Mapedit's
Open dialog box. Once you click the OK button, you'll be taken into Mapedit
as usual. After you've created all the shapes you want, saving the changes
will cause the HTML file to be updated. You can get Mapedit from http://www.boutell.com/mapedit/.
Fig. 12.11
To create client-side imagemaps, just select the picture you want to make an imagemap for.
WebMap, a capable Macintosh map-editing program, is currently free,
until it's released commercially. It lets you create all the geometric
region types from rectangles to circles and ellipses to polygons to points.
It can create ![]() imagemap
definition files for
imagemap
definition files for ![]() CERN,
NCSA, or
CERN,
NCSA, or ![]() MacHTTP
Web servers. It also enables you to easily move and change regions that
have already been defined.
MacHTTP
Web servers. It also enables you to easily move and change regions that
have already been defined.
With this user-friendly program, you can easily create imagemap definition
files. Simply choose File and then New. Then, using the Mac file selector,
find the location of your imagemap graphic. This picture can be in either
GIF or ![]() PICT
graphics formats.
PICT
graphics formats.
You can create as many imagemap region types as you want using the floating toolbox next to the WebMap window (see fig. 12.10). The interface is similar to drawing programs (see table 12.2). The only difference between the circle and ellipse region type is that the circle has a constant radius. If you make a mistake in either the placement, size, or mere existence of a region type, you can fix it.
Fig. 12.10
All the standard geometric region types are accessible through WebMap's toolbox.
Table 12.2 Creating Region Types Using WebMap
| Region Type | How to Create |
| Circle | Click and hold the mouse button to specify a corner of the square to contain the circle. Hold down the mouse button and move the mouse to specify the size of the circle. Release the mouse button when the circle is the desired size. |
| Ellipse | Click and hold the mouse button to indicate a corner of the square in which the ellipse will reside. While holding down the mouse button, move the mouse to size the ellipse. Let go of the mouse button when the ellipse is at the size and shape you want. |
| Rectangle | Click and hold the mouse button to indicate a corner of the rectangle. Release the mouse button when the rectangle is the size you want. |
| Polygon | Click the mouse button to specify a corner of the polygon. Release the mouse button. Move the mouse pointer to the next corner you want to indicate. Repeat these steps for each corner of the polygon. After you specify the last corner, move the mouse pointer close to the first vertex and then click the mouse button. |
With WebMap, you can't create a smaller region on top of a larger one. However, you can easily place larger region types on top of smaller ones. As a result, you have to plan carefully which regions you place when. You should place the smaller region types first and then work your way up to the largest regions.
After you've created all the regions you want, you can save the imagemap definition file by choosing File and then Save. This saves the imagemap definition file with an .m extension, which is the default extension that MacHTTP looks for in an imagemap definition file. WebMap also automatically saves the file in MacHTTP's custom format, making it unusable for the prevalent Web servers around. To create an imagemap definition file that other Web servers can use, choose File, Export As Text. You can specify to create either a CERN- or NCSA-compatible file. You can get WebMap from http://www.city.net/cnx/software/webmap.html.
WebMap assumes that your
Sometimes the Undo feature doesn't work with WebMap. If you've accidentally created a region and Undo doesn't work, just clear the region. Go to the toolbox and select the Arrow icon. Then use the mouse to select the region you created by accident. Next, choose Edit and then Clear.
After you've created the files for your imagemap, the only thing left
to do is to test it. Even though some map-editing programs let you try
the region types within the program, this built-in facility is often imperfect.
The programmers have made certain assumptions with the ![]() imagemap
process. The best way to test the
imagemap
process. The best way to test the ![]() imagemap
is to put it on your
imagemap
is to put it on your ![]() Web
server and act like an average user.
Web
server and act like an average user.
By testing the imagemap in this fashion, you can see different aspects
that you might've overlooked. If the ![]() imagemap
graphic file is too large and takes a long time to download, you'll see
it. You'll also be able to see if the imagemap regions are distinct enough
for the average person. Finally, you can see if the URLs for each region
actually work as they should. If you're using relative links, testing the
imagemap on the server is especially important.
imagemap
graphic file is too large and takes a long time to download, you'll see
it. You'll also be able to see if the imagemap regions are distinct enough
for the average person. Finally, you can see if the URLs for each region
actually work as they should. If you're using relative links, testing the
imagemap on the server is especially important.
Before releasing your imagemap for everyone's perusal, find someone else to try it. Get a friend with a different Internet Service Provider to access your new imagemap. He or she can give you a (somewhat) unbiased opinion of the imagemap graphic and region types.
Imagemaps and ![]() graphics
in general don't translate particularly well to text. In fact, they don't
translate at all. For this reason, you should provide some alternatives
for people who don't have graphical browsers. Also bear in mind that some
people have configured their browsers so that they don't automatically
load pictures. People who access the Web through
graphics
in general don't translate particularly well to text. In fact, they don't
translate at all. For this reason, you should provide some alternatives
for people who don't have graphical browsers. Also bear in mind that some
people have configured their browsers so that they don't automatically
load pictures. People who access the Web through ![]() UNIX's
command-line mode and people with slow modems fall into these categories.
Because they are a strong minority, you have to provide some support for
them.
UNIX's
command-line mode and people with slow modems fall into these categories.
Because they are a strong minority, you have to provide some support for
them.
You can let ![]() non-graphics
people access the various points on your
non-graphics
people access the various points on your ![]() imagemap
in a number of ways. You can provide a separate home page for these people
and mention it in your graphics-heavy page. You also can put in regular
hypertext links at the top or bottom of all your home pages. These links
can point to the same links accessible through the
imagemap
in a number of ways. You can provide a separate home page for these people
and mention it in your graphics-heavy page. You also can put in regular
hypertext links at the top or bottom of all your home pages. These links
can point to the same links accessible through the ![]() imagemaps.
Whichever approach meets your fancy, you should take one of them. If you
ignore the text-only crowd, you're alienating a large group of people.
imagemaps.
Whichever approach meets your fancy, you should take one of them. If you
ignore the text-only crowd, you're alienating a large group of people.


|

