
In this chapter, you'll see how to navigate throughout the Visual J++ environment. To prepare you for your Visual J++ development, this chapter provides you with a preview of the tools you'll use when you work within Visual J++. If you master the Visual J++ environment, you will encounter fewer hindrances once you begin coding.
This chapter will not cover every option of every part of the Visual J++ system. You should, however, know in advance what some of the Visual J++ tools do so that when the time comes, you'll know what information you need and you can return to the appropriate section to refresh yourself on that topic. Once you master this chapter, you will better understand many of Visual J++'s commands; this means that you will have the tools to begin working with code starting in chapter 4, "Using the Visual J++ Wizards."
The Visual J++ menu system is a standard Windows-based menu system. Youwill likely find that many of the commands are familiar to you. Although you've probably worked with lots of Windows menus in the past, you should take a moment to look through the Visual J++ commands that are there for you to use.
When you select from a menu, a pull-down menu opens that contains a list of command choices (see figure 3.1). Many Java programmers work with UNIX-based machines and compile their programs from the command-line prompt. In case you are new to the Windows operating system, the following list the basics for selecting from Windows menus:
The menus are your access vehicle to virtually every Visual J++ command. Although Visual J++ lets you issue some commands by clicking a toolbar button or by pressing a keyboard shortcut key, the menus provide the most complete and consistent method of selecting the command that you want. For example, if you press Alt+F, Visual J++ displays the pull-down File menu shown in figure 3.1. Once you open a pull-down menu, you can highlight the various options on the pull-down menu by pressing your up- and down-arrow keys or by moving your mouse cursor over the commands that you see.
Alt+F displays the pull-down File menu.
Not all of Visual J++'s commands are active at all times. For example, you'll see that in figure 3.1 the File menu's Close option is grayed out. When I opened the File menu, I did not have any file or project open; hence, there was no file available at the time to close. Instead of offering me an option that I could not use, Visual J++ grayed out the File, C lose option and displayed only the options that made sense.
Familiarize yourself with the menu system as quickly as you can by opening various menus and looking at the options there. Don't worry if some of the menu commands are cryptic because you'll become more familiar with them as your Visual J++ instruction progresses.
Many commands contain shortcut keys you can use in lieu of selecting from a menu. For example, the File menu shows that Ctrl+N performs the same operation as selecting New from the File menu.
The following sections each briefly explain the Visual J++ menus so you'll have a better idea of the Developer Studio's capabilities.
The File menu contains various file-related commands that let you open, close, and save Visual J++ files. Most of the File menu commands are standard Windows application commands, but Visual J++ supports some new File menu features.
Remember that you'll be working with multi-file projects when you write Visual J++ applets and applications. The File, Open Workspace and File, Close Work space commands let you open and close project files.
When you choose File, New to indicate that you want to create a new file, Visual J++ needs to know what kind of file you want to create. Select the file's type from the New dialog box (see figure 3.2).
Select the new file's type.
yYou can create the following types of files with the New dialog box:
Once you create a file, choose File, Save; File, Save As; and File, Save All commands to save your work. If you attempt to close Visual J++ before you save your work, Visual J++ prompts you to save with a dialog box to protect your unsaved material.
![]()
What Are All Those Save Commands For?
In addition to the usual File menu's New, Open, and Save commands, Visual J++ lets you search for specific information across all files on your disk or within selected folders. For example, if you worked last month on a Visual J++ application that lets users purchase magazine subscriptions over the Internet, you may not remember where you stored the files, but Visual J++ can find the files for you. When you choose the File, Find in Files command, Visual J++ displays the Find in Files dialog box (see figure 3.3).
Use the Find in Files dialog box to search for files.
You can type a word to search for, such as "magazine" or "subscription"; remember to specify the root directory in the In Folder text box. Then click Find to start the search. If Visual J++ finds the keyword in one or more files, it reports back to you with a list of files that contain the keyword. You can also narrow the search details by using the following suggestions:
One of the nicest features of the Find in Files command is that Visual J++ remembers your previous searches. If you want to look for something that you've already searched for and found, click the down arrow next to the Find What text box and select your previous search. Visual J++ resets all the search options in the Find in Files dialog box to match the selected previous search.
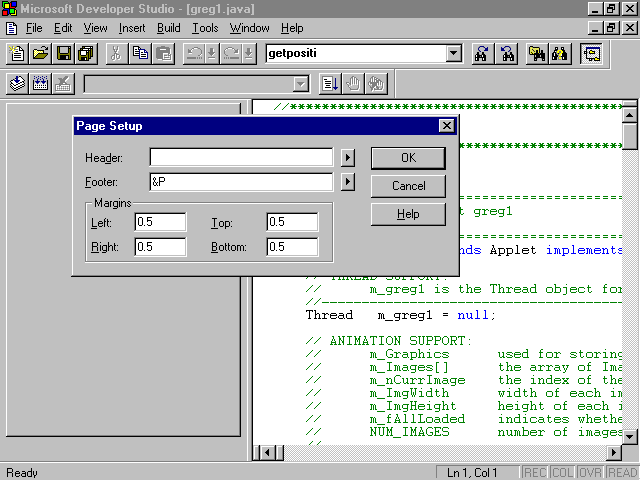
The File, Page Setup and File, Print commands let you control the printing of your Visual J++ files. Most of the time, you'll use the File, Print command to print a source code file that you want to analyze. The File, Setup command lets you control the way the page looks when you print a file. When you choose F ile, Page Setup, Visual J++ displays the Page Setup dialog box (see figure 3.4).
Control the way Visual J++ prints your listings.
The Page Setup dialog box lets you adjust the four margin sizes for your source code listings as well as request a header or footer. The header and footer information can be useful for differentiating your listings from one another. For example, if a particular project contains 25 program listings, you can use make Visual J++ print the file name in the header or footer areas of the program listings. You may also use the header or footer to print the time, date, and page numbers. Table 3.1 lists the special control codes that the Page Setup dialog box requires for the various header and footer text you might want to specify.
Table 3.1 Use Control Codes to Determine How Header and Footer Information Is to Appear
| Control Code | Description |
| &c | Center the header or footer |
| &d | Current date |
| &f | File name |
| &l | Left-justify the header or footer |
| &p | Current page number |
| &r | Right-justify the header or footer |
| &t | Current time |
Get into the habit of printing the date and time when you print code listings. When you later look through a stack of file listings, you will be able to tell which listings are the most recent. The control codes are not case-sensitive and you can combine them. For example, if you want a listing to print with a left-justified file name in the header and a centered page number in the footer, type &l&f for the header control codes and &c&p for the footer control codes in the Page Setup dialog box before printing the listing.
As with most File menus, Visual J++'s File menu displays the most recent list of files you've worked with; you can easily return to your previous work instead of selecting a disk, path, and file name each time you return to a current project.
You will use the File menu more often than the other menus. Again, if you've had experience with Windows software in the past, you will have no trouble with Visual J++'s menus. If you are new to PC-based Windows software, as some UNIX-based Java programmers are, you'll find the menus easy to use and learn.
Use the Edit menu for text editing and searching. The difference between searches performed with the Edit menu's commands and those performed with the File menu's Find in Files dialog box is dramatic: the Edit menu's searching commands work only on the current file that you are editing when you select from the Edit menu whereas the Find in Files command searches across multiple files looking for data.
Perhaps one of the most important Edit menu commands is the Undo command. Visual J++ keeps track of your edits (up to 64K worth of edits) and lets you undo, or reverse, one or more edits. Therefore, if you accidentally delete a command from a source code file, choose Edit, Undo (or press Ctrl+Z) to reverse the command's deletion. The Edit, Redo command lets you reverse the effects of the last Edit, Undo command. In effect, Redo undoes the most recent Undo. If all that sounds confusing, you may find that using Edit, Undo and Edit, Redo makes logical sense. If you undo a command's deletion but then decide that you really did want to delete the command, instead of typing the command once again, choose Edit, R edo; Visual J++ responds by restoring the file to its pre-Undo state and putting the command back in the file again.
The next five Edit menu commands, Cut, Copy, Paste, D elete, and Select All, perform edits on your source code files and usually utilize the Windows clipboard to perform their tasks.
The Edit, Cut command deletes a block of text you've marked (by dragging your mouse from the start to the end of the text or by using Shift+Arrow keys to highlight blocks of text) and sends the block to the clipboard memory. When you subsequently use Edit, P aste, Visual J++ sends the cut clipboard contents to the designated target area of your file.
The Edit, Copy command sends the selected block of text to the clipboard, but instead of deleting the text from its current location, Visual J++ sends a copy of the block to the clipboard. You then can use the Edit, Paste command to insert the copy to other locations in the file.
The Edit, Delete command deletes a marked block of text but, unlike the E dit, Cut command, Edit, Delete does not send the deleted text to the clipboard. In addition to deleting marked text, Edit, Delete also deletes all text on a line that appears to the right of your text cursor if you have not selected a block of text. Therefore, Edit, Delete deletes characters to the end of the current line.
The Edit, Select All command quickly selects the entire file, so you can send the entire file to the clipboard if you need to. The Edit, Select All command is useful when you want to create a new source file whose contents are much like a previous file's contents. You can select the entire file's contents and paste those contents into the new file that you then can change as needed.
The Edit, Find command works a lot like the Find in Files dialog box; however, the Edit, Find command searches only within the current source file. Therefore, if you are working on a large program and need to find every occurrence of a specific command or phrase, you can choose Edit, Find to locate the text. Once you enter the text to find and then check the appropriate options, you can click the Find Next button to start the search or the Mark All button to place a bookmark at each found location so that you can return there later. A bookmark is a special named or unnamed location of text that you've marked and want to return to. The end of this section explains more about bookmarks.
Many professional programmers use Microsoft development products without ever knowing (or using) the Edit, Find extended options. Not only can Edit, Find locate specific words and phrases; Edit, Find can also locate text patterns known, in this instance, as regular expressions. When you select Edit Find, Visual J++ displays the Find dialog box. Enter the text or text pattern for which you want Visual J++ to search in the Find what drop-down list box. Visual J++ uses a drop-down list box so that you can select from a list of previous finds.
The Find dialog box contains the following options that affect how your search takes place:
To search for a pattern of characters, such as all words that begin with a particular letter, you must use the regular expression's find wildcard characters. However, Visual J++ assumes that you want to make a literal find unless you specify otherwise. Therefore, if you want to search for all occurrences of text that begins with the letters args, you could search for args*. If, however, you did not check the Regular Expression option, Visual J++ would think you literally wanted to find all occurrences of the letters args followed by an asterisk. If you want the asterisk to represent the regular expression's wildcard character, you must check the Regular E xpression option before beginning the search. Visual J++ would then find all matches of all words that begin with args, such as args(), and argsPlus.
Table 3.2 The Regular Expression Special Searching Wildcard Characters
| Character | Represents this text |
| . | Matches any individual character. Therefore, the pattern "r.n" matches both "run" and "ran" but not "raven". |
| * | Matches zero or more characters. Therefore, "b*n" matches both "begin" and "ban". |
| + | Matches one or more characters or the expression, that precedes the plus character. Therefore, the pattern "All+Load" matches both "AllLoad" and "AlLoad". |
| ^ | Matches a pattern at the beginning of a line. For example, the pattern "^if" matches only lines where the word "if" starts the line. |
| $ | Matches a pattern at the end of a line. Therefore, "-1);$" matches only lines where the string "-1);" terminates the line. |
| [] | Matches any of the characters appearing in the brackets or any range of ASCII characters delimited by the hyphen. For example, the pattern "199[0-9]" matches "1990" through "1999". The pattern "m[ea]t" matches "meet" and "meat" but not "melt". |
| \{\} | Matches any sequence of characters between the escaped braces. For example, the text pattern "\{ba\}*by" matches "by", "baby", "bababy", and "babababy" in the nonsense word "babababy". |
| \ | Specifies that Visual J++ treats the preceding character as a normal character and not as part of the regular expression pattern. Therefore, the pattern "\[i\]" matches the string "[i]" whereas, normally, the brackets would represent regular expression special search characters. |
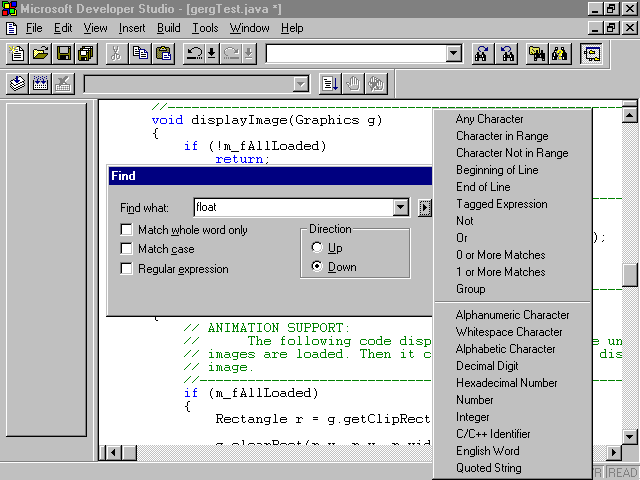
Table 3.2 can get confusing, and Microsoft knows that with all that search power comes a lot of details. Therefore, Microsoft placed a helpful button on the Find dialog box that lets you request the regular expression character so you don't have to remember to type square brackets when you want to specify a range search. When you click the right-arrow button next to the Find What text box, Visual J++ displays the popup list that you can select from (see figure 3.5). If, for example, you select Character in Range, Visual J++ supplies the square brackets that you then fill in with characters to search for within your target range.
The Find dialog box lets you select regular expression characters.
The Edit, Replace command lets you replace both literal text and text patterns using regular expressions. When you choose Edit, Replace, you'll be able to enter the text you want to change in the Find What text box. The replacement text must be entered in in the Replace With text box. You may also select from the same options as the Find command's text box described in the previous table. The buttons to the right of the Replace dialog box let you find the next occurrence of the search text, replace the found selection, or replace all occurrences of the matching text that appears in the currently edited file .
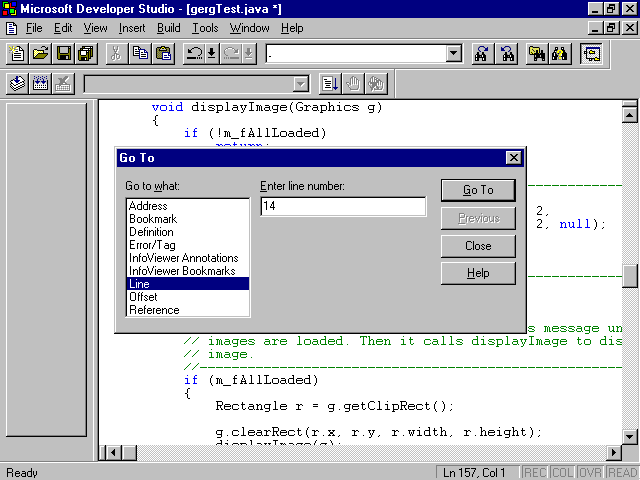
The Edit menu's Go To option presents you with the Go To dialog box (see figure 3.6). The default go to location is a specific line for which you must supply a number. For example, to scroll the text cursor to line 341, you can select the Edit, Go To command, select Line in the Go to What list box, and type 341 in the Enter Line Number text box. When you then click the Go To button, Visual J++ sends you to line 341 in the current file. Table 3.3 lists the other locations where Visual J++ will send you..
Quickly go to specific locations in your file.
Table 3.3 You Can Go to Several Different Kinds of Locations in Your File
| Location | Description |
| Address | A debugging internal machine address. |
| Bookmark | A named bookmark. |
| Definition | An identifier, such as a variable name, whose definition you want to see. You must enable the browse information to use the Definition location. |
| Error/Tag | An error or tag from the list provided, assuming you've compiled your program and received errors. |
| InfoViewer Annotations | An InfoViewer annotated topic. (See chapter 2, "Getting Started with Visual J++," for help on annotating Books Online's InfoViewer help topics.) |
| InfoViewer Bookmarks | An InfoViewer boomark you've set. (See chapter 2 for help on placing Books Online's InfoViewer bookmarks.) |
| Line | The line number you want to go to. |
| Offset | A decimal or hexadecimal value that represents the number of lines you want to move from your current cursor's location. |
| Reference | The identifier whose reference you want to see. You must enable the browser information to use the Reference location. |
The bookmark options in the Edit pull-down menu, InfoViewer Bookmarks, and the Bookmark options let you quickly jump to a set of bookmarks located in the online documentation or bookmarks that you've created for the current file. When you select I nfoViewer Bookmarks, Visual J++ presents you with a choice of a Books Online topic title list and book names.
Visual J++'s Developer Studio lets you set bookmarks in multiple locations within your source code. You just might find that Developer Studio's electronic bookmarks are more helpful than the ones you use for real books. Use the buttons on the Edit, Bookmarks dialog box, shown in figure 3.7, to add, delete, and return to bookmarks you've placed in a file.
Add bookmarks to your code for a quick return to problem areas.
You can add two kinds of bookmarks: Named bookmarks and unnamed bookmarks. You can return to named bookmarks with the Edit menu's Go To option, as well as the Bookmarks dialog box's Go To button. Visual J++ keeps track of your named bookmarks when you save the file; the bookmarks remain in place the next time you edit the same file. Unnamed bookmarks are temporary; Visual J++ erases them when you close the file.
To add an unnamed bookmark, press Ctrl+F2, the BookmarkToggle command. Visual J++ adds a blue icon to the left of the line to indicate the bookmark's location. Remember that the Edit, Find dialog box's Mark All button also places unnamed bookmarks at all successful find locations.
To add a named bookmark, click the line that will get the bookmark and select the Edit, Bookmark command. Type a name, such as Problem Area, in the Name text box before clicking the Add button. (The file and line number receiving the bookmark appear at the bottom of the Bookmark dialog box when you open the dialog box.) As you add named bookmarks, the Bookmark dialog box displays the current bookmark list.
You can remove a bookmark by clicking its name within the Bookmark dialog box and then clicking Delete. You can delete unnamed bookmarks by clicking on their lines (where the blue bookmark icons appear) and pressing Ctrl+F2 to remove the bookmarks.
Here are two ways to jump to a named bookmark:
Use the Edit, Go To dialog box's Next and Previous Bookmark commands, or press F2 and Shift+F2, to move forwards and backwards among unnamed bookmarks.
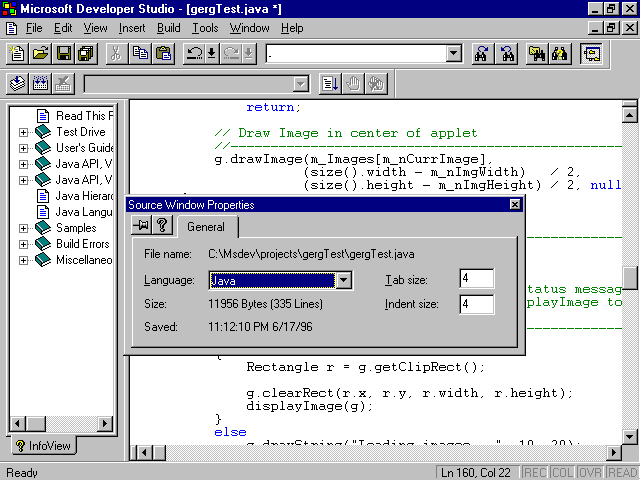
The Edit menu's Properties option produces figure 3.8's Properties dialog box. The properties you can control are editing window properties. The information that appears in the Properties dialog box is dependent on what you were doing at the time you selected the E dit, Properties command. For example, if you're editing a source file, the Properties dialog box displays the path and file name of your editing window's file, the file's language (such as Java or HTML), the tab stop size (in characters), and the indention size that you want Visual J++ to use when automatically indenting source code lines for readability.
The properties determine how your editing sessions operate.
The View menu contains several tools that let you see portions of your project workspace from different aspects. Many of the commands are related to compiling and debugging applications; we'll save those commands until you need them. For now, learn only the View commands you need to get started.
The View, Full Screen command is one of the most useful tools you can use when you lack screen space. The title bar, menu bar, salad bar, toolbar, and status bar all take up space. (Perhaps you won't find a salad bar in Visual J++, but those other bars do get in your way at times.) You can quickly devote your entire screen to the current window by selecting V iew, Full Screen. As figure 3.9 shows, your editing window expands to consume the entire screen and you are left with only two scroll bars and an icon (in the upper-left hand corner). You can click the icon to get back all those bars that provide information but clutter the screen. Use View, Full Screen to see as much of your file as you can possibly see at one time.
Get the most screen space possible with View Full Screen.
While viewing your window in full screen mode, you can still select from the menu bar, even though Visual J++ hides the menu bar. For example, if you press Alt+W while in full screen mode, Visual J++ displays the Window's pull-down menu.
Visual J++ does not only provide you with the Standard toolbar and Project toolbar as chapter 2 described. Visual J++ also supports the following toolbars that you can display or hide by clicking the appropriate toolbar names in the View, Toolbars dialog box:
Unless you use an oversized screen and an unusually high-resolution graphics card, you'll probably choose not to display more than two or three toolbars at any one time. For example, when you begin a debugging session, you might turn on the Debug toolbar while you use the debugger, but then you'll remove the Debug toolbar when you no longer need it. By removing toolbars you don't need, you give more screen real estate to your editing window where you can see more source code at one time and create better programs because of the extra viewing room.
If you don't want to see the floating ToolTips messages that appear when you rest your mouse over a toolbar button, you can uncheck the ToolTips option. Rarely will you want to turn off ToolTips, however, because the ToolTips show you the purpose for all the toolbar buttons. In addition, if you want help remembering which toolbar buttons have shortcut keys, you should leave the With shortcut keys option checked. For example, the Find Next toolbar button's shortcut key is F3. If you rest your mouse pointer over the Find Next toolbar button (located on the Standard toolbar, five buttons from the right), the ToolTip appears that both tells you the purpose of the toolbar button and displays the shortcut key.
The two InfoViewer options on the View menu, InfoViewer Query Results and InfoViewer History List, contain two different kinds of online help viewers that the Project Workspace's InfoViewer window does not provide. Use View, Infoviewer Query Results when you want to display a list of InfoViewer topics you've searched for using the H elp Search command. The Query Results dialog box contains a list of search result titles; you can jump to a specific topic by clicking its title.
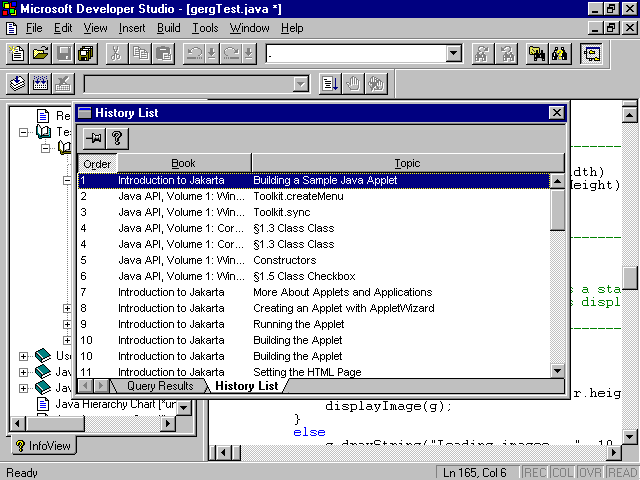
The View, InfoViewer History List option displays a scrolling list of your most recent online help searches. The History List dialog box, shown in figure 3.10, displays a list of help topics recently searched. When you click on a topic, InfoViewer instantly jumps to that topic within the Books Online documentation. You can click the push pin on the dialog box to keep the dialog box on your screen when you return to your editing session, which is helpful if you want to keep the online help within easy reach.
You can return to your recent online help topics to review them.
The remaining View commands relate to the running and debugging of programs;this book will return to them when appropriate.
Use the Insert menu commands when you want to insert information into your current project instead of creating the information from scratch. For example, choose Insert, F ile when you want to insert a new source file into the currently active window. Insert, File is useful for inserting an old source code file into your current project.
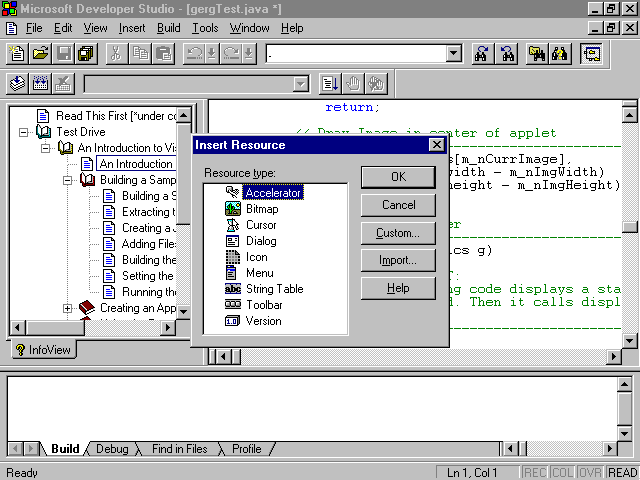
When you want to insert new resources into your current project, select Insert, R esource. Visual J++ displays the Insert Resource dialog box, shown in figure 3.11, with which you can select a Windows resource type to insert. Once you select the type, such as a dialog box, Visual J++ lets you create or import the resource to add to your project.
Use the Insert Resource dialog box to insert resources into your current project.
Windows necessitates the need for resources due to Windows' graphical nature. Although not all Windows resources are graphics-related, most are. Resources have names and you'll refer to those names from inside Visual J++ programs when you want to initialize or display one of the resources. Here is a brief description of resources you can add to a Visual J++ project:
When you select a resource from the Insert Resource dialog box, Visual J++ displays the appropriate resource editor (such as a bitmap creator) you can use to build, name, and store the resource. The Project Workspace window also updates to include a Resource tab for viewing your project's resources.
Select the Insert, Resource Copy command when you want to duplicate a resource defined in an existing resource file instead of creating a resource from scratch.
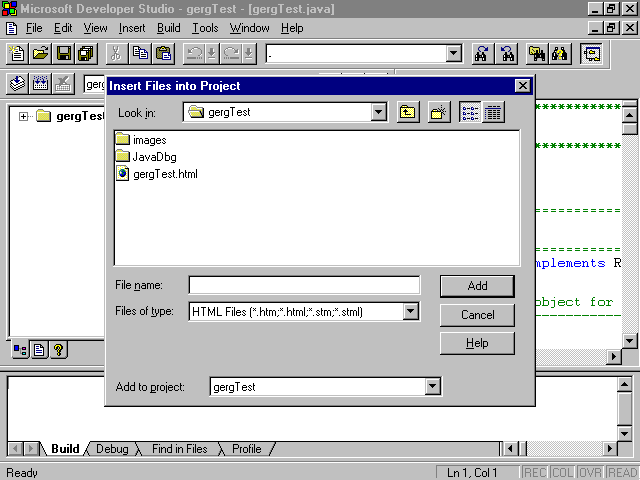
Select the Insert, Files into Project command when you want to add or delete files from your current project workspace. The Insert Files into Project dialog box, shown in figure 3.12, lets you add and delete files by selecting appropriate file names and locations. The Insert Files into Project dialog box lets you insert multiple files at one time into your current project, whereas, the Insert, Files into Project command lets you insert only a single file into the currently active editing window. You can select the multiple files by holding Ctrl while clicking each file name you want to add to your project.
Use the Insert Files into Project dialog box to insert existing files into your current project.
Insert, Project inserts an additional and complete project into your current project's workspace. Visual J++ inserts the entire project, including all associates' files, into your current project. Therefore, if you want to create a new project that is similar to an existing project, you can first create a new project workspace and copy the entire existing project into the new workspace. In the new workspace, you can make the necessary changes to differentiate the new project.
The Insert, New Java Class command lets you create and insert a new class into your project. Most of the time, your projects will contain only a single class. If you use the New Project Wizard (described in chapter 4), you'll rarely create a new class from scratch. If, however, you create new Visual J++ programs one file at a time, the New Project Wizard dialog box lets you add your program's class using a pre-determined uniform format.
The Insert, Component command lets you insert prebuilt components, such as OLE custom controls, Visual Basic (VBX) controls, or ActiveX controls, into your current project. If the component, such as some OLE controls, needs additional information, Visual J++ runs a wizard to make sure you select only those component parts that are right for your Visual J++ application.
The Build menu is the most important menu bar option at your disposal once you've created a new project. The Build menu contains commands that turn your project's human-readable source code into machine-readable code. The term build is actually taking the term compile to its next evolutionary step. The Build menu not only contains commands you need to compile individual files; it can compile all files in your project, including the binding of resources to your project. The Build menu contains commands that compile conditionally. Therefore, if you attempt to build a project whose files are already completely compiled, Visual J++ will not waste your time by re-compiling those files unless you specifically ask Visual J++ to take the time to do so.
![]()
Projects and Subprojects
The Tools menu is one of those menu items that you won't select from as frequently as the others. The first two commands, Browse and Close Browse Into File, let you use the browser to search for particular objects within a Visual J++ application. Applications can have so many items, from simple variable names to advanced bitmap images, that Visual J++ creates a database, called the browser database, every time you build a program. Once you build a program, you can browse (search) through the project files looking for particular objects and other items you want to see. When the browser finds an object match, you then can go directly to the object's definition or its use in your source code. The browser saves you much time wading through projects looking for files.
The Tools, Profile command lets you examine the behavior of a Visual J++ application. You can find inefficiencies within the program's execution. Visual J++ newcomers should be more concerned with learning to write applications than with efficiency, but you should remember the profiling tool exists, so that you can run some of your more sluggish applications through the profiler to learn where the bottlenecks occur. Often, the profiler can give you clues about inefficient sections of code that you can rewrite to make your application run faster.
The Tools Remote Connection command lets you run a Visual J++ application from another networked computer. The Remote Connection command is another one of those commands that most newcomers to Visual J++ do not need right away; many users will never need it.
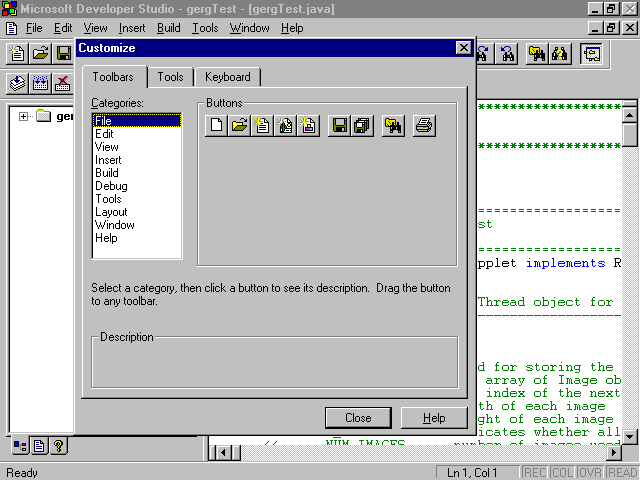
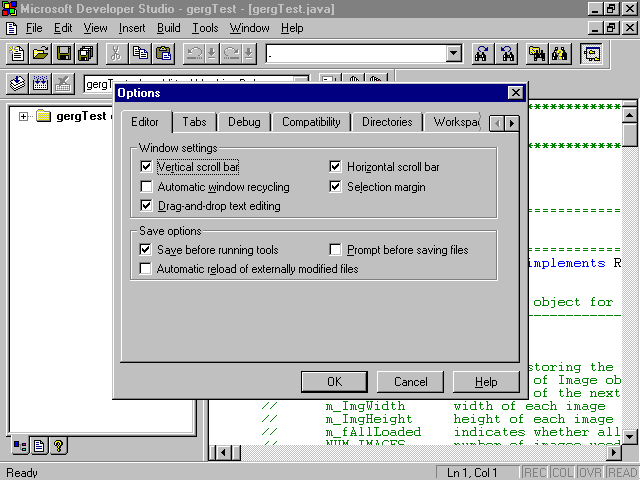
Most of today's Microsoft applications contain the Tools, Customize and T ools, Options commands that let you modify the behavior of the applications. Generally, the out-of-box default values for these two commands are adequate for most people. However, the commands produce dialog boxes, shown in figure 3.13 and figure 3.14, which you can use to customize various portions of Visual J++ including toolbars, menu commands, and keyboard shortcuts, editor options, tab settings, Visual J++ screen settings, and initial toolbar locations.
Customize parts of Visual J++ with Tools, Customize.
Customize the way the Visual J++ environment works with Tools, Options.
Choose the Tools, Record Keystroke command to record a series of keystrokes. When you select this command, two buttons appear that let you stop or pause the keystroke recording with your mouse. The keystrokes in question might be a common but lengthy command or variable name, or the keystrokes might represent a selection of a menu option selections that perform a task such as printing source code files. Therefore, in addition to the shortcut keys that Visual J++ provides, you can record your own macro keystrokes that perform a series of instructions or type a series of letters when you trigger the macro.
To play back a recorded keystroke macro, select the Tools, Playback Recording command (Ctrl+Shift+Q is the shortcut key for Tools, Playback Recording). Visual J++ then issues the recorded keystroke instructions as if you were pressing the keys yourself.
The Window menu is a common menu found on most of today's Windows applications. A Windows program, such as Visual J++, is usually not contained in a single window but in a series of windows. For example, you may have a window open with a source code file, another window that contains a resource bitmap, another window that contains debug information, and yet another window that displays the results of your most recent compile.
By using the Window menu commands, you can control the way the various windows appear on your screen according to the commands described in table 3.4.
Table 3.4 The Window Menu Commands
| Command | Description |
| New Window | Creates a new empty window in which you can open a file, including a file already open in another window on your screen. By adjusting the contents, you can actually look at several different views of the same files by scrolling open windows to different locations within the same files. |
| Split Window | Lets you cut the currently active window in half (or even cut a split window into additional windows) so that you can view two or more panes with different views of the same file. The Split Window consumes fewer memory resources than the New Window command, which dedicates a new window and several window resources to each open window on your screen. |
| Hide | Makes your currently active window invisible. The window remains ready for your use but stays out of the way until you want to see it by selecting Hide once again. |
| C ascade | Arranges your windows in a cascaded fashion so that the windows overlap each other (you can still see the title bars of the windows that are behind the front window). When you want to make an inactive window active, click on that window's title bar to bring the window into view and to hide the previously-current window. |
| Tile | Arranges Developer Studio windows horizontally, |
| H orizontally | side by side, so you can see the contents of each |
| open window. The windows remain small so you can | |
| see all of them at once. | |
| Tile | Arranges Developer Studio windows vertically, on |
| Vertically | top of each other, to display taller but thinner |
| windows than those you see with the windows tiled | |
| horizontally. The windows remain small so you can | |
| see all of them at once. | |
| Close Al l | Closes all open windows in one step. |
| Remaining | The remaining Windows commands are not really |
| commands | commands but comprise the list of the window title |
| bars (up to nine of them) that you have open at | |
| the time. When you select one of these windows, | |
| Visual J++ makes the window active so you can work | |
| within it. |
The goal of this chapter was to introduce you to the Visual J++ environment, paying particular attention to the common menu commands that you will work with. The Visual J++ menus act like most other modern-day Windows applications although Visual J++'s menu system is designed to support the needs of the Visual J++ programmer.
Now that you've been introduced to the system, and now that you know your way around the menus and various dialog boxes that you'll need to get started, the next chapter dives right into your first Visual J++ applet! You'll soon see, however, that creating your first applet requires virtually no work on your part! The Visual J++ wizards will create the applet for you.
Here are the points this chapter covered:
![]()
![]()
![]()
| Previous Chapter | Next Chapter |
| Table of Contents | Book Home Page |
| Que Home Page | Digital Bookshelf | Disclaimer |
To order books from QUE, call us at 800-716-0044 or 317-361-5400.
For comments or technical support for our books and software, select Talk to Us.
© 1996, QUE Corporation, an imprint of Macmillan Publishing USA, a Simon and Schuster Company.