
In this chapter, you'll finally create and look at Visual J++ code! This chapter explores the Visual J++ New Project Wizard and explains how the wizard creates Java-like applets and applications. The wizard-created programs do not do much on their own, but the Visual J++ wizards take a lot of the initial and tedious work out of your hands and create the shell of a project. Once the wizard creates the shell, you then can modify the code to suit your program needs.
This chapter will not explore the depths of Java programming even though you'll see some code. This chapter does explain how some of the HTML tags control the loading and placement of Visual J++-produced code in your Web pages. This chapter is definitely a hands-on chapter and you should follow along with the wizard's steps to familiarize yourself with the way Visual J++ works. In addition to creating your first program, you'll have a better feel for the look and nature of Java-based programs once you complete this chapter.
When you first start a Visual J++ applet or application, let Visual J++ generate the initial applet shell. Once the wizard generates the shell, you then can modify the code and add your own code to make the program do what you want.
Visual J++, however, does more than simply create a simple source code shell. Here are just a few of the things the Visual J++ wizard does for you:
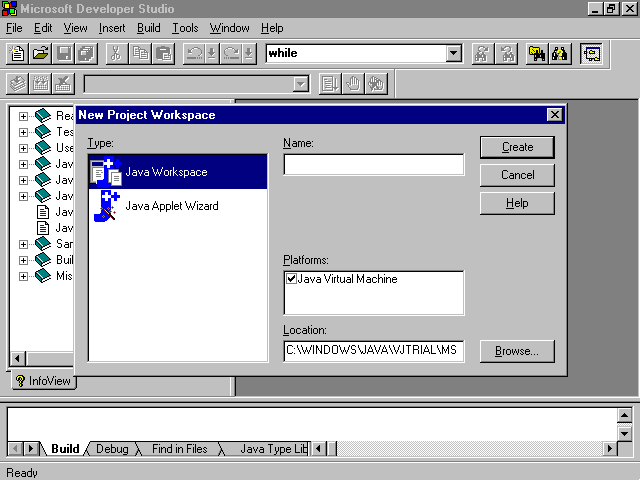
When you're ready to run the wizard to create a new program, choose File, New to display the New dialog box. Select Project Workspace and click the OK button to start the wizard. Visual J++ displays the wizard's first dialog box (see figure 4.1).
The wizard's starting screen requests file information.
Table 4.1 describes each of the New Project Workspace wizard's four options.
Table 4.1 The New Project Workspace Opening Dialog Box Options
| Option | Description |
| T ype | You can select either Java Workspace or Java Applet Wizard. The Java Workspace wizard creates only an empty project to which you can add additional files. The Java Applet Wizard creates a new project and then, using the wizard dialog boxes described next, adds files to the new project according to your wizard instructions. |
| N ame | Enter the name of your Visual J++ program. Visual J++ uses the name as the subdirectory name to store the project files in as well. |
| P latforms | Depending on your Visual J++'s release data, the Java Virtual Machine is the only platform you will probably see. Recall from chapter 1, "Java and Visual J++," that Java code is machine-independent code. Therefore, the wizard will create a Java program for an imaginary computer called the Java Virtual Machine and each Web browser will then be able to interpret the virtual machine's bytecode. |
| L ocation | Specifies the full disk and path where Visual J++ stores your project files. The default directory name is the same name you typed in the Name text box but you can change the directory to a different name and location. Use the Browse button to select a different location if you want to locate a different location instead of typing a complete path name. |
Most Visual J++ developers will develop a Java applet or application instead of a blank project. Therefore, you'll rarely select the Type box's Java Workspace option. Follow these steps to create your first project:
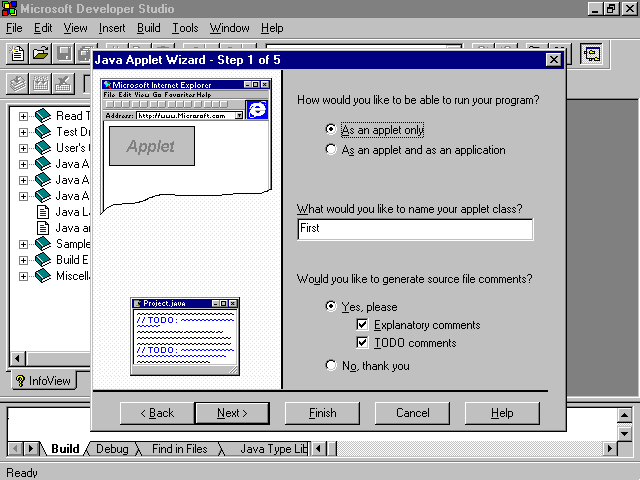
Once you enter all the initial start-up information in the wizard's New Project Workspace dialog box, click the Create button to display the first of five dialog boxes that describe the steps the wizard will take to create your project. Figure 4.2 shows the first of the five wizard dialog boxes.
The wizard's first step towards a completed project.
The first option you will select in the wizard's first dialog box is to tell the wizard which kind of project—an applet or an applet combined with a stand-alone application—that you want created. If you mark the As an Applet and as an Application option button, Visual J++ changes the figure you see in the wizard's dialog box to include not just a Web page but also a window that represents the stand-alone application as well.
For this wizard walkthrough, mark the As an Applet Only option button to create an embedded Web page applet.
Each applet contains at least one class. Many Java programmers attempt to place one class per applet. A class is a collection of data items and procedures that act upon those data items. Generally, the applet's class has the same name as the applet itself. As you can see, Visual J++ names the class First, just like the applet name and the applet's directory.
Finally, you can now request source code comments. A comment is a remark for humans, not for computers. Comments are messages inserted throughout your program that describe parts of the program. Later, when you go back to update the program, your comments can help explain the purpose for various sections. The wizard uses explanatory comments to tell you about the applet's generated code (remember that the wizard will ultimately generate source code for you), as well as special TODO comments that suggest to you ways you can customize the generated source code to fit your own requirements.
For your first few generated applets, and even beyond, I strongly suggest that you generate both kinds of source code comments: explanatory and TODO comments. If you mark the No, Thank You check box, Visual J++ will not generate source code comments, but you'll have a much more difficult time understanding the generated source code.
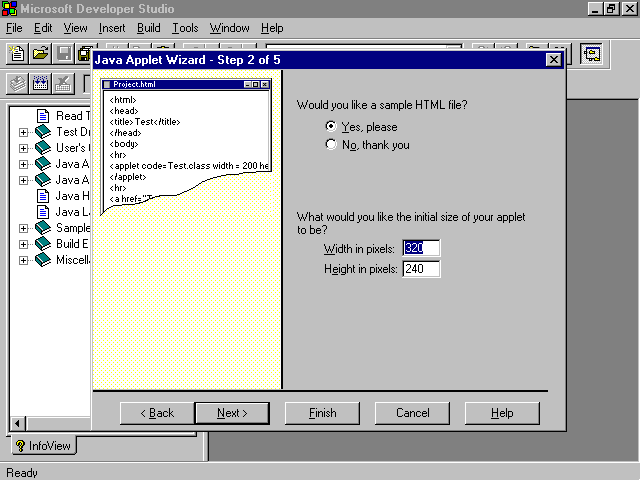
Click the Next button to display the wizard's next dialog box (see figure 4.3).
The wizard creates an HTML Web page for you.
If you're following along with this chapter's applet generation (and you should be, shouldn't you?), leave the Yes, Please option button marked, which generates an HTML file. Unless you're inserting an applet into an existing Web page, let the wizard generate an initial Web page that you can add elements to later. The applet's appropriate tag commands will already appear in the Web page and you won't have to insert the <APPLET> tag commands later.
In addition, you can control the size, in pixels, of your applet's window when the applet appears on the end-user's Web page. A pixel, from the combined words picture element, is one dot on the user's screen. A standard VGA screen consists of 640[ts]480 pixels and the default width and height pixel values are half that, 320[ts]240. Therefore, your applet will generally consume one-half of the Web page's viewing screen when someone views the Web page with a standard VGA adapter and monitor.
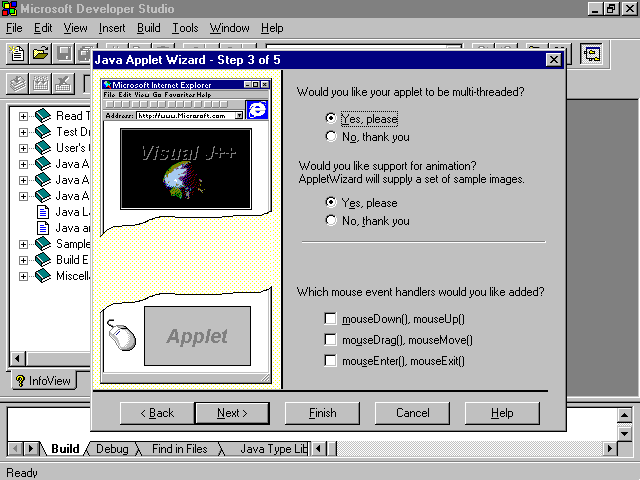
For this example, leave the second step's dialog box alone and click Next to display the third step's dialog box (see figure 4.4), which shows an animated twirling globe spinning on its axis.
The wizard's third step lets you select your applet's animation and mouse events.
Before discussing the animated globe, notice the first option on the dialog box labeled Would You Like Your Applet to Be Multi-Threaded? Recall from chapter 1 that the term multi-threaded refers to an applet that can perform two or more tasks at one time. Each task is considered to be a thread and you can control the threads in an applet. Multiple threads let users begin to see results of calculations and graphic movements while another longer calculation or a sort routine is in process. The user's total applet running time does not get faster and, due to the threading overhead, is actually a tiny bit slower, but the user sitting there watching the applet feels as if more is happening because of the continuous activity he or she sees among the active running threads.
If you do not elect to create a multi-threaded applet, you will save some program size and applet runtime speed if you uncheck this option. However, for this walkthrough, please leave the multi-threaded option marked. The generated source code will be a little longer and the length will make for slightly more confusion when you first look through the generated file, but you'll be able to keep animation running while other processes within the program run.
Speaking of animation, the second set of options, labeled Would You Like Support for Animation?, again creates a lengthier first-time source code file but makes for a much more interesting applet. Click the Yes, Please option button, if it's not already marked, to start the dialog box's animated spinning globe. That same globe will appear in your resulting applet.
The last part of the dialog box controls the mouse events that your application captures. Here are the items you can control through the wizard's generated code:
The parentheses after the mouse event names indicate that the event names are event procedure names. Sometimes an event procedure is called an event handler because event procedures respond to events when events occur. A procedure is a routine inside your Java program. Visual J++ supplies many pre-defined procedures that you can use (such as the mouse-handling event procedures) and you can write your own. You'll learn more procedures in this book's second and third parts.
One of the big advantages that Java-based programming offers is that you don't have to waste a bunch of time looking for events. You simply write or modify event handlers. When the program eventually runs, if an event takes place, the matching event handler executes, but if the event does not take place, the event handler stays dormant.
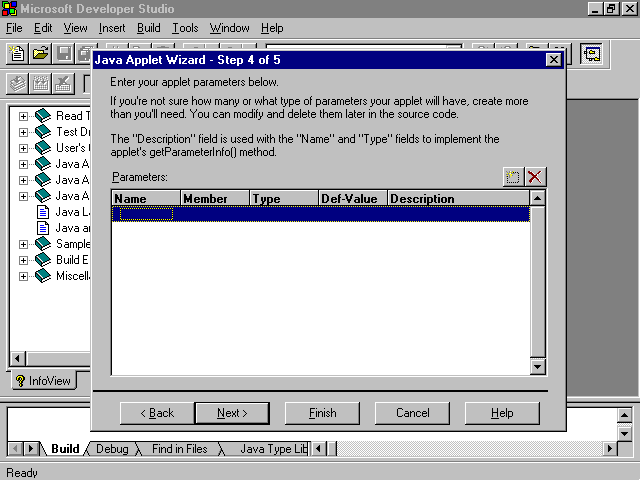
For this walkthrough, do not mark any of the mouse-based event handlers. Click Next to move to the wizard's fourth step. Figure 4.5 shows the dialog box that you'll see.
Enter program parameters in the wizard's fourth step.
![]()
Windows Events
A parameter is a value sent to your program from another source, such as from the HTML Web page or from another program that triggers the execution of yours. Java-based applets and applications can accept zero, one, or more parameters. Therefore, when another application runs your Java-based application, your Java-based program can check to see if any parameters were sent and act upon those parameters. For example, a tax calculation applet might be sent parameters that contain a gross pay and tax rate from another program. Therefore, the tax calculation will produce results based solely on the parameters sent to it and the program behaves differently every time a different pair of parameters are sent.
To add a new parameter, click the New button. Visual J++ adds the parameter information for you. If you highlight a parameter's line and click Delete, Visual J++ removes the parameter. Visual J++ names the parameters m_Param1, m_Param2, and so on as you add the parameters but you can edit the source code file and rename the parameters if you want to do so.
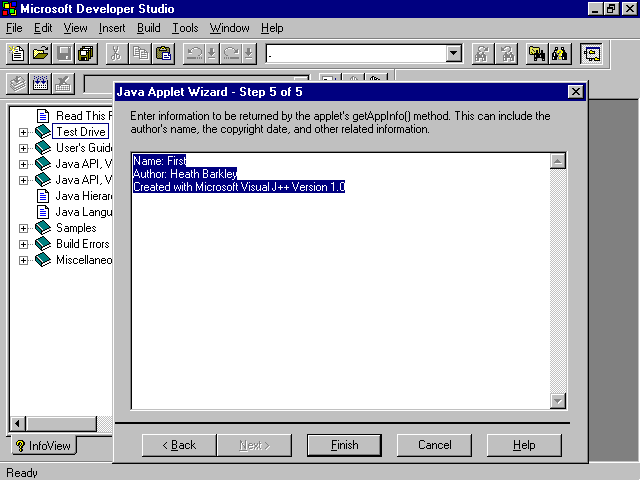
For this walkthrough, your applet needs no parameters from an outside source. Therefore, you do not need to enter information in this dialog box. Click the Next button to move to the final step in the wizard. Figure 4.6 shows the dialog box that appears.
The program's descriptive information.
The Java Applet Wizard's fifth step contains applet name, author, and source development system information. Visual J++ gets the author information from the information you entered when you installed Visual J++. The dialog box presents this information in a text editor-like window. Therefore, you can change the information and add additional information. As the dialog box states, the procedure named getAppInfo() returns this information to your program in case you want to display such information in the Help, About dialog box.
If everything in the information dialog box looks fine, click the Finish button (Visual J++ grays out the Next button because there is nothing left to do but complete the wizard and generate your code).
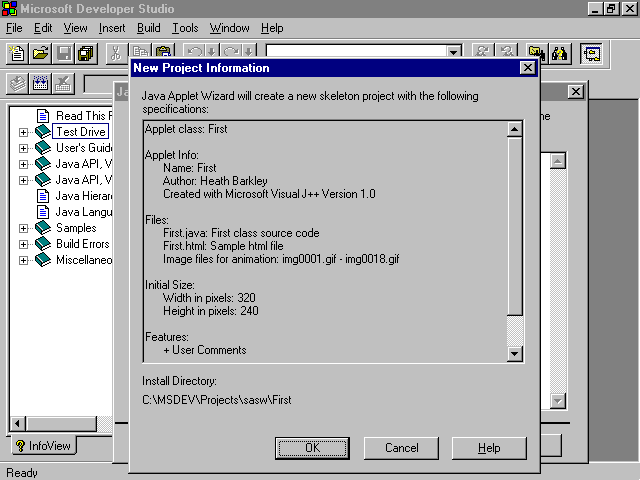
After you click Finish, the New Project Information dialog box appears (see figure 4.7). This final dialog box informs you of what is about to take place. The wizard is about to generate an applet's source code and associated files based on the information you selected during the wizard's first dialog boxes.
The wizard is now ready to generate the code.
The dialog box displays all the generated code's information that so you have a chance to look over the information and decide if you want to generate the applet or make changes (by clicking B ack). You may cancel the entire process by clicking the Cancel button.
The dialog box displays the following information about the First applet:
In addition to the generated information, the wizard informs you of the location of the generated files, namely, C:\MSDEV\Projects\First (your path name may differ from the one that you see in figure 4.7). Click the OK command button to generate the code. Depending on your computer's speed, the code generation will take only a few moments and you'll return to the Visual J++ screen. Basically, the screen looks like the Visual J++ start-up screen except that the Project Workspace window contains three tabbed windows instead of the usual single window with the online help's InfoView information showing.
The wizard generated all the files and inserted the files into a project named First. You now can look through the project, as the next section explains, and see the generated code.
The wizard generated your code and opened the Project Workspace window for you.
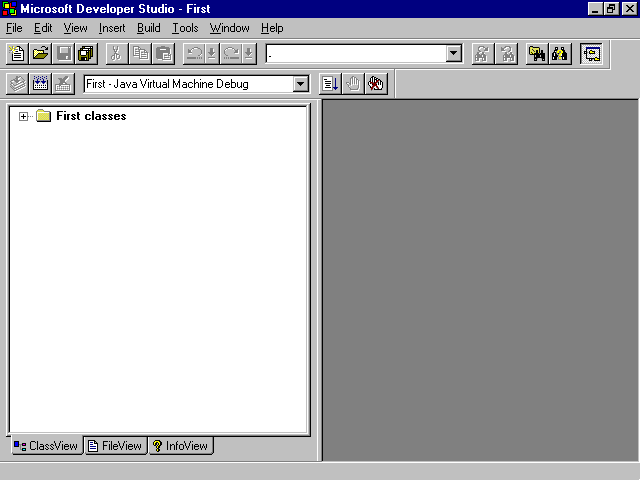
Before looking at actual code, take a few moments to navigate through the Visual J++ screen. At first, there is not much to see on the screen. Visual J++ helps you by not cluttering your screen until you want to see specific information.
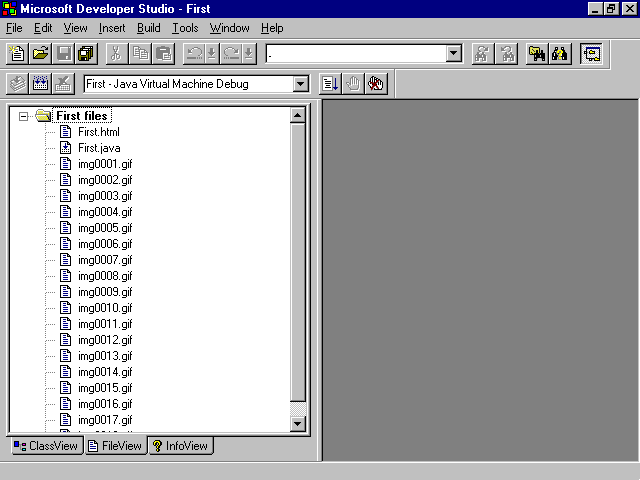
For example, click the FileView tab to display the FileView window. You'll see a folder labeled First files. The plus sign indicates that the folder is collapsed (closed), but when you click the plus sign, the folder contents open to reveal the file contents of your applet. All 20 files described by the wizard's final dialog box appear in your project. Figure 4.9 shows your screen with the open FileView window. When working with a project, you can always click the FileView tab to get a list of your project files.
The FileView window displays your project's file listing.
You'll return to the FileView window in a moment, but for now, click the ClassView tab and then click the plus sign next to the First folder to see a list of classes in your project. The only class in the project is named First. Expand, or open, the First class to see a list of procedures that appear in your project. Some of the procedures are applet-specific; that is, some of them are new to your applet, while others (the ones with the books in their icons whose names begin with m_) are methods, or internal event procedures supplied from the Visual J++ library of pre-defined procedures.
Perhaps the best place to begin looking at the generated code is to view the HTML Web page definition file that the Visual J++ wizard created. Remember that the primary purpose of an applet is to appear on an Internet's end-user computer when that end-user loads the Web page that contains the applet.
To look at the HTML file, click the FileView tab to display the list of First project files once again. Double-click First.html to open the file. Visual J++ displays the file contents in the Editing window to the right of the Project Workspace window. Although you will be making no changes to the files in this particular project, the editing window contains a text editor with all the usual editing features such as character insertion, deletion, cut, copy, and paste.
Listing 4.1 contains the HTML file listing that the wizard generated.
Listing 4.1 The Wizard's HTML File
<HTML>
<HEAD>
<TITLE>First</TITLE>
</HEAD>
<BODY>
<HR>
<APPLET
CODE=First.class
WIDTH=320
HEIGHT=240 >
</APPLET>
<HR>
<A HREF="First.java">The source.</A>
</BODY>
</HTML>
This is a great time to analyze the HTML file. The HTML file contains tag commands that determine how this particular Web page will appear on an end-user's screen. The tag commands are not case sensitive so it does not matter if you type them in uppercase, lowercase, or mixed case. The Internet programming industry seems divided on whether uppercase or lowercase tag commands are preferred. Generally, it seems as if most people prefer uppercase so that the tag commands stand out from the tag command parameters and other Web page information. Interestingly, Microsoft chose to generate lowercase tags.
The <HTML> and </HTML> tags always mark the beginning and end of an HTML file. The <HEAD> and </HEAD> tags mark the beginning and end of the Web page's primary heading, which appears at the top of the Web page and usually contains a title. You can see that this header has a title, delimited with <TITLE> and </TITLE>, that simply contains the name of the Java applet First. When you eventually display this Web page, which you'll learn how to do in the chapter 5, "Running Visual J++ Programs," the First title will appear in large letters across the top of the page.
The <BODY> and </BODY> tags delimit the body of the Web page and generally contain the largest portion of the Web page, including the Web page document's contents. You'll almost always locate your applets in the Web page body as the wizard did here for you.
The <HR> tags do not contain ending </HR> tags because <HR> is the horizontal rule tag that draws a horizontal line across the screen to separate parts of the Web page. A horizontal line appears every place that <HR> occurs on the page.
Obviously, the lines that follow the first <HR> specify the applet information. They are
<APPLET
CODE=First.class
WIDTH=320
HEIGHT=240 >
</APPLET>
The <APPLET> tag requires extra parameters that many of the other tag commands do not require. The <APPLET> tag indicates that the Web page is to load an applet at that particular Web page location, so the <APPLET> tag must contain the applet information, such as the applet name, so that the Web page can properly find the applet and display the applet in an appropriate window. The <APPLET> tag is free-form meaning that it can span several lines and you can insert spaces where you want, or you could list the entire <APPLET> tag command on a single line.
The CODE parameter names the applet's class that is to execute. For now, remember that a class is generally the same as an applet program because most applets contain a single class and the class contains all the functioning applet code. Therefore, the class will generally be your Java file name (with the .java extension). Sometimes programmers enclose the class name in quotation marks but the wizard does not. Although the quotation marks are optional, they often help separate the class name from the surrounding parameters.
The WIDTH and HEIGHT parameters are always required for all applets that you embed in a Web page. The Web page browser must be told the size of your applet's window (the applets will appear on the page in a window). Finally, the </APPLET> ending tag indicates that the applet parameter information is complete.
The following line looks as if it references the applet as well:
<A HREF="First.java">The source.</A>
The <A HREF="First.java"> tag is not associated with the <APPLET> tag command. The <A HREF> tag provides a hypertext link, or hotspot, to a specific location and that location is your Java program's source code. Notice that the ending </A> tag follows the words The source. Therefore, the text The source. will be an underlined hotspot that the end-user, when she or he clicks the text, will be able to see the source code of the applet that runs above in the window.
Before looking at the Web page, take a moment to look at the Java code that Visual J++ produced. Although we will not, in this chapter, perform a line-by-line analysis as we did for the HTML file, you can already get acquainted with the Java language somewhat by looking at the Java applet's code.
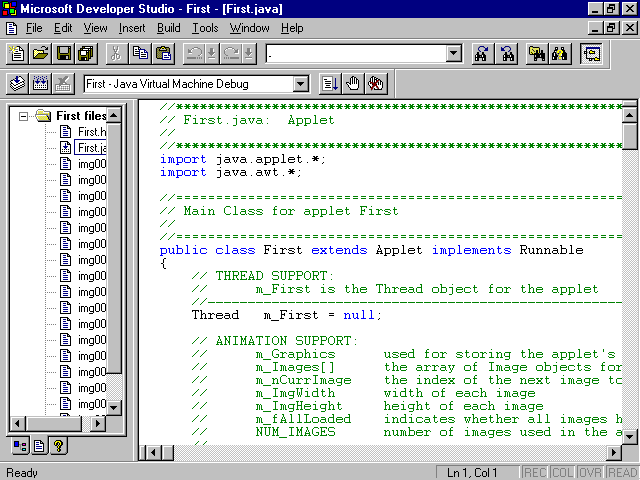
Feel free to leave the HTML code in the editing window while looking at the Java code. To view the Java code, double-click the file named First.java in the Project Workspace window. The Java applet's code appears in the editing window as shown in figure 4.10. Again, you can adjust the editing window's size to see more of the applet's code if you want.
You can view the Java applet code in the editing window.
Scroll down through the Java code and you'll see comments that describe the parts of the applet. Java supports the following two kinds of comments:
Here is an example of three Java lines that contain the C comment style:
a = 78; /* Comments can follow code. */
/* This comment spans
two lines. */
Here is an example of three Java lines that use the C++ comment style:
a = 78; // These comments must follow code.
// This comment spans
// two lines. (notice that // is ALWAYS required.)
The applet contains a heading comment, enclosed in a beginning and ending line of commented asterisks, that contain the applet's file name. As you look through the applet code, you'll see the following line that defines the applet's class:
public class First extends Applet implements Runnable
This line is telling Java that the applet is named First and is runnable.
Scroll down through the file and you'll find the location of the multi-threading information, labeled with appropriate comments. Don't worry if the code looks cryptic because the code is cryptic! You don't have to understand any of the applet code at this point. In addition to cryptic code lines, you'll see the TODO comments that you requested when you generated the applet, such as the following:
// TODO: Add Constructor code here
The TODO comments make customizing the code simple because the comments let you know where customization lines go. You'll soon find where the animation support occurs in the file.
Find the following comment:
// The start() method is called when the page containing the applet
// first appears on the screen. The AppletWizard's initial implementation
// of this method starts execution of the applet's thread.
//------------------------------------------------------------------------
The comment lets you know where the first line of execution in the program occurs. Beneath the comments are the applet's starting (initialization) and stopping (termination) code. A little later, you'll see the code that loads all the animation images so those images will be loaded on the end-user's machine before the animation actually begins.
Once you generate an initial program, you will use your Java knowledge (the knowledge that you learn as you progress through this book!) to modify the code and customize the code to suit your specific needs. Therefore, once you use the wizard to generate the program files, you'll usually modify the files. This chapter, however, focuses on the wizard itself because the wizard is fairly comprehensive and deserves its own treatment as you've seen.
Now that you have a taste of what the wizard generated, are you ready to see the applet in action? You must first perform the following steps:
You will perform both steps in the next chapter where you'll learn a lot about the Java compilation process and you'll learn how to load and execute a Java applet from both a Web browser and from a stand-alone applet viewer.
The goal of this chapter was to familiarize you with the Java applet wizard. the applet wizard walks you through the generation of a Java-enabled applet. Along the way, the wizard also sets up the necessary code to build a stand-alone application if you request one and also generates a simple HTML-based Web page to house the applet.
Now that you've generated an applet and an HTML-based Web page using the Visual J++ wizard, you're ready for the next step. In the next chapter, you'll build the application and watch the applet run within the Web page and also by itself.
Here are the points this chapter covered:
![]()
![]()
![]()
| Previous Chapter | Next Chapter |
| Table of Contents | Book Home Page |
| Que Home Page | Digital Bookshelf | Disclaimer |
To order books from QUE, call us at 800-716-0044 or 317-361-5400.
For comments or technical support for our books and software, select Talk to Us.
© 1996, QUE Corporation, an imprint of Macmillan Publishing USA, a Simon and Schuster Company.