
In this chapter, you'll dive right into Visual J++ by installing the software if you have not yet done so. Then you will learn your way around the parts of the Visual J++ environment. This chapter shows you ways to use Visual J++ that match the needs of most users. Instead of an encyclopedia of commands and menu selections, you'll learn all the basics you need to get started developing Java applets and applications as soon as possible.
Visual J++'s interface matches that of Microsoft's current trend of providing the same development platform for whatever Microsoft language you decide to use. Therefore, once you master the Visual J++ Developer Studio, the program-creating tools that come with Visual J++, you'll also know your way around Visual C++ and Microsoft's FORTRAN Powerstation. Eventually, Microsoft promises to provide the Developer Studio platform for every language offered, including Visual Basic.
Turn on your computers and locate your Visual J++ CD-ROM. You're about to enjoy Visual J++!
Installing Visual J++ is a fairly routine process if you have installed Windows software. Before installing the software, make sure that you have the following minimum hardware configuration:
The Visual J++ installation is fairly straightforward. You'll tell the Setup program which disk and directory to use for the install and then Visual J++ takes over. There are few decisions you need to make along the way, however, that might change the behavior of the installation. The following sections describe those installation decisions. Once Visual J++ finishes installing, you can elect to install Internet Explorer 3.0 as well.
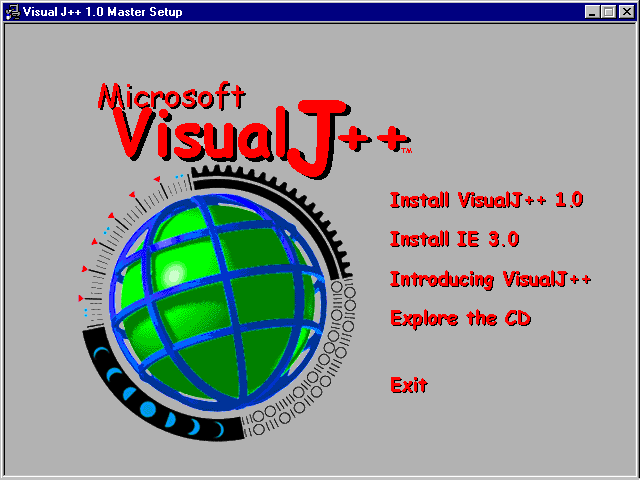
To install Visual J++, insert the Visual J++ CD-ROM into your CD-ROM drive. If you've enabled AutoPlay, the CD-ROM's AutoPlay feature should take over and you'll see the Visual J++ welcome screen shown in figure 2.1.
The Visual J++ opening screen.
To start the installation, move your mouse pointer over Install Visual J++ 1.0. As soon as the mouse pointer rests over the title, the mouse pointing cursor changes to a hand and Install Visual J++ 1.0 highlights. Click your mouse button to begin the installation.
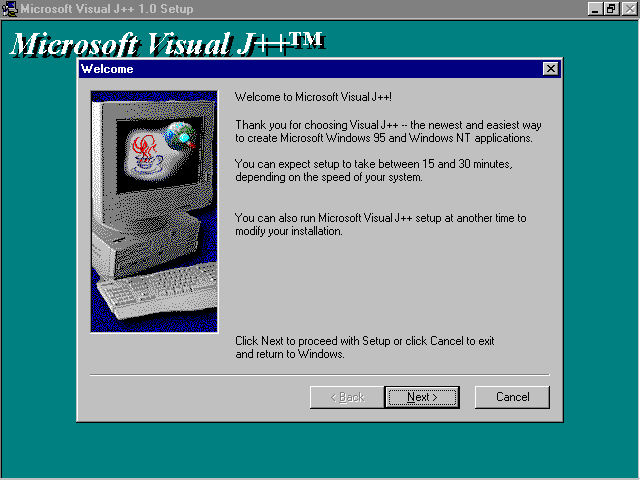
When the Visual J++ installation begins, your computer presents you with the Welcome dialog box shown in figure 2.2. The Welcome dialog box explains how long you can expect the installation to take and informs you that you can run the Setup program any time you like if you want to change the installation options.
The Visual J++ Welcome dialog box.
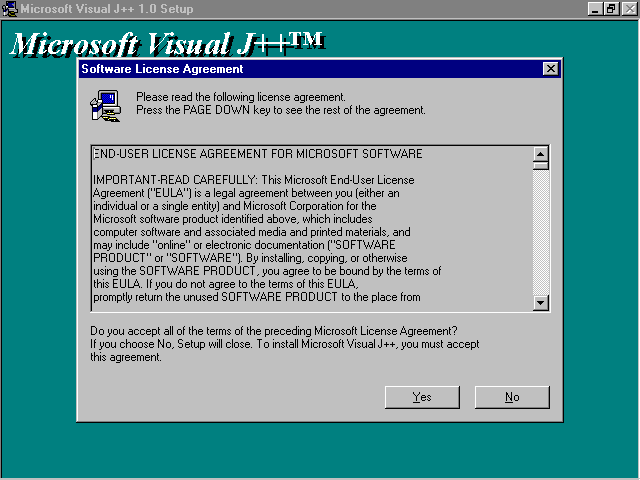
Once you've read the Welcome dialog box, click the button labeled Next to read the Software License Agreement dialog box. The Setup program is actually a Windows 95 wizard and, as with most wizards, you'll click the Next button after selecting options in each installation dialog box to move to the next dialog box. If you click the Cancel button anywhere along the way, you'll cancel the installation and you'll have to start over from the beginning the next time you run Setup.
Unlike most wizard dialog boxes, you'll have to click the Yes button to move to the next Setup dialog box. The Yes button indicates that you've read and understood the license agreement (and that you have an advanced degree in tort law so that you can understand such an agreement!). If you do not want to agree to the licensing language, you can click No to cancel the installation. Microsoft generally assures you'll get a refund if you decide not to agree to their license; you simply have to return the software.
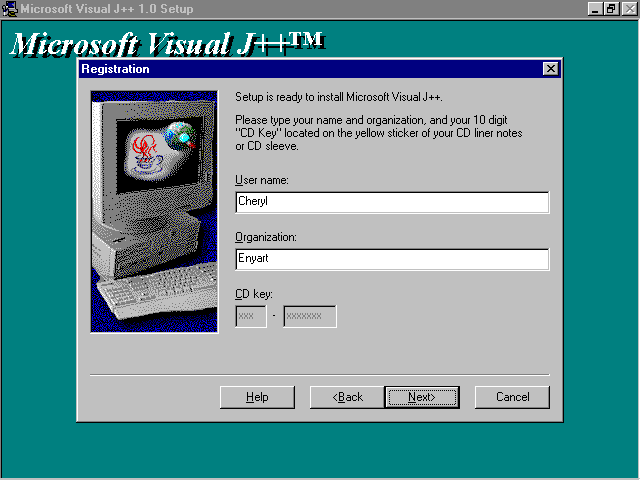
Once you click the Yes button to move on, you'll see the Registration dialog box shown in figure 2.3. Depending on your Windows settings, you may have to enter your name and organization in the dialog box as well as the CD key that appears on the back of your CD-ROM's jewel case. The 10-digit CD key will appear on your Visual J++ About dialog box after installation of Visual J++.
The Visual J++ Registration dialog box.
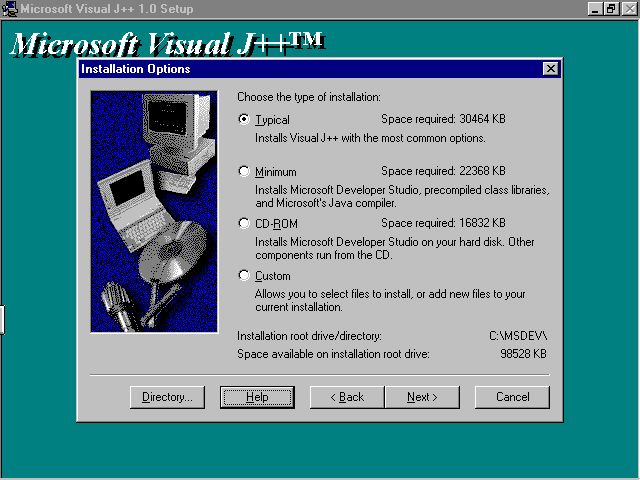
Perhaps one of the most important Setup program dialog boxes follows the Registration dialog box. The Installation Options dialog box, shown in figure 2.4, describes the four different ways you can install Visual J++. Using the Installation Options dialog box, you'll specify one of the following install options:
The Installation Options dialog box.
If you are new to Java coding, as well as being new to the Developer Studio concept, select the Typical installation option. You should be pleased with the options the Typical option gives you. Of course, if you are running low on disk space, you'll have to select either the second or third option. Only select the Custom option if you know something about Visual J++, or if you've used another Microsoft product that supported the Developer Studio environment, or if you're bold and just want to have control over every detail of the installation.
Before clicking Next, notice the Directory button. As the Installation Options dialog box indicates in the lower right-hand corner, the default disk and pathname is C:\MSDEV\. If you want to install Visual J++ to a different disk drive, click the Directory button and change the C: to your preferred drive. I do not recommend that you change the path from MSDEV.
Once you decide on installation option, the disk, and path, click Next to display the final installation dialog box. After clicking Next, Visual J++ begins to install on your system. Depending on the speed of your computer, the installation may take 10 to 30 minutes. Once installed, click the Welcome screen's Exit button to return to your Windows environment.
If you select the Custom installation option, you probably know quite a bit about development tools or you've used Microsoft's Developer Studio before now. If you fall into either of these categories, you probably need little help pursuing that installation option.
This text will not cover all the details of the Custom install because it is the nature of this book to describe the typical use of the Visual J++ development system. Nevertheless, you may want to take a moment to review some of your Custom install choices if you decide to control the installation yourself. There is one particular time when you may want to select the Custom option even if you're not extremely familiar with Visual J++ or with similar tools: if you want to install the entire Visual J++ system. In other words, none of the other three installation options installs the entire Visual J++ system onto your hard disk.
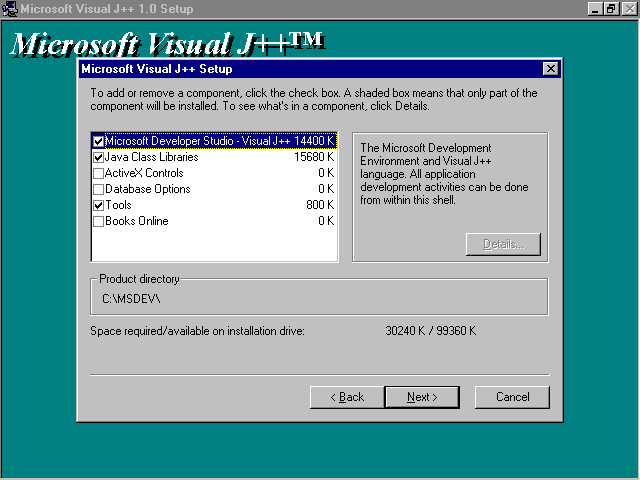
If you select the Custom installation option from the Installation Options dialog box, the Setup program presents you with the six choices shown in figure 2.5. the three selected choices are the Typical installation choices that the Setup program would have installed had you not overridden the default installation.
You can decide exactly what you want to install.
Table 2.1 presents an overview of the six options. If any particular option contains additional sub-options, such as Database Options, you can click the Details button to select which, if any, of the option you want to install. Table 2.1 describes the options that you'll see when you install using the Custom option.
Table 2.1 You Can Customize the Visual J++ Options You Want to Use
| Option | Description |
| Microsoft Developer Studio | Requests the editor, compiler, and related tools you need to write and compile Java-based programs. You must install the Developer Studio if you want to work with Visual J++. |
| Java Class Libraries | Contains both the compiled and source class files. Class files are files with components you can use inside your own applets and applications. The source often helps you find errors during debugging sessions. |
| ActiveX Controls | Installs the ActiveX-related technology that lets you turn your Java programs into OLE-like controls. |
| Tools | Loads the resource editor and other utility programs you can use to help develop advanced Java programs. |
| Books Online | Places the complete online documentation onto your hard disk for quick access when you need to find online help about Visual J++. |
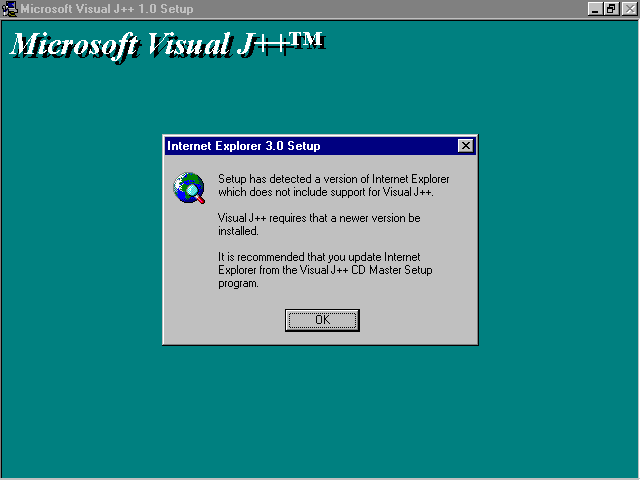
Unless you already have a Java-enabled Web browser that displays Visual J++-produced programs, you'll want to install Internet Explorer 3.0. Once you finish installing Visual J++, the installation procedure presents you with the Internet Explorer 3.0 Setup dialog box shown in figure 2.6. (If you have an outdated version of Internet Explorer 3.0, such as a beta test release, the Visual J++ Setup program will recognize that you do not have the latest Internet Explorer and will prompt you for the newest version's installation with figure 2.6's dialog box.)
When you see figure 2.6's dialog box, select Install Internet Explorer 3.0 from the Welcome screen, which will reappear to install Internet Explorer 3.0. Once you accept the Internet Explorer 3.0 license agreement (as you did earlier when you installed Visual J++) , the installation process is automatic and requires no further interaction from you.
Internet Explorer 3.0 runs Java-enabled applets.
Internet Explorer 3.0 updates system information. After the Internet Explorer 3.0 process completes, Visual J++ displays a dialog box that requests that you restart Windows by clicking the Yes button. (If you have open applications with unsaved data, you'll be prompted to save the data before Windows restarts.) Be sure to restart Windows, either by clicking Yes or by restarting from the Start menu, before you use the newly-installed Internet Explorer 3.0 for the first time. When you install Visual J++, you can also install Internet Explorer 3.0 if you don't have Internet Explorer 3.0 on your system.
![]()
WinDiff Appears After Installing Visual J++
If you ever want to uninstall Visual J++, you can do so easily by following these steps:
You can also remove Internet Explorer 3.0 from the hard drive with the Control Panel's Add/Remove utility as well. Be sure to remember that Internet Explorer 3.0 is required if you want to surf Java-enabled Web pages unless you have another Java-enabled Web browser installed.
After installing Visual J++, when you return to your usual Windows startup screen, you may not realize right away how to start Visual J++. When you select the Microsoft Visual J++ Start menu program group, you will not see Visual J++ listed among the options. Remember that you create Visual J++ programs using the Developer Studio environment. Therefore, when you want to work with Visual J++, you first need to select Microsoft Developer Studio from the Microsoft Visual J++ program group. Once Windows loads and starts the Developer Studio, you'll see the Developer Studio environment.
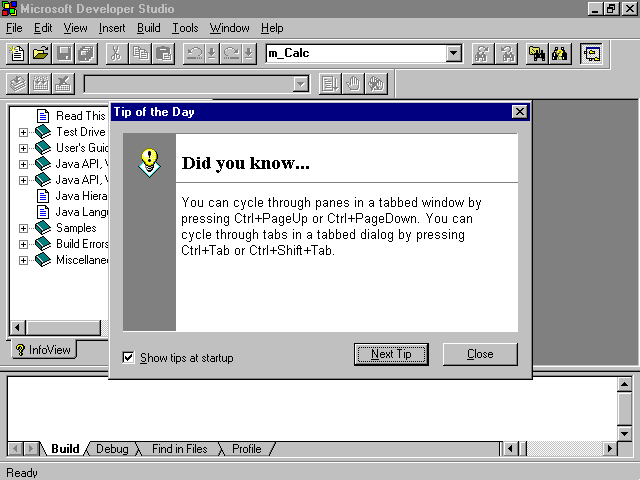
If you've used other Windows 95 products very much, such as Microsoft Word 95, you'll already be familiar with the Tip of the Day dialog box that always appears when you start Visual J++. You can read through multiple tips by clicking the Next Tip button or you can close the dialog box and simply begin to work with Visual J++ by clicking Close.
If you want to eliminate the Tip of the Day dialog box each time you start Visual J++, click the Show tips at startup option before closing the dialog box.
Once you finish your Visual J++ session, you should exit Visual J++ properly: you run the risk of losing data if you turn off your computer too soon. To quit Visual J++, click the close window button in the upper-right hand corner of the Visual J++ Developer Studio workspace window, double-click the control icon in the workspace's upper-left hand corner, or select the File, Exit from the menu bar. If you attempt to leave Visual J++ without saving your most recent edits, Visual J++ will ask if you want to save your work before exiting.
Figure 2.7 describes the various parts of the Visual J++ Developer Studio screen that you'll find after closing the Tip of the Day dialog box. Table 2.2 describes these screen components.
Important Visual J++ screen elements.
Other screen elements will appear as you work within Visual J++, but figure 2.7's elements are the most common screen components that you'll see when you start working in Visual J++.
Table 2.2 Visual J++'s Important Screen Elements
| Element | Description |
| Control icon | The control icon produces the standard Windows control menu with which you can move, size, and close the Visual J++ Developer Studio workspace window. |
| Menu bar | The menu bar is a standard Windows menu bar that produces pull-down menu options when you click on an option or press Alt along with the underlined letter. For example, if you click on the File menu bar option or press Alt+F, you'll see the File menu's options. |
| Standard toolbar | This toolbar provides editing and file shortcuts. By clicking a toolbar button, you often can keep from selecting a menu option. |
| Find textbox | The Find textbox displays a dropdown listbox of most your most recent search text. When you want to locate a certain word, command, or phrase in your Java code, you can enter a word to find in the Find textbox and press Enter to start the search. |
| Project toolbar | This toolbar contains several debugging and compilation shortcuts. |
| Project Workspace window | The Project Workspace window can contain these multiple tabbed items: ClassView, InfoViewer, FileView, and ResourceView. When you first start Visual J++, you'll typically see only InfoViewer. InfoViewer gives you access to online help and the Books Online references available with Visual J++. You'll see the ClassView tab when you create or modify a program that contains classes. (Most Java programs contain classes, as you'll learn as you get further into this book.) FileView lets you select which files you want to edit. FileView is useful because a Visual J++ application usually contains several files, not just a single program listing. These multiple files are stored in a larger collection called a project. Therefore, when you work with a project, you're working with a multi-file Visual J++ application or applet. You'll see the ResourceView tab when your project contains Windows resources such as menus and bitmaps. |
| Editing area | The editing area contains a window that holds your program code as you write and edit Visual J++ programs. In addition, the Editing area displays resources, classes, and online help information. |
| Status bar | Displays messages of Visual J++'s status, describes menu options as you highlight them, and displays some error messages and warnings. |
For now, familiarize yourself with the Visual J++ Developer Studio elements described in table 2.2. If you've used Visual C++, you already understand the Developer Studio and you are probably one step ahead of the game. Chapter 3, "Working Within Visual J++," will walk you through some exercises that let you use the Developer Studio and explain the Developer Studio further.
All of the Books Online are available inside the InfoViewer. Therefore, if you see more than one tab in the Project Workspace window, click on InfoViewer to see the Books Online that are available to you.
When you want to access a Books Online topic, such as the Java API (the Java Application Programming Interface) reference, click on the plus sign to the left of the reference you want to read. Just as a book has chapters, the Books Online references contain sub-topics that are often further divided. As long as you see a plus sign to the left of a topic, you'll be able to expand the topic further for more detail. When the plus sign turns to a minus sign, you'll be able to click the minus sign to close the topic back to its closed form. Once you expand a topic down to a document icon, you'll be able to double-click the document icon and then you can read the text described. The topic's text appears inside the Editing area where you can scroll through the material and learn more about that topic.
Figure 2.8 shows a Visual J++ session with a user reading about building a sample applet. Notice that the help text appears in the Editing area and the selected topic's title and document icons appear in the Project Workspace window.
Read helpful information online with Visual J++.
Whenever scroll bars appear inside one of the Visual J++ Developer Studio windows, you can scroll the window up, down, left, and right to read all the window's contents. If no scroll bars appear, the window displays the entire topic. If you move your mouse pointer to an underlined hypertext link help topic, the mouse pointer changes to a pointing hand; when you click your mouse over that link, Visual J++ displays the help linked to the original topic.
Visual J++ supports several other kinds of online help in addition to the Books Online feature. The Help menu option lets you search for specific help topics throughout the entire set of help topics, define subsets of help documentation that you use a lot to speed searches, to read a Tip of the Day tip (in case you turned off the automatic Tip of the Day dialog box), to locate Microsoft-based technical support phone numbers and addresses, and to locate Web sites that carry Microsoft-related Visual J++ information.
In addition to the Books Online and Help menu bar options, Visual J++ supports context-sensitive help. When you begin writing programs, you can move your cursor over any command or keyword and press the F1 help key. Visual J++ instantly displays helpful information about that topic. When you use context-sensitive help, Visual J++ keeps both your code's Editing area window and a help topic window open.
Whenever you are finished reading a help topic, you can close the help topic by pressing Esc or by clicking the window close control button (the small button icon with an "X" on it) that appears in the upper-right hand corner's second row of window buttons. If you select a subsequent help topic before getting rid of the first one, Visual J++ overwrites the first topic's window with the new topic; multiple help topic windows do not stay active inside the Editing window.
![]()
Using the Help's toolbar
As with most modern Windows programs, Visual J++ supports ToolTips, the pop-up descriptive text that appears when you rest your mouse pointer over a toolbar button.
You can add your own bookmark reference titles to help topics.
The goal of this chapter was to walk you through the installation of a typical Visual J++ system. Visual J++ offers several options you can select that install a different set of Visual J++ tools and features. Depending on your disk space limitations, for example, you may want to install a more limited Visual J++ system such as the Minimum installation option that leaves the majority of Visual J++ on CD-ROM.
Once you install Visual J++, you can access all kinds of online help. Help is, therefore, never further away than your keyboard. By expanding and collapsing the Books Online references, you'll be able to zero-in on the help topics that will give you the most benefit.
This chapter covered the following points:
![]()
![]()
![]()
| Previous Chapter | Next Chapter |
| Table of Contents | Book Home Page |
| Que Home Page | Digital Bookshelf | Disclaimer |
To order books from QUE, call us at 800-716-0044 or 317-361-5400.
For comments or technical support for our books and software, select Talk to Us.
© 1996, QUE Corporation, an imprint of Macmillan Publishing USA, a Simon and Schuster Company.