
In this chapter, you'll put on your exterminator suit and hunt bugs! A bug is a program error, and all sorts of things can go wrong when you write programs. Visual J++ helps you locate and eliminate the bugs, however, with powerful online debugging tools that let you run your program slowly and analyze results along the way.
In fact, Visual J++ sports so many debugging tools that most programmers never use all the debugging tools available to them. Some of the debugging tools require an extensive knowledge of your computer's internal hardware architecture and the typical Visual J++ programmer will have little need for the in-depth internal debugging tools they find.
As you saw in part I, "Introducing Visual J++," you can generate two executable versions of your program. They are
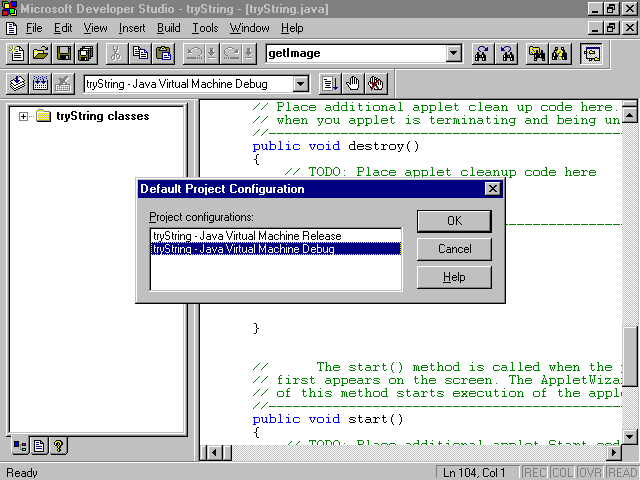
When creating your Visual J++ program, be sure to use the debug version by selecting from the Default Project Configuration dialog box show in figure 8.1. To select the Default Project Configuration, choose Build, Set Default Configuration. Once you've selected the build version, you can use the normal Build menu commands or toolbar buttons to build your project in the usual manner.
Select the version you want to build.
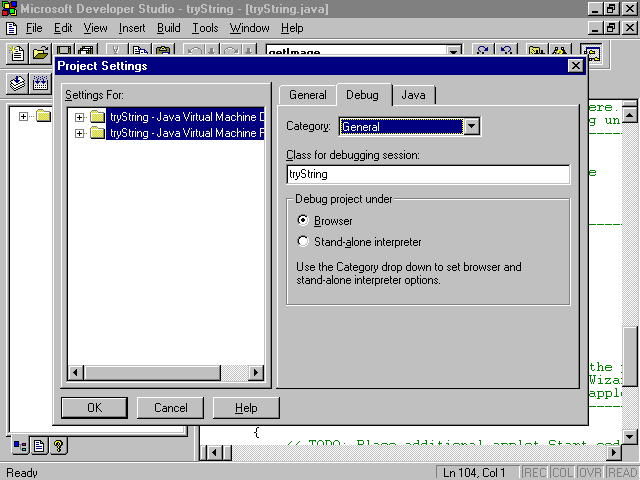
In addition to setting the appropriate project configuration, you may want to adjust the debug settings found in the Project Settings dialog box (which appears when you choose Build, Settings) shown in figure 8.2. (You must click the Debug tab to see the Debug page.) The Debug settings control the way your debug sessions work for the following four categories (select the appropriate category from the Category drop-down list box):
Choose the Build, Settings option to specify debug settings.
Recall from chapter 3, "Working Within Visual J++," that you access Visual J++'s debugger commands from the Build menu. Visual J++ does not contain a Debug menu that so many other Microsoft development projects sport. Nevertheless, the lack of a Debug menu does not imply that Visual J++ lacks powerful debugging capabilities.
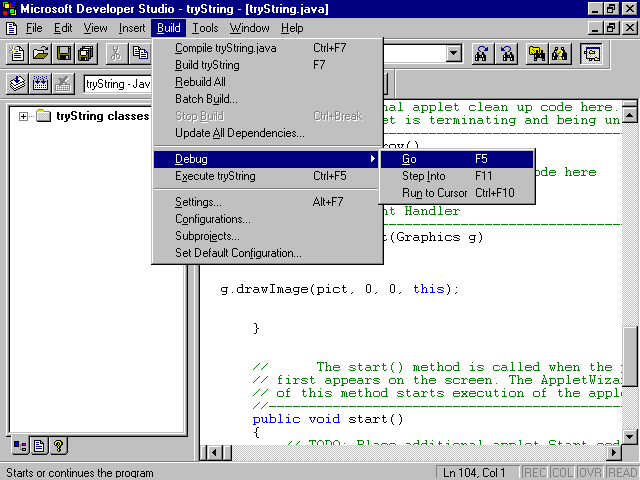
To access Visual J++'s debugging capabilities, choose Build, Debug option to display a submenu (see figure 8.3). In addition to the debugging commands you'll find on the Build menu, the View menu, the Project toolbar, and the Debug toolbar give you debugging access.
A submenu appears after you choose Build, Debug.
Chapter 3 did not explore the Debug toolbar in detail because you were not, at that time, prepared to understand debugging nuances. Figure 8.4 shows the Debug toolbar, which you can display by choosing View, Toolbars. As you work in a debug session, the toolbar buttons gray out when unavailable. Table 8.1 gives a brief explanation of each toolbar button's purpose. Some of table 8.1's information is advanced and requires a thorough knowledge of your computer's architecture (such as the Registers and Memory toolbar buttons).
Throughout the rest of this chapter, you'll find more detailed information on when and where you might use each of the buttons.
Table 8.1 The Debug Toolbar Saves You Lots of Testing and Debugging Time
| Toolbar button | Purpose |
| Restart | Starts a program's execution from the beginning after you stop execution through the Break command or by setting a breakpoint. |
| Stop Debugging | Terminates the current debugging session. |
| Step Into | Single-steps (executes one line at a time) through a method instead of executing the method at regular speed. |
| Step Over | Single-steps through all program statements except for called methods that execute outside the single-step mode. |
| Step Out | Executes your program from the current location to the first statement that follows the current method call. |
| Run to Cursor | Executes the program until the execution reaches the current cursor's position. |
| QuickWatch | Displays the QuickWatch window from where you can look at and change variables. |
| Watch | Lets you display and organize variables whose values you want to monitor. |
| Variables | Opens the Variables window from where you can view the contents or variables and data members. A variable is a named storage area that holds a data item. Part III explains how to define and work with variables in great detail. |
| Registers | Shows the contents of your computer processor's internal registers. |
| Memory | Displays a memory dump that you can analyze to locate problems. |
| Call Stack | Contains a list of method calls recently executed. |
| Disassembly | Displays your program's internal assembly language source code. |
The Debug toolbar's buttons can help you greatly.
When you first compile and test your application, you'll want to display the Debug toolbar to help you with your early development debugging requirements. Once you've gotten most or all of the bugs out of your code, you may want to hide the Debug toolbar once again so that you'll have more screen space to work with your project.
![]()
To Debug or Not Debug?
As you know, a bug is a computer error of some kind. The debugger, therefore, helps you locate and eliminate program bugs. If you're new to programming you need to understand the nature of debugging and to understand the nature of debugging, you should know what kinds of bugs await you.
Rarely does a computer bug occur because of a hardware failure. Due to the nature of computer technology, if a computer works the first day or two you buy it, the computer will probably work for years. When your computer does finally fail because of hardware, the computer really fails! The hard disk crashes or a memory chip pops out of its socket or the power supply no longer supplies power.
Therefore, when a program does not work correctly, the problem is almost always with your program and not with your computer. (Computer programming is a humbling experience.) A bug can occur in many ways. Three general categories of computer bugs occur. The following lists the three kinds of bugs:
As you learned in chapter 5, "Running Visual J++ Programs," if you accidentally misspell a command, variable, or class name, you'll generate a compiler error. Most compiler errors fall in the category of syntax errors (misspellings or incorrect grammar usage). You don't necessarily have to compile the program to find syntax errors. As you type your program into the Editing window, Visual J++ colors certain commands and keywords to let you know that you entered a term that Visual J++ recognizes as a reserved language term. The syntax color-coding will become second nature to you. In other words, if you expect your commands to appear in blue, as they will by default, and you type a command that does not appear in blue, you'll know right away that you misspelled the command or used capital letters when you should have used lowercase letters.
When a compiler error does occur, the error appears in the Debug portion of your Visual J++ screen's lower window (see figure 8.5). Scroll the left and right scrollbars if you cannot read the entire error message. Double-click the error message to move directly to that error line within your project.
Double-click an error message to move right to the error.
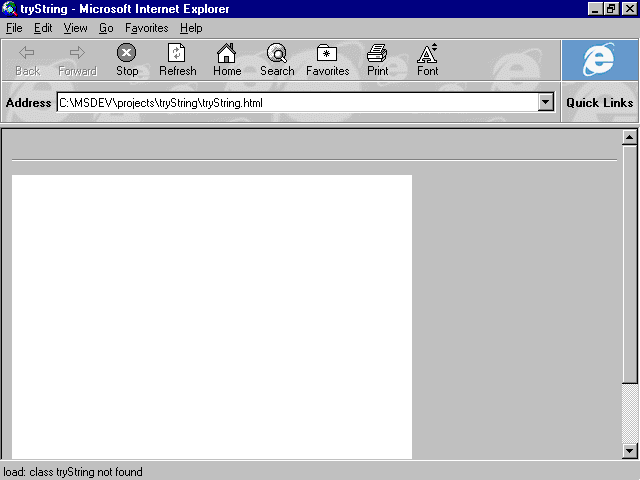
Runtime errors are perhaps the most embarrassing errors to get. The reason for the embarrassment is that your users are the ones who usually find runtime errors. The possibility of runtime errors justifies your use of thorough testing techniques when you develop programs. Nevertheless, no matter how thoroughly you test your programs, runtime errors do raise their ugly heads now and then and your users will let you know quickly about them.
Unlike logical errors, your users will see an error message when they encounter runtime errors. Not only will your users see the error message but the program will refuse to continue! When your users call you up to tell you that they found a bug, that they received an error message, and that their programs cannot seem to get past the error, you'll immediately realize why runtime errors are the most embarrassing form of errors.
Figure 8.6 shows what can happen when your user encounters a run-time error in a Visual J++ applet. Although Internet Explorer started and attempted to execute the applet, the applet's class support file is not available. The error message in Internet Explorer's status bar informs you (or, worse, your end-user) of the problem and nothing else happens until you fix the mistake.
Logical errors are the primary reason for the debugger's existence. After all, Visual J++ finds, either at compile-time or at runtime, the other two kinds of errors for you and displays appropriate error messages. The rest of this chapter explores the ways that you can analyze your program-based information, such as data members and variable contents. In addition to looking at data, the Visual J++ debugger also lets you single-step through your applet or application one line at a time, executing the program at your own pace.
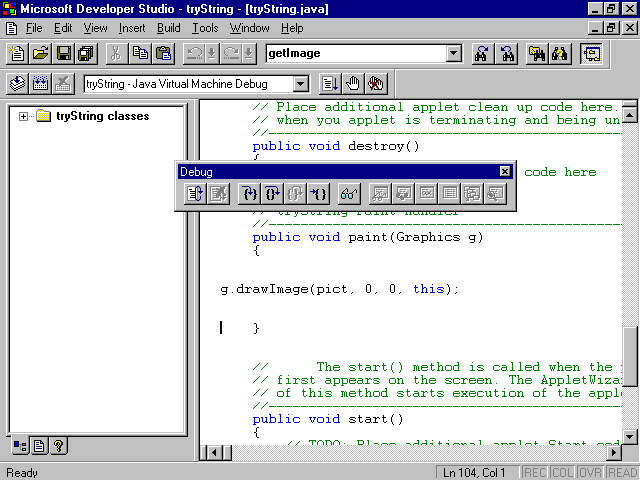
A breakpoint is an executing program's stopping point. You can set one or more breakpoints in your program. Suppose you're having trouble with a particular set of calculations that appear towards the middle of your program. One way to find the problem is to set a breakpoint at the start of the first calculation. The next time you execute the program, the first part of the program runs as usual and at the usual speed. At the breakpoint, the program immediately halts and sends you to the Developer Studio once again. Therefore, you can be viewing your applet inside the applet viewer or in your Web browser and as soon as execution gets to the breakpoint, the Developer Studio regains control. You'll still be able to switch to the output by using the Windows Alt+Tab keystroke or taskbar switching capabilities.
Once your program rests at a breakpoint, you may want to do one or more debugging tasks. For example, you may want to
The Debug toolbar's buttons come in especially handy during a breakpoint because you can control the way that the rest of the program executes (one line at a time, stepping into or over methods, and so on).
A small red stop sign appears to the left of all lines on which you've attached a breakpoint. The following are the ways you can set a breakpoint at a line of code:
Define one or more breakpoints from the Breakpoints dialog box.
Once you set one or more breakpoints, you can remove the breakpoints just as easily by reversing the setting. For example, if you click a line of code that contains a breakpoint and press F9, Visual J++ removes the breakpoint.
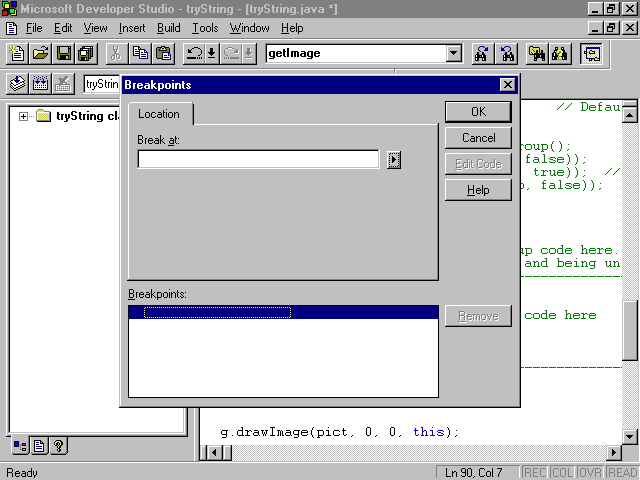
Here are the Breakpoints dialog box options that you can set:
Visual J++ supports location breakpoints, which are breakpoints that suspect program execution at specific locations in your code.
Location breakpoints are simple to specify and use. When you press F9 to add a breakpoint to a particular line of code, you're setting a location breakpoint. You can set multiple locations breakpoints. Location breakpoints are also called unconditional breakpoints because Visual J++ stops the program's execution unconditionally no matter what was happening during the execution when execution reaches the location set.
In addition to setting a breakpoint at a particular line of code, you can also set a location breakpoint at the following locations:
You can set a breakpoint at the beginning of a method by doing the following:
Before learning how to set a breakpoint at a method's return point, you need to understand the call stack. As you'll learn in part III, "Programming with Visual J++," your programs will call methods and return from methods. A method works a lot like a temporary program detour. Methods can trigger the calling, or the execution, of other methods. Therefore, at any one time, your program's execution might be in the middle of a method called by another method; that method would be on hold because it might be called by yet an additional method that's waiting for the execution path to unravel and get back to its own processing.
Due to Java's object-oriented nature, a program's execution path is not always easy to follow, especially when such a path leads through a series of embedded method calls. The call stack lets you see the execution path of your program's methods. For example, if your program is in the middle of a drawString() method triggered by one of your dispOut() methods that is called by your program, you'll be able to trace that method execution path. By studying the current method call path with your expected method call path, you can determine if the current logical bug occurred due to an invalid method call.
At any breakpoint, you can display the Call Stack window. The Call Stack window displays the sequence of method calls that brought you to the current execution point as well as libraries needed for the method calls and any parameters (data you send to methods) sent to each of the methods in the path.
Once you display a program's Call Stack window, you can set a breakpoint at any method's return point by following these steps:
When the method terminates, you'll get a breakpoint right before the method returns to its calling method.
A label is a named section of code. In listing 8.1, a label, Again, appears in the third line of the code. A label always precedes a colon. The colon separates the label from the rest of the code.
Listing 8.1 You Can Set a Breakpoint at Any Label
public void getAns (Graphics g)
{
Again:
g.drawImage(pict, 0, 0, this);
do
{
ans = callDisp("Retry (Y/N)");
if (ans != 'Y' && and != 'N')
{ continue Again; }
}
}
If you want to set a breakpoint at a label, follow these steps:
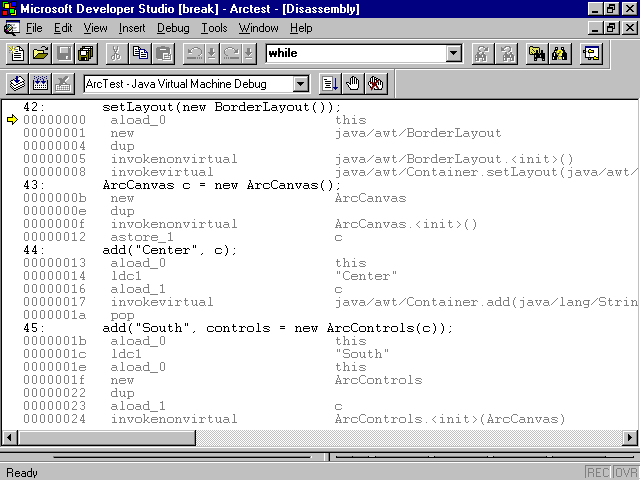
To set a breakpoint at a memory address, you must understand how to open the Disassembly window.
When you display the Disassembly window, you display the internal assembly language code that Visual J++ translates your Java source code into for execution. If you suspect that an internal memory alignment or bit-shift is bothering your program's reliable execution results, you might want to study the Disassembly window to trace your program's internal nature. Once you stop execution at a breakpoint, choose View, Disassembly to open the Disassembly window (see figure 8.7).
Analyze your internal code with the Disassembly window.
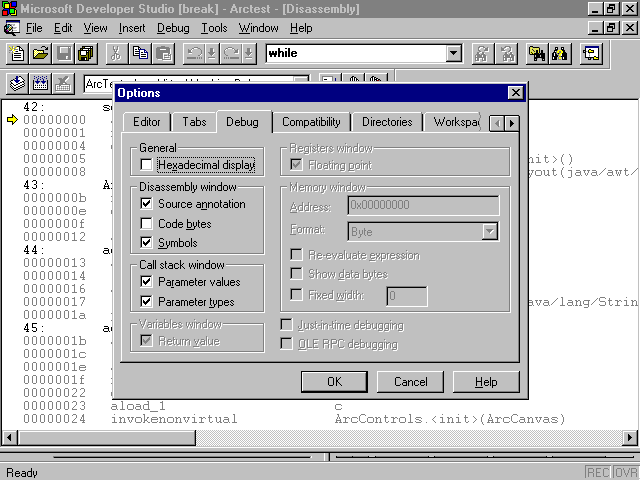
If you choose Tools, Options, the Options dialog box appears. Click the Debug tab to display figure 8.8's Options dialog box, you can control the following Disassembly window options:
Set debug options from the Options dialog box.
If you want to set a breakpoint at a memory address, follow these steps:
The Developer Studio supports a few different location breakpoint formats. When you use the Breakpoints dialog box to specify a breakpoint, you can click the Break At right arrow to set a breakpoint at the current line, type a line number, or enter any of table 8.2's location formats.
Table 8.2 Visual J++ Supports Four Kinds of Location Breakpoint Formats
| Format | Example | Description |
| .lineNumber | .43 | A specific line within the current source file. The Breakpoints dialog box, opens the breakpoint's source code file. |
| Filename!lineNumber | myApp.java!52 | Line 52 in the source code file named myApp.java. |
| Offset | 0x391C | Offset 0x391C in the code segment. |
| Offset | IP | The instruction pointer offset to the code segment. |
The Watch window and Variables window let you view, analyze, and even change the contents of variables and data members as your program executes. In other words, your program might set a variable to zero but, at any breakpoint you set, you can change that variable to a different value to see what results occur.
Not only can you manage single data values but also expressions that contain any valid Java operator. You can enter expressions to watch while your programs execute. The Watch window constantly updates those expressions as needed during the execution of the debugging session.
Unlike many of the debugging-related windows, you can set up a Watch window before you start executing your program in a debugging session. You don't have to display the Watch window at a breakpoint; instead, you can set up your Watch window before you execute the program.
To add a variable, data member, or expression to the Watch window, simply display the Watch window and type the data value or expression. If you've stopped the program at a breakpoint and then you enter a data value or expression, Visual J++ immediately evaluates the result and displays the value (given the other program values at that point in the execution).
The QuickWatch dialog box (available from the Debug toolbar) lets you add a variable or data member (not an expression though) to the Watch window as well. To do so, place your cursor to the left of or within the name of the targeted variable or data member and click the Debug toolbar's QuickWatch toolbar button to display the QuickWatch dialog box (see figure 8.9). When you click the Add Watch button, Visual J++ inserts the targeted value in the Watch window.
The QuickWatch dialog box quickly lets you set watch values.
To use the Watch window for data viewing, perform these steps:
If you want to change the value of an item at a breakpoint, perform these steps:
Terminate your current debugging session if you want to remove a Watch window data item or expression. Highlight the line with the item and press Delete.
The Variables window (as well as the Watch window) often contains a wide assortment of values. Many of these items, such as named objects, often contain one or more additional data items and variables. The Variables window lets you view all the data items within your application. Just like the Watch window, the Variables window lets you view a detailed or summarized representation of your data.
Figure 8.10 shows an active Variables window. The name of the data item appears in the left column and the value (or values) that reside in that item appears on the right. If a plus sign appears to the left of an item, you can click the plus sign to see the next level of detail. The plus sign changes to a minus sign when there is no further detail to show. You can then collapse the detail by clicking the minus sign.
The Variables window can show different levels of detail.
The goal of this chapter was to explain how to use Visual J++'s integrated debugger to locate the logical bugs that can appear in your Visual J++ applets and applications. A logical bug is difficult to find but by setting breakpoints, watch expressions, and viewing memory contents during the program's execution, you'll be better equipped to locate hard-to-find bugs.
The next chapter begins a new part of the book. Whereas these first eight chapters have been hands-on, the next few will provide more theory to get you started on your path to programming with Visual J++. Writing a program literally requires that you learn a new language: the Java language.
Here are the points this chapter covered:
![]()
![]()
![]()
| Previous Chapter | Next Chapter |
| Table of Contents | Book Home Page |
| Que Home Page | Digital Bookshelf | Disclaimer |
To order books from QUE, call us at 800-716-0044 or 317-361-5400.
For comments or technical support for our books and software, select Talk to Us.
© 1996, QUE Corporation, an imprint of Macmillan Publishing USA, a Simon and Schuster Company.