 retrieval system without
prior written permission of the publisher except in the case of brief quotations
embodied in critical articles and reviews. Making copies of any part of
this book for any purpose other than your own personal use is a violation
of United States copyright laws. For information, address Que Corporation,
201 West 103rd Street, Indianapolis, IN 46290 or at support@mcp.com.
retrieval system without
prior written permission of the publisher except in the case of brief quotations
embodied in critical articles and reviews. Making copies of any part of
this book for any purpose other than your own personal use is a violation
of United States copyright laws. For information, address Que Corporation,
201 West 103rd Street, Indianapolis, IN 46290 or at support@mcp.com.
Notice: This material is excerpted from Special Edition Using HTML, 2nd Edition, ISBN: 0-7897-0758-6. This material has not yet been through the final proof reading stage that it will pass through before being published in printed form. Some errors may exist here that will be corrected before the book is published. This material is provided "as is" without any warranty of any kind.
QuarterDeck Inc., makers of the QEMM memory management product, has also thrown their hat into the ring of HTML authoring tools. WebAuthor 2.0 isn't really a program; it's an add-on module for Microsoft Word 6.0 for Windows. Word for Windows works in distinct "views"-not all features are available at all times. Sometimes you need to use a specific view to use some of the features. WebAuthor merely adds another view in which you can work in Word. While in the WebAuthor view, you can access numerous HTML functions that are unavailable to other Word documents.
In this chapter, you learn about the following:
WebAuthor 2.0 is available from QuarterDeck (http://www.qdeck.com/)
for 30 days for evaluation purposes. It comes as a self-extracting executable
file. To install WebAuthor, you first need to run the executable from a
temporary directory. Next, when you're using Windows 95's install program
option, find the full path to that temporary directory and use the file
INSTALL.EXE. Finally, follow WebAuthor's installation wizard for your name,
company name, address, and the directory to which you want WebAuthor installed.
Don't worry about any privacy issues because none of this information is
transmitted to QuarterDeck or anybody else.
If you want to use the product longer than 30 days, you have to purchase the full version directly from QuarterDeck. The trial version of WebAuthor does work after that time, but it cannot convert and save files into HTML. It also doesn't come with an uninstall feature, so to remove WebAuthor, you have to delete a specific list of files. Fortunately, QuarterDeck provides the list of files to be deleted if you don't like WebAuthor.
The price of the full version of WebAuthor is $49.95. By the time you read this chapter, the 32-bit version of WebAuthor, which works with Word for Windows 7.0, should be released.
After you've installed WebAuthor, you can easily access it from within
Word for Windows 6.0. To get to WebAuthor, start up Word, and then select
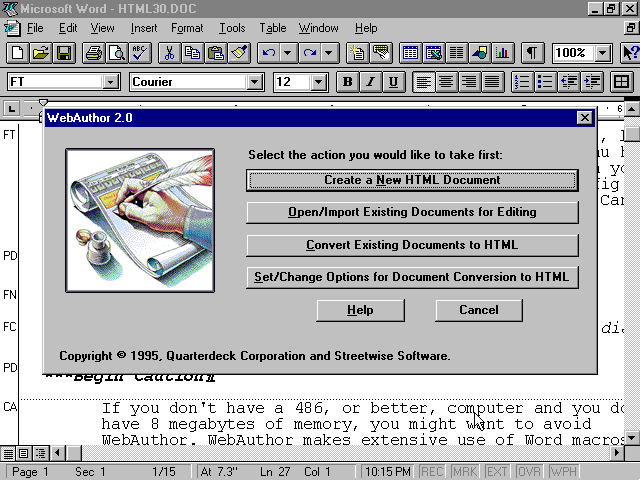
the bAuthor. When you start up WebAuthor, you
are presented with a dialog box (see fig. 29.1).
If you accidentally chose WebAuthor, you can click the Cancel button and
return to Word.
The first thing you see when you access WebAuthor is this dialog box.
If you don't have a 486, or better, computer and you don't have 8 megabytes of memory, you might want to avoid using WebAuthor. WebAuthor makes extensive use of
To get started on making your new Web page, you should click the Create
A New HTML Document button on the initial WebAuthor dialog
box. Clicking this button opens a blank document into Word and puts it
into WebAuthor view. This view offers multiple toolbars, each with a different
area of specialization. The menu headings and items also get changed when
you're in WebAuthor view.
It's unlikely that you'll finish your Web page in one sitting, because
you'll probably want to decorate it a little. If you click Open/Import
Existing Documents for Editing on the initial WebAuthor dialog box, you
can open up your existing Web page, or open a file to edit as your Web
page. Use the Windows 95 file selector and choose either an HTML, Word
for Windows, or Rich Text Format (RTF) file. While you can load an HTML
document directly into Word, it will be treated as a regular text file.
If you want to use WebAuthor's HTML functionality while in Word, you must
go through WebAuthor. WebAuthor automatically converts the specified document
into a format readable by Word for Windows. It then loads in the specified
file into a new window and goes into the WebAuthor view.
WebAuthor actually keeps track of two documents for your
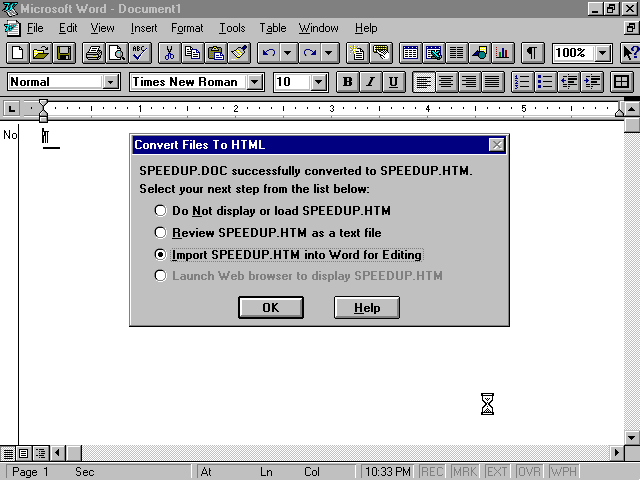
You can also automatically convert large Word for Windows or RTF files.
Simply click the Convert Existing Documents option in
the initial WebAuthor dialog box. Clicking this button opens the file selector
where you can specify the file to convert. You can convert either a Word
for Windows document or an RTF file. Using this option is different from
loading the Open/Import option in that the conversion is more interactive.
With this option, you're prompted for how you want the different paragraphs in your document to be converted. After you go through the whole document, you're given the option to load the file into Word (see fig. 29.2). The conversion isn't perfect, particularly failing on oddly formatted documents. But for people who have lots of existing documents that are internal memos or press releases, using this option is an easy way to put them into HTML format.
After WebAuthor converts a document, you can do a variety of things with the HTML file.
You can also configure WebAuthor's conversion behavior by using the
Options.
Under this menu heading, you can find options to configure the styles,
the behavior of tables, and general HTML output format. These options affect
WebAuthor's conversion of Word documents into HTML only. You learn more
about the configuration of WebAuthor
later in this chapter.
You can easily access WebAuthor's configuration program without starting Word. Click the Windows 95 Start button and select the Programs menu item. There you'll see a new menu heading, "Quarterdeck WebAuthor 2.0." Selecting that will bring up a window with a few items in it. Double-click the Conversion Options icon, and you can configure WebAuthor.
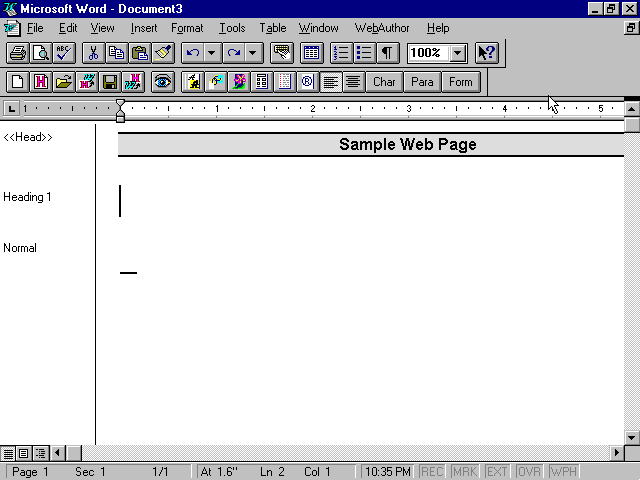
After you get into WebAuthor, you see many changes to Word. If you're creating a new Web page, you are asked to enter its title, which is required for working in WebAuthor. The first change you'll notice is an entirely new toolbar (see fig. 29.3). But that's not the only thing that changes with Word. The entire menu bar changes, with new options under almost every menu heading. The most commonly accessed HTML tags are available through the buttons, but some of the more advanced HTML elements are under the menu headings.
You notice another subtle modification to Word by WebAuthor when you
save a Word file. WebAuthor asks whether you want to update the HTML document.
If you tell it to generate a new HTML file, you are asked for certain characteristics
for some parts of the file, mainly tables. After the conversion to HTML,
you have the option of having WebAuthor verify the HTML file. It also lets
you start up the default browser (see "Configuring WebAuthor,"
later in this chapter) and load the new HTML file directly. This capability
is particularly useful if you're creating a Web page that makes use of
Netscape extensions. Simply define your default Web browser to be Netscape
and have WebAuthor pass the HTML file to it.
WebAuthor adds a new toolbar to help you create your Web pages.
In WebAuthor view, the tasks you'll most want to do are to enter and delete text for your Web page. You can do so seemlessly with WebAuthor because it basically just takes Word documents and converts them into HTML code. For some HTML-specific tags, WebAuthor uses macros to do the HTML conversion.
If you're creating a new HTML document, after you enter the title for
it, you can start typing away. Because Word is reading all the keyboard
input, you don't have to learn any new commands. Simply use Word like you
always do, and forget that you're in the WebAuthor view. You can even use
Word's spell checker and thesaurus when creating your Web page.
Because WebAuthor basically sits on top of Word, you can delete text just as if you were modifying a regular document. The only keyboard-related difference you have to watch out for is that some of the shortcut keys have been changed. Aside from that, you really don't have to learn special keystrokes with WebAuthor.
You do have to be careful when trying to modify the text of hyperlinks because you can't do it directly. When you select a link, you must work with it as an entire object. So if you have a bit of text linked to something else, you must deal with both objects. You learn how to edit links later in this chapter.
WebAuthor is exceedingly slow when deleting a single character. As a result, try to avoid deleting words a letter at a time.
You can modify the HTML style of any line at any time. WebAuthor gives
you a generous left-hand column, which displays the HTML style of the current
line. Changing the style of a line is the same as changing the attribute
of text in Word: you select a block of text and click a button. The only
difference here is that you have to click one of the HTML style buttons.
You can open the styles as another toolbar by clicking the Char button
(see fig. 29.4).
You can easily modify the styles of any text by using this toolbar.
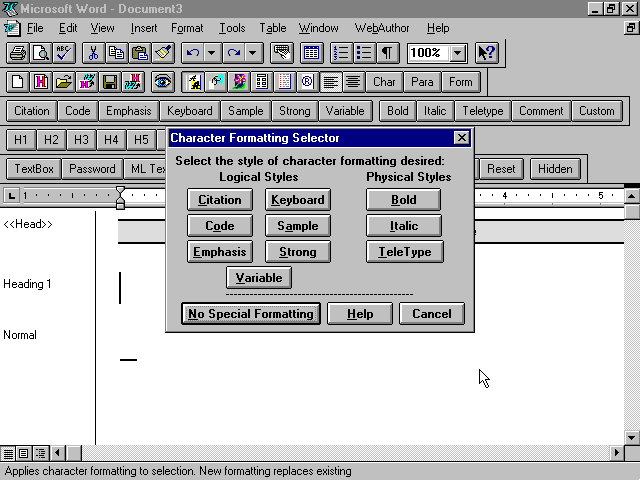
If you have a small monitor and want to use as few toolbars as possible, you can also modify the HTML style. Simply click on the Format Character button in the WebAuthor main toolbar.
Clicking this button opens the Character Formatting Selector dialog
box, which lets you choose the specific style you want to apply (see
fig. 29.5). You can also access this dialog box by choosing Format,
Character. A notable shortcoming of WebAuthor is that
you can't apply multiple styles to text. This means that a word can either
be bold or italic, but not both. If you try to mix different styles together,
WebAuthor will warn you ahead of time before it overwrites the other style.
If you don't want to use the Format Character toolbar, you can change styles with this dialog box.
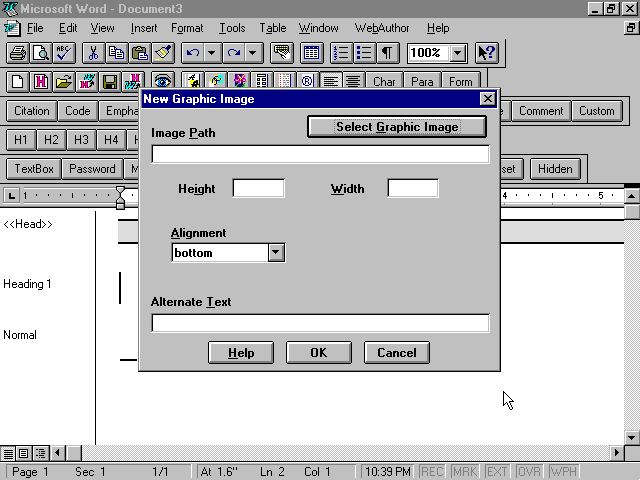
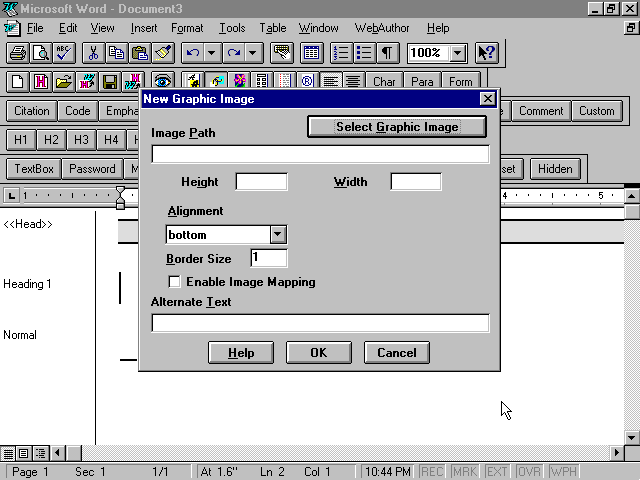
You can easily insert graphics at any point in your HTML document by
choosing Insert, Image. The New Graphic
Image dialog box then appears (see fig. 29.6).
You can also get to this dialog box by clicking the Image Manager button.
The New Graphic Image dialog box makes inserting graphics into your
Web page very easy.
WebAuthor uses relative references whenever you add graphics to your Web page. Be sure to save your document before you insert a graphic. That will allow WebAuthor to work out all the references correctly.
In this dialog box, specify the attributes of the graphic you want to
use. In the Image Path, type in the full path of the graphic
you want to use, or click the Select Graphic Image button
to find it. You can also indicate the height and width of the image if
you know it, but these fields are optional. Specify how you want the text
around the graphic to be aligned by using the Alignment
drop-down list. Be sure to type in a description of the graphic you're
using in the Alternate Text field.
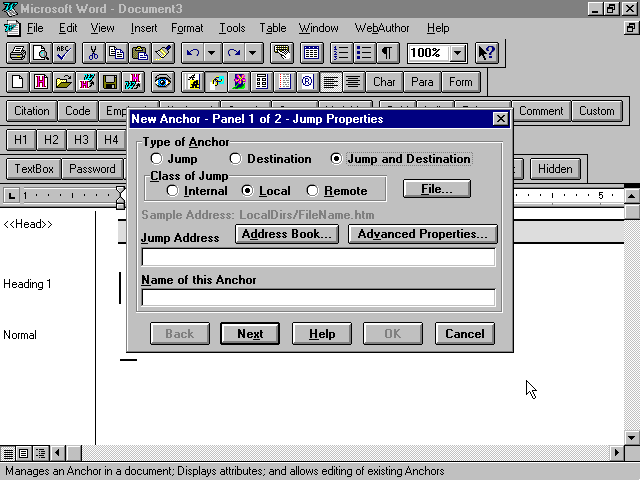
Probably the second most important thing you will want in your Web page
is hypertext links (see chapter 4). Links basically
let you put a pointer to another document on the Web that people can access.
You can do so easily by using the Anchor Manager dialog box (see
fig. 29.7), which you access by choosing the Anchor Manager button.
You can also access this dialog box through the Insert
menu heading, followed by the HyperText Link menu item.
If you want to create any type of hyperlink, you need to use this dialog box.
Creating simple hypertext links is easy using WebAuthor, especially
when you use the Anchor Manager dialog box. Because most of the time you'll
want to jump to other Web pages or Net resources, you'll first learn about
creating those links. You'll learn about creating destinations and jumping
to them later in this chapter.
If you want to turn some existing text into an anchor, simply highlight
the text you want to be the text of the anchor. Next, click the Anchor
Manager button, and the corresponding dialog box shows up. Only the
If your computer is the Web server, and you want to create a link to
a file on your hard drive, you can do that, too. Instead of choosing the
Remote jump class, choose the Local jump class. As for
the Jump Address field, type in the full path of the file to which you
want to link. If you don't remember the complete path to the file, you
can click on the File button and use Word's file selector
to find it.
You can use the Return for Visible Display field of the URL Address
Book dialog box to alter the text of the hypertext link itself. If you
specify Nothing, whatever text is highlighted will stay the same. The URL
option replaces the highlighted text with the name of the URL. The URL
Description option replaces the highlighted text with whatever description
you've previously typed in for that entry.
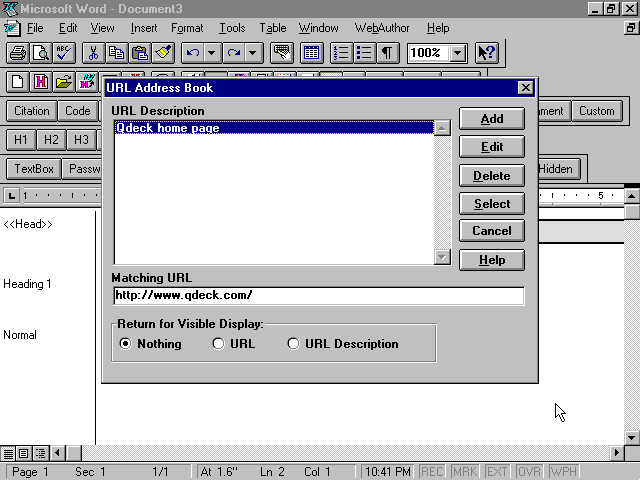
WebAuthor also allows you to keep frequently accessed URLs in a central
location. When you're creating a Remote jump, simply click the Address
Book button in the Anchor Manager dialog box. The Address Book is a simple
list of commonly accessed URLs that you enter yourself (see
fig. 29.8). In the URL Address Book dialog box, use the Add,
Edit, and Delete buttons to manipulate
the entries. Find the entry you want to use, and click the Select
button.
Using the Address Book is a handy way to not have to type in commonly
accessed URLs.
WebAuthor lets you put in graphics with your hypertext links. After
you type in all the information for the link, click the Next
button in the Anchor Manager dialog box. Doing so lets you modify the display
properties of the hypertext link you're creating (see
fig. 29.9). By default, the Type of Display is set
to Text Only, which means you're creating a regular text
link.
You can control what type of link you'll create by using the Display Properties dialog box.
To create a graphics-only link, click the Image Only
radio button, and you are presented with the Image Properties fields. Click
the Choose Image Properties button to specify the attributes
of the graphic you want to use (see fig. 29.10).
You'll notice that this is simply a modified New Graphic Image dialog box.
Fill in the fields for the graphical link as you would for inserting a
regular graphic. You can determine how big a border you want around the
image by typing a value into the Border Size field.
You can specify various attributes about the graphic you want to use as a link.
The Enable Image Mapping field toggles the creation of the ISMAP attribute for the graphic (see chapter 12). It does not, however, help you create the imagemap definition file or create a client-side imagemap.
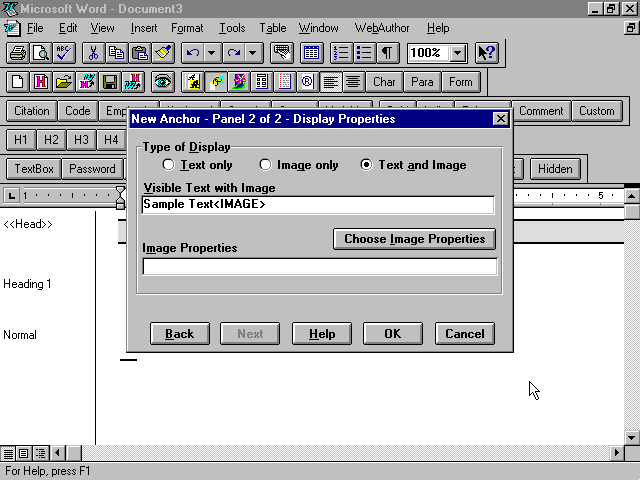
To create a text and graphics link, click the Text and
Image radio button in the Anchor Manager dialog box. Fill in the image
attributes as you would for an image-only link. Notice that the text in
the Visible Text with Image field now has <IMAGE> at the
end of it. This string is basically a placeholder for where the graphic
will appear in relation to the text of the link. So if you want your graphic
on the left of the text, move the <IMAGE> string to appear
before the text of the link. You can even move the <IMAGE>
string somewhere in the middle of the text of the link.
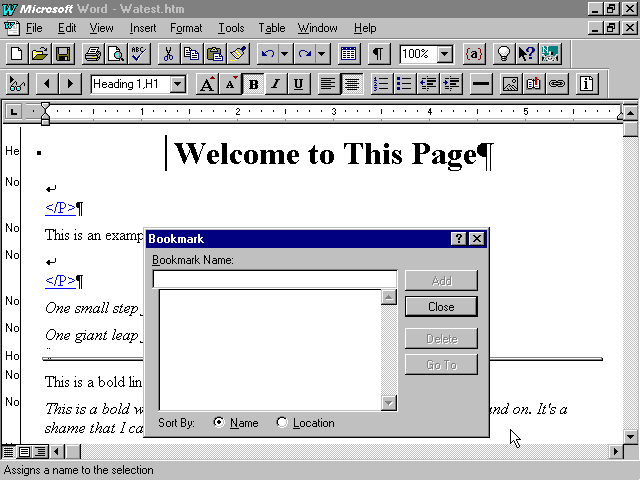
One nice feature of HTML links is that you can have them jump to other
points in your documents. These links are typically known as internal
links because they are internal to the current HTML document. To create
such a link, you need to define a destination point somewhere in the document.
You can define a destination point with WebAuthor by specifying a Destination
anchor type in the Anchor Manager dialog box. Type in a name you want to
assign to the current cursor position in the Name of this
Anchor, and click the OK button.
You can go directly to that destination point by choosing to create
an Internal jump class. You can also jump directly to that point from another
Web page. All you have to do is specify the URL for the current document
and add # followed by the name of the destination. This capability
is useful if you have a Web page on your site that has a list of services
(see fig. 29.11). Just create destinations
for each definition, and put in links to the appropriate destination. Jumps
to an internal point put the line of that destination at the top of the
browser.
Internal jumps are also useful for very long pages. You can simply have the top part of your page list the contents on your Web page. Each entry can have a link that makes an internal jump somewhere further down the Web page.
Internal destination points are useful for putting all your services
in one Web page.
The Jump and Destination anchor type lets you combine the capability
for something to be a reference point and refer to something else. With
this anchor type, you can make URLs be reference points. When another person's
Web page refers to your destination point, the user will see the link you've
created. You'll want to use this feature when you're creating links to
other Net resources in the middle of your Web page. Because the line with
the link is at the top of the browser, you can put some text before the
link. This text will allow you to explain either what the link points to,
or why you're pointing to it.
For the most part, WebAuthor treats HTML text the same way as Word does,
as individual characters. The only major difference is that WebAuthor treats
links as entire objects. That means that if you want to change the visible
text of the link, you can't simply change it using WebAuthor. To modify
an existing link, select the link and open the Anchor Manager dialog box.
Notice that all the fields that have been specified are already filled
in. Simply modify any of the link's attributes to suit your taste. If you
want to change the visible text, go to the Display Properties dialog box
for the link, and edit the text. To change the graphic of a link, change
the path of the image to be used.
You can also use WebAuthor to create sophisticated HTML elements, such
as tables and forms. These HTML tags can create interesting and useful
effects for your Web page. You can use tables to display a great deal of
information in an ordered fashion (see chapter 13).
Forms are useful for creating Web pages that are accessible via password
only or for getting user feedback (see chapter 21).
These HTML elements are also very easy to create using WebAuthor's new
toolbars and menus.
One of the few Word menus that hasn't changed when in WebAuthor view
is the Table menu. This menu still behaves as it does with Word in any
of its default modes. You can easily create a table at the current cursor
location by choosing Table, Insert. You
then are prompted with Word's own Table Creation dialog box. Specify how
many rows and columns you want as well as the size of the width of the
columns. Next, type in the values for each cell of the table.
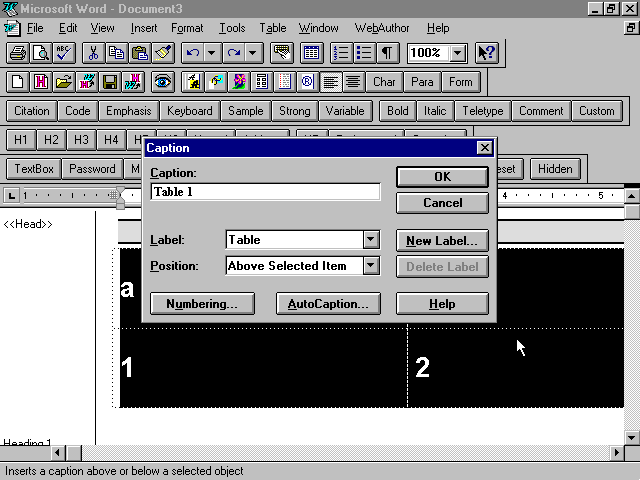
You can add a caption to the table by selecting the table to which you
want to add a caption. Then choose Table, Caption,
and you are presented with Word's Caption dialog box. Simply type in the
name of the caption you want to assign to that table under the Caption
heading (see fig. 29.12). The Position drop-down list.
You can add all sorts of captions by using Word's own dialog box.
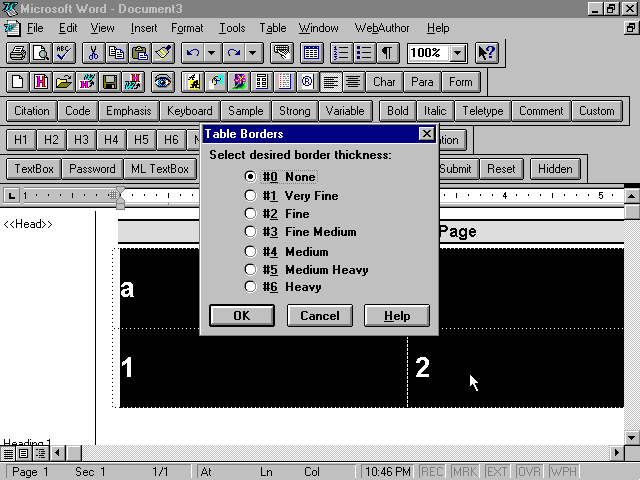
You can change the borders of the table by choosing the Table
menu heading, followed by the Border menu item. The Table
Borders dialog box then appears, with the default value set to None (see
fig. 29.13). To change the border thickness, simply click the appropriate
value you want. When you're finished, click the OK button.
You can control the thickness of the border for your tables.
If you have an existing set of values that you want to put into a table,
choose Table, Convert Text to Table.
You are prompted for the number of rows and columns to create, as well
as how to interpret the text.
One of the more difficult tasks in working with HTML is the creation
of forms. WebAuthor simplifies this task by giving you the Forms toolbar,
which you can access by clicking the Form button on the main WebAuthor
toolbar. You can access the dialog box version of the toolbar by clicking
on the Form Manager button. You can also access the dialog box by choosing
Insert, Form.
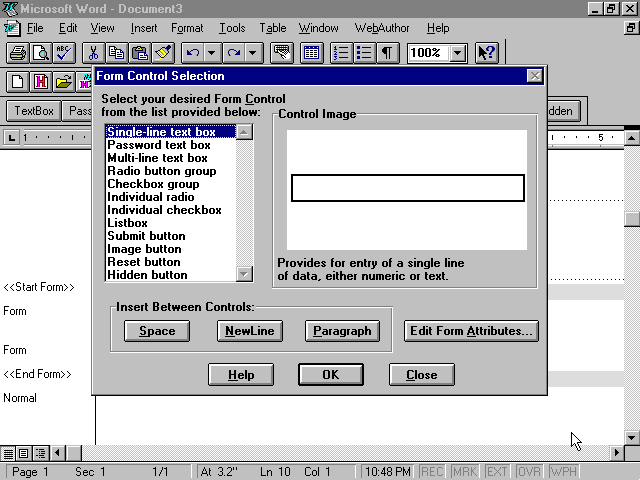
To create a text-based form, follow these steps:
See Chapter 22, "Form Layout and Design,"
for more information about CGI scripts.
You can choose to create a wide assortment of forms.
Radio buttons and checkboxes are more complicated to create than regular
text fields, because text fields simply take input from the user and relay
it to the CGI script. radio buttons and checkboxes require a definite set
of items to be created and names for each entry. As a result, you have
more work to do and more things to keep track of. Here, too, WebAuthor
simplifies the work of writing out the HTML code.
After you select the radio button or checkbox group that you want to create, you are presented with the New CheckBox Button Group dialog box (see fig. 29.15).
You have to enter several variables when creating new button and checkbox groups.
To create a new radio button or checkbox group, follow these steps:
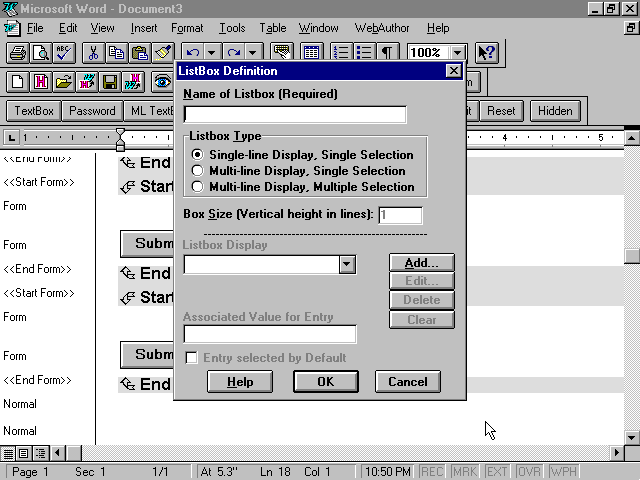
Creating a listbox is similar to creating a checkbox or radio button
group. The only real difference is the dialog box; see the ListBox Definition
dialog box in figure 29.16. You also don't
have nearly as many fields to fill in as with the radio button group.
The ListBox Definition dialog box is similar to the radio button
and checkbox dialog box.
To create a listbox, follow these steps:
You can actually configure two different aspects of WebAuthor. You can change the regular WebAuthor options, which apply only when you're in WebAuthor itself. You also can change the WebAuthor conversion options, which you use only when you're trying to load in HTML or RTF files.
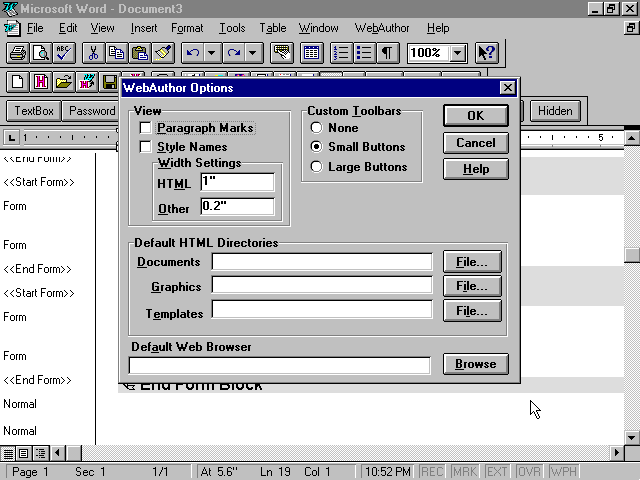
You can access the WebAuthor program options by choosing Tools,
WebAuthor Options. Because WebAuthor is an add-on module
to Word for Windows, it doesn't have many options of its own; see the WebAuthor
Options dialog box shown in figure 29.17.
You can control the general display of Word while in WebAuthor view by
using the View options. The Width Settings specify how
much of a left-hand margin is given to show the HTML style names. By default,
WebAuthor sets the margin width to 1 inch so that all style names are visible.
WebAuthor doesn't have many of its own configurable options because it runs on top of Word.
The Custom Toolbar options control the size of WebAuthor's
toolbars. Choosing None actually gets rid of the toolbars that WebAuthor
comes with. You use the Default HTML Directories section to specify where
you keep HTML-related documents. WebAuthor uses the directory specified
by the Documents field under the File Locations tab of Word's configurable
options, by default.
Under the Default Web Browser field, you can specify
the browser you want to start up whenever you have WebAuthor build a new
HTML document.
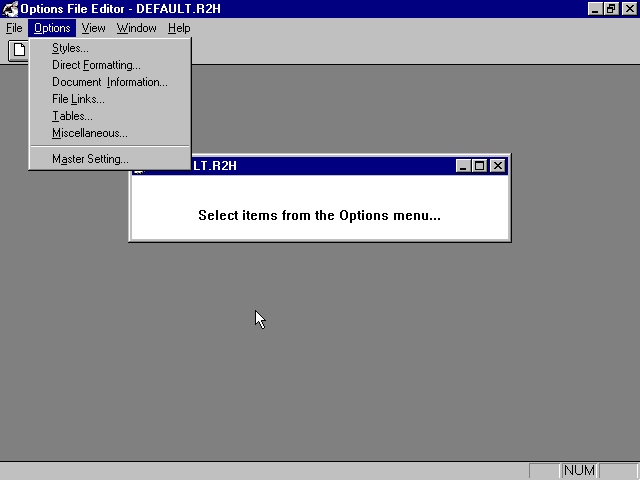
The bulk of the configurable options for WebAuthor comes with its conversion
facility. You can change these options by choosing Tools,
Conversion Options. Doing so actually launches another
application to let you change the conversion behavior of WebAuthor. Of
the available menus, the one that you'll want to use is the Options
menu (see fig. 29.18).
WebAuthor's conversion behavior is controlled by this drop-down menu.
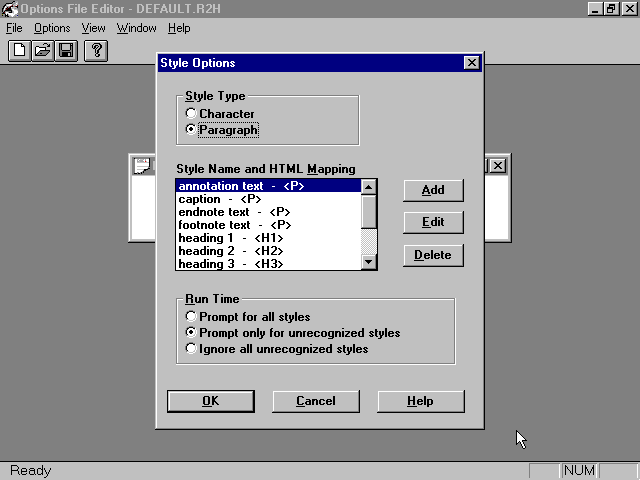
By default, WebAuthor comes with a predefined set of conversion rules
defining how Word attributes should be converted into HTML styles. You
can add or remove conversion rules by choosing Options,
Styles. The Style Options dialog box then appears (see
fig. 29.19). This dialog box shows all the currently defined rules.
You can alter the list of rules by using the Add, Edit,
and Delete buttons.
The Style Options dialog box lets you decide what HTML tags will
be assigned to what Word styles.
Similarly, you can configure the way text with certain fonts gets converted
into HTML by using the Direct Formatting item under the
You can also specify whether some information in Word is exported to
the HTML file. You control whether this information gets exported by using
the Document Information menu item.
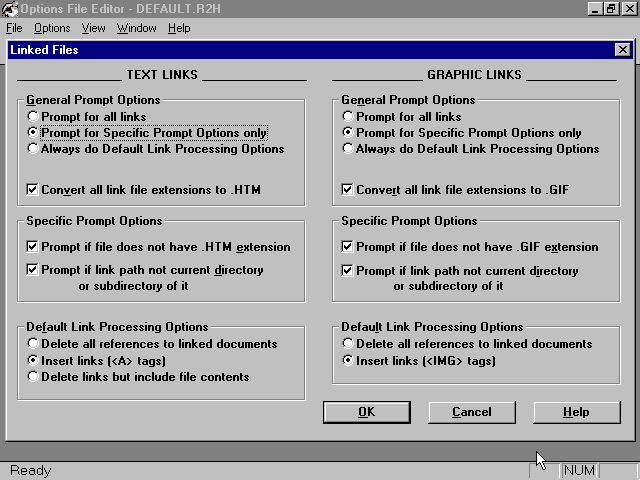
The File Links menu item lets you decide when WebAuthor
will prompt you for file information. You can also configure how WebAuthor
processes default links, both for text and graphics, with the Linked Files
dialog box (see fig. 29.20).
The Linked Files dialog box lets you determine how often WebAuthor prompts you for link formation.
Because of the way tables can be created in WebAuthor, they have their
own menu item under the Options menu heading. The Tables
menu option lets you decide what type of HTML output to create, either
Netscape or formatted with <PRE>. You can also define what fonts
and their attributes are to be used for both table headings and cells.
The Options
menu lets you configure, as you might have guessed, a hodgepodge of options.
You can determine whether WebAuthor provides Netscape support or HTML Level
2 support. You can also decide when bidirectional links should be created
between footnotes, endnotes, and others.


|


