


Previous chapters have covered all the separate elements needed to program applets. In this chapter we bring these concepts together. We first cover general applet design and then construct two practical applets.
Although applets can be programmed by trial and error, putting some effort into design ahead of time can save headaches later in the programming process.
You wouldn’t build a house without a floor plan, so why jump into building an applet? Designing any program is not a trivial task, but if you take some time to figure out the major foundations of your applet, the coding will be much smoother.
There are many facets to program design. What do you want your program to do? Who is the program being written for? This chapter assumes that you’ve already answered these fundamental questions and are ready to code your applet. We’ll concentrate on two very important aspects of applet design: user interface and class design.
Almost all applets involve some sort of visual interaction with the user. It is important to structure the interface near the beginning of the design process because changing the user interface later can be difficult. User interface (UI) is the subject of many books, and there are as many approaches to user interface as there are modern religions. For the sake of simplicity, we’ve tried to keep the applets in this section functional. When your are designing your UI, always keep functionality mind. Some other major areas to consider are layout, grouping, and user interaction.
Choosing the wrong layout on a container can make the job of laying out the user interface painful. Different layouts have different strengths:
The judicious use of containers is extremely important in applet programming. If there is a logical distinction between user interface components, group them in a container. Remember, there are no restrictions on the number of elements and layouts you use in your applet. Grouping similar elements together and nesting layouts might be the most effective way to achieve the UI you want. It can also make moving or modifying elements later much more manageable.
Any applet, no matter how big or small, should react logically to a user’s actions. For instance, if the applet’s main function is to play sound, clicking the mouse button should probably toggle the sound on and off. Always try to anticipate ways users will want to interact with your applet. Try to make your applets consistent with industry standards so users are not surprised by idiosyncratic quirks in the UI.
Because Java is an object-oriented environment, it’s natural to split a program up into classes. Once you start to break applets down into different classes, however, you add to an applets complexity. Because a majority of applets are reasonably simple, most applets need only one class.
Class design is a sensitive subject. Class design is a near-religious issue among many object-oriented programmers. The subject can be broken into two camps:
There is no right or wrong answer to class design. The correct answer is probably somewhere in between the extremes. If a project is large or may contain large components that could be reused in later projects, try to break it up into its natural class structure. If it will just be a small one-time applet, it probably makes more sense to keep things simple.
In this chapter, we concentrate on two working applets. Each concentrates on a different important aspect of programming applets:
At the end of Chapter 22 we developed a sample user interface for an algebraic calculator. Luckily, creating prototypes like this is often quite fruitful. With some minor modifications, we can use that prototype code as the interface of a working applet. Listing 24.1 shows the code we start with.
import java.awt.*;

import java.applet.Applet;

public class Calculator extends Applet {

    Label display;

    Panel bottom;

    Panel num_panel;

    Panel func_panel;

    Button number[] = new Button[10];

    Button function[] = new Button[6];

    public void init() {

      setLayout(new BorderLayout());

      display = new Label(“0”, Label.RIGHT);

      add(“North”, display);

      bottom = new Panel();

      bottom.setLayout(new BorderLayout());

      num_panel = new Panel();

      num_panel.setLayout(new GridLayout(4,3));

      for (int x=9; x>=0; x--) {

        number[x] = new Button((new String()).valueOf(x));

        num_panel.add(number[x]);

      }

      function[4] = new Button(“.”);

      num_panel.add(function[4]);

      function[5] = new Button(“=”);

      num_panel.add(function[5]);

      bottom.add(“Center”, num_panel);

      func_panel = new Panel();

      func_panel.setLayout(new GridLayout(4,1));

      function[0] = new Button(“+”);

      function[1] = new Button(“-”);

      function[2] = new Button(“*”);

      function[3] = new Button(“/”);

      for (int x=0; x<4; x++)

        func_panel.add(function[x]);

      bottom.add(“East”, func_panel);

      add(“Center”, bottom);

    }

}
The final version of the calculator should appear similar to the one shown in Figure 24.1. It contains three main panels that are added to the applet:
The construction of the basic user interface was discussed in Chapter 22.
Early prototype of Calculator keyboard. (Note incorrect key order.)
Listing 24.2 shows the modified code we are going to use for the final version.
import java.awt.*;

import java.applet.Applet;

public class Calculator extends Applet {

    Label display;

    Panel bottom;

    Panel num_panel;

    Panel func_panel;

    Button number[] = new Button[10];

    Button function[] = new Button[6];

    public void init() {

      setLayout(new BorderLayout());

      display = new Label(“0”, Label.RIGHT);

      add(“North”, display);

      bottom = new Panel();

      bottom.setLayout(new BorderLayout());

      num_panel = new Panel();

      num_panel.setLayout(new GridLayout(4,3));

      for (int i=7; i>0;i = i - 3)

        for (int j=0; j<3; j++) {

          number[i+j] = new Button((new String()).valueOf(i+j));

          num_panel.add(number[i+j]);

        }

      number[0] = new Button((new String()).valueOf(0));

      num_panel.add(number[0]);

      function[4] = new Button(“.”);

      num_panel.add(function[4]);

      function[5] = new Button(“=”);

      num_panel.add(function[5]);

      bottom.add(“Center”, num_panel);

      func_panel = new Panel();

      func_panel.setLayout(new GridLayout(4,1));

      function[0] = new Button(“+”);

      function[1] = new Button(“-”);

      function[2] = new Button(“*”);

      function[3] = new Button(“/”);

      for (int x=0; x<4; x++)

        func_panel.add(function[x]);

      bottom.add(“East”, func_panel);

      add(“Center”, bottom);

    }

  }
The basic code is essentially the same. There is, however, one section of code that is different and a bit tricky:
for (int i=7; i>0;i = i - 3)

  for (int j=0; j<3; j++) {

    number[i+j] = new Button((new String()).valueOf(i+j));

    num_panel.add(number[i+j]);

  }
In the Chapter 22 version, the keyboard (although functional) looks a bit odd (refer to Figure 24.1): the keys don’t look like a normal calculator (see Figure 24.2).
This is a result of how GridLayout adds components to the container: left-to-right, top-to-bottom. When the buttons are added, they need to be added in the sequence 7›8›9›4›5›6›1›2›3. That’s exactly what the nested for loop does. Our prototyping in Chapter 22 paid off with code that is usable for the calculator with only a slight modification.
The finalized Calculator applet.
In order to keep things simple, only one class is used in the Calculator applet: the applet itself. If the applet were going to be extended greatly and pieces of it were going to be pulled out and used in other projects (say for a scientific calculator or a numeric keypad in another application), it would make sense to break it up into classes. This could be accomplished relatively easily, because there are concrete elements that could be pulled out, such as Display and Numeric Keypad. In fact, this is exactly what happens in the ColorPicker example.
In order to perform calculations with our calculator, the current number is stored in thedisplay Label and converted when necessary. But the calculator also needs to retain its state in order to remember the last number entered and the last function called. Thus, the following variables are added to the Calculator class:
float last_num = 0;

  char last_func = ‘ ‘;
These come into play when any function key on the calculator is pressed. For example, if we wanted to add 2 and 3, we would press the 2 button, the + button, the 3 button, and finally the = button. By the time the = is pressed, there needs to be a way to find out what the first argument is (the second is stored in the label) and the function that needs to be processed.
Because there will be no additional classes in the program, a method is needed to handle all the events caused by the user pressing different buttons. Luckily, this is provided. Whenever a button is pressed, an ACTION event is generated and the action() method of the panel that contains it is called. If it’s not handled in the component, the event is passed up to the container that holds the component. Thus, all we need is an action() event handler:
public boolean action(Event evt, Object what) {
The only events that need to be handled are button clicks. Everything else can be ignored. What we need is a simple way to filter out everything that is not a button. Luckily, Java includes run-time time checking:
if (evt.target instanceof Button) {
At this point, the applet knows that a button has been clicked. Which button? The simplest way is to just get the label of the button, which has purposely been made only one character, and perform a switch() on it:
char but_val = ((Button) evt.target).getLabel().charAt(0);

switch (but_val) {
The typecast, although bothersome, is necessary because the target of the event can be any object. A specific method of class button [getLabel()] needs to be called, however. This returns a String, on which in turn charAt(0) is called, which gives the character desired.
First, check to see if a function button was pressed:
case ‘+’:

case ‘*’:

case ‘-’:

case ‘/’:     last_num = Float.valueOf(display.getText()).floatValue();

        last_func = but_val;

        display.setText(“”);

        break;
Because this is an algebraic calculator, no functions are performed until the user presses the “equal” key. This means we need a way to keep track of the last number selected and the function to be performed. This is accomplished with the assigning of last_num and last_func.
The last_num assignment may look a bit strange. However, all that’s happening is that the text of the label (a String) is converted into a Float, and then that Float is converted into the float base data type. Remember that Float and float are not the same.
When the equal key is pressed, things get a bit more complicated:
case ‘=’:  float curr_num = 0;

        float result = 0;

        curr_num = Float.valueOf(display.getText()).floatValue();

        if (last_func != ‘ ‘) {

          switch (last_func) {

            case ‘+’:  result = last_num + curr_num;

                    break;

            case ‘*’:  result = last_num * curr_num;

                    break;

            case ‘-’:  result = last_num - curr_num;

                    break;

            case ‘/’:  result = last_num / curr_num;

                    break;

        }

        last_num = result;

          display.setText(String.valueOf(result));

      }

      break;
First, the current number is stored as a floating-point number. Then, if a function key was pressed, perform that function on the current and last numbers and set the display to the result.By default last_func is a space, so if equal is pressed before a function is pressed, nothing happens.
Finally, when a number is pressed, it is appended to the current label, unless the label has the default “0” in it, in which case the display is set to the number just pressed. Finally, True is returned because a button was pressed. If a button was not pressed (evt.target wasn’t an instance of Button) return False.
        default:  if (display.getText() == “0”)

                display.setText(“”);

                display.setText(display.getText() + but_val);

      }

      return true;

    }

    return false;

  }
That’s it. There is a surprising amount of functionality for such a small amount of code. This illustrates an important point about the Abstract Window Toolkit (discussed in Chapter 22) and Java in general: It is tempting to try and handle everything yourself when programming, but looking at the framework and figuring out how things work together pay off in the end. For example, coming from programming on a different platform it would be easy to miss the action() handler and to end up using handleEvent() for everything. Using handleEvent() would make the calculator much more difficult to write.
Listing 24.3 shows the final code for the Calculator.
import java.awt.*;

import java.applet.Applet;

public class Calculator extends Applet {

  Label display;

  float last_num = 0;

  char last_func = ‘ ‘;

  Panel bottom;

  Panel num_panel;

  Panel func_panel;

  Button number[] = new Button[10];

  Button function[] = new Button[6];

  public boolean action(Event evt, Object what) {

    if (evt.target instanceof Button) {

      char but_val = ((Button) evt.target).getLabel().charAt(0);

      switch (but_val) {

        case ‘+’:

        case ‘*’:

        case ‘-’:

        case ‘/’:  last_num = Float.valueOf(display.getText()).floatValue();

                last_func = but_val;

                display.setText(“”);

                break;

        case ‘=’:  float curr_num = 0;

                float result = 0;

                curr_num = Float.valueOf(display.getText()).floatValue();

                if (last_func != ‘ ‘) {

                  switch (last_func) {

                    case ‘+’:  result = last_num + curr_num;

                            break;

                    case ‘*’:  result = last_num * curr_num;

                            break;

                    case ‘-’:  result = last_num - curr_num;

                            break;

                    case ‘/’:  result = last_num / curr_num;

                            break;

                }

                last_num = result;

                display.setText(String.valueOf(result));

              }

              break;

        default:  if (display.getText() == “0”)

                display.setText(“”);

                display.setText(display.getText() + but_val);

      }

      return true;

    }

    return false;

  }

  public void init() {

    setLayout(new BorderLayout());

    display = new Label(“0”, Label.RIGHT);

    add(“North”, display);

    bottom = new Panel();

    bottom.setLayout(new BorderLayout());

    num_panel = new Panel();

    num_panel.setLayout(new GridLayout(4,3));

    for (int i=7; i>0;i = i - 3)

      for (int j=0; j<3; j++) {

        number[i+j] = new Button((new String()).valueOf(i+j));

        num_panel.add(number[i+j]);

      }

    number[0] = new Button((new String()).valueOf(0));

    num_panel.add(number[0]);

    function[4] = new Button(“.”);

    num_panel.add(function[4]);

    function[5] = new Button(“=”);

    num_panel.add(function[5]);

    bottom.add(“Center”, num_panel);

    func_panel = new Panel();

    func_panel.setLayout(new GridLayout(4,1));

    function[0] = new Button(“+”);

    function[1] = new Button(“-”);

    function[2] = new Button(“*”);

    function[3] = new Button(“/”);

    for (int x=0; x<4; x++)

      func_panel.add(function[x]);

    bottom.add(“East”, func_panel);

    add(“Center”, bottom);

  }

}
Finally, here is the HTML applet tag for the calculator:
<applet code=”Calculator.class” width=135 height=140>
Although the standard colors (Color.black, Color.red, and so on) are fine for basic applets, it would be great to be able to see how different RGB colors are represented. ColorPicker is an interactive applet that enables you to do this. Figure 24.3 shows the user interface of the ColorPicker.
Unlike the Calculator, the ColorPicker is broken up into many different classes. This complicates the programming slightly but does fit much more closely into the object-oriented paradigm.
The ColorPicker has two main panels:
The user interface of the ColorPicker.
The color selector panel in turn holds three RGB choosers, one for Red, Green, and Blue. In addition, a label is added at the bottom to display the hex representation of the current color, which is used directly in browsers (to set the background color or bgcolor, for example).
Each RGB selector in turn contains a scrollbar and a text field that interact with one another to give a graphical and textual readout of the current value. In this way each color component selector can be thought of as one component that holds the current value, with two interfaces to allows changes: text entry and sliding the scrollbar.
A BorderLayout is used throughout the applet, except in the placing of the RGB choosers, where a 3¥1 GridLayout would be more natural.
Whereas the calculator is contained in one class, the ColorPicker contains a class for each of the containers listed in the “User Interface” section.
The ColorPicker is the class that represents the applet itself, although here it is little more than a launch point for the other objects that make up the applet:
public class ColorPicker extends Applet {

  ColorPanel out;

  ColorSelector select;

  public void init() {

    setLayout(new BorderLayout() );

    out = new ColorPanel();

    select = new ColorSelector(out,255,204,102);

    add(“West”, select);

    add(“Center”, out);

  }

}
All that is really happening here is the layout is defined and an instance of a ColorPanel and ColorSelector (see the following classes) are created. Note that a handle to the ColorPanel, out, is passed to the ColorSelector, which allows the objects to communicate back and forth directly.
The ColorPanel is the representation of the current color. Luckily, the AWT provides a class that visually does the job perfectly: Panel. The only other significant aspect to the class is that it needs to have a method to change the color:
class ColorPanel extends Panel {

  void change(Color new_c) {

    setBackground(new_c);

    repaint();

  }

}
This, aside from some cosmetic considerations later, is the entire ColorPanel class.
The ColorSelector constitutes the entire input portion of the applet. Although the bulk of the actual interface coding lies lower in the hierarchy (in the RGBChooser class). It needs to contain three RGBChoosers, a Label for the HTML (hex) representation of the current color, and finally a reference to the ColorPanel to allow it to change its color:
class ColorSelector extends Panel {

  ColorPanel controller;

  Label html;

  RGBChooser red, green, blue;

  ColorSelector(ColorPanel myController, int r, int g, int b) {

    super();

    controller = myController;

    setLayout(new BorderLayout());

    Panel controls = new Panel();

    controls.setLayout(new GridLayout(3,1));

    red = new RGBChooser(this, r, “Red”);

    controls.add(red);

    green = new RGBChooser(this, g, “Green”);

    controls.add(green);

    blue = new RGBChooser(this, b,”Blue”);

    controls.add(blue);

    add(“Center”, controls);

    html = new Label(“#000000”);

    html.setBackground(Color.gray);

    add(“South”, html);

    colorChange();

  }

}
The bulk of this code is pretty straightforward. Notice that a reference to the instance of the ColorSelector class is passed down to each RGBChooser, along with their default value and a text label to identify them. Also, the HTML label is constructed using a dummy string to ensure that the layout manager doesn’t resize it to be too small to hold the requisite color information.
However, the colorChange() method seems a bit strange. The need for it arises from the need for the ColorChoose to be notified that the color has changed from three separate places. If either the red, green, or blue component change, the whole color changes, which must be reflected in the new color. The applet could be designed to require the user to press an “update” button when they want to see the color they have chosen, but it would be much more satisfying that whenever an RGB component is changed the color panel changes automatically. And that is exactly what is done.
void colorChange() {

      Color new_c = getColor();

      int col[] = new int[3];

      StringBuffer text;

      text = new StringBuffer(“”);

      col[0] = new_c.getRed();

      col[1] = new_c.getGreen();

      col[2] = new_c.getBlue();

      for(int i=0;i<3;i++) {

          if (col[i] < 16)

              text.append(‘0’);

          text.append(Integer.toString(col[i],16));

      }

      controller.change(new_c);

      html.setText(“#” + text.toString());

}
First a call to getColor() is made. Although this could be placed inline in the colorChange() method, it makes more sense to abstract it out as a method of its own because it represents an essential state of the class that would be of use were it to be used in other programs:
Color getColor() {

  return new Color(red.value(), green.value(), blue.value());

}
The bulk of the rest of the code in colorChange() pertains to massaging the color into the HTML representation: a six-digit number representing the color in three hex pairs. The current color is broken down into red, green, and blue through the respective methods in the Color package. Then, each is converted to a hex string representation (prefixing a ‘0’ if necessary). Finally, the ColorPanel and HTML label are updated to reflect the change.
The three RGBChooser objects are the only way in which the user can interact with the ColorPicker applet. Thus, they should be as flexible as possible while keeping their function as obvious as possible.
Each object needs to continually hold the state of one piece of information: an integer value between 0 and 255. It is natural to be able to type the number in, so a TextField is an obvious component to add. However, a linear way to change the number by sliding the mouse would make it possible to quickly inspect a wide variety of colors. A Scrollbar would do this job nicely. Let’s take a first crack at the class definition:
class RGBChooser extends Panel {

  ColorSelector controller;

  Scrollbar colorScroll;

  TextField colorField;

  int c_value;

  RGBChooser(ColorSelector myController, int initial, String caption) {

    super();

    controller = myController;

    setLayout(new BorderLayout());

    colorField = new TextField();

    colorScroll = new Scrollbar(Scrollbar.VERTICAL, initial, 0, 0, 255);

    set_value(initial);

    add(“East”, colorScroll);

    Panel temp_panel = new Panel();

    temp_panel.setLayout(new GridLayout(3,1));

    Label label1 = new Label(caption);

    temp.add(label1);

    temp.add(colorField);

    add(“Center”, temp_panel);

  }

}
First, we set up a handle to the ColorSelector that contains the RGBChooser. This allows the RGBChooser to inform the ColorSelector when the value of the component has changed.
Next, we set up the TextField and ScrollBar. Unfortunately for this application, a scrollbar is at its minimum value when at the top of its area and maximum at the bottom. Thus, there needs to be conversion from scrollbar values to actual values (when the scrollbar is 0 the desired value is 255 since the scrollbar is at the top of its allowable area, for example).
Much like the ColorPanel, it would be nice to have an interface to the state of the object, so we will add both a method to change its value and to return it:
int value() {

  return c_value;

}

void set_value(int initial) {

  c_value = initial;

}
All that’s left in the class is the handling of events. Because the Calculator used ACTION events, we will purposely use raw event handling here to show a different way to do things. Doing your own raw event handling is fine, but remember that you are responsible for dispatching events if they are not handled by the overridden handleEvent.
Here’s the event handler:
public boolean handleEvent(Event evt) {

  Integer in;

  if (evt.target == colorScroll) {

    in = (Integer) evt.arg;

    colorField.setText(String.valueOf(255-in.intValue()));

    set_value(255 - in.intValue());

    controller.colorChange();

    return true;

  } else if (evt.target == colorField) {

    String tmp;

    tmp = (String) evt.arg;

    in = Integer.valueOf(tmp);

    set_value(in.intValue());

    colorScroll.setValue(-1 * (in.intValue() - 255));

    controller.colorChange();

    return true;

  } else {

    return super.handleEvent(evt);

  }

}
First, if the scrollbar has been moved, get its current value (which is passed along in the event as its argument), and then set the value of the RGBChooser to that value (remembering to change from scrollbar values).
Second, if the user has changed the value of the colorField, its value is converted to an integer and then the RGBChooser is set to that value.
In either case, if the user updates the scrollbar, the text field is altered as well, and vice versa. This helps to avoid a discrepancy between the different types of input. With the data in sync, the ColorSelector is notified and the color is updated.
Finally, if the event was not handled, call the default event handler. This insures that if new code is added later everything will work at planned (calls to action(), mouseUp(), and so on).
Believe it or not, the applet is now finished. By deriving classes from the components and adding behavior as we went down the class hierarchy, all the needed functionality has been added. This reflects one of the wonderful things about object-oriented programming: If the design is proper to the project at hand at the beginning of the project, and each component does its job correctly, a working program falls out at the end.
Listing 24.4 shows the finished working applet.
import java.awt.*;

import java.applet.Applet;

import java.lang.Integer;

public class ColorPicker extends Applet {

  ColorPanel out;

  ColorSelector select;

  public void init() {

    setLayout(new BorderLayout() );

    out = new ColorPanel();

    select = new ColorSelector(out,255,204,102);

    add(“West”, select);

    add(“Center”, out);

  }

}

class ColorPanel extends Panel {

    void change(Color new_c) {

    setBackground(new_c);

    repaint();

  }

}

class ColorSelector extends Panel {

  ColorPanel controller;

  Label html;

  RGBChooser red, green, blue;

  ColorSelector(ColorPanel myController, int r, int g, int b) {

    super();

    controller = myController;

    setLayout(new BorderLayout());

    Panel controls = new Panel();

    controls.setLayout(new GridLayout(3,1));

    red = new RGBChooser(this, r, “Red”);

    controls.add(red);

    green = new RGBChooser(this, g, “Green”);

    controls.add(green);

    blue = new RGBChooser(this, b, “Blue”);

    controls.add(blue);

    add(“Center”, controls);

    html = new Label(“#000000”);

    html.setBackground(Color.gray);

    add(“South”, html);

    colorChange();

  }

  void colorChange() {

    Color new_c = getColor();

    int col[] = new int[3];

    StringBuffer text;

    text = new StringBuffer(“”);

    col[0] = new_c.getRed();

    col[1] = new_c.getGreen();

    col[2] = new_c.getBlue();

    for(int i=0;i<3;i++) {

      if (col[i] < 16)

      text.append(‘0’);

      text.append(Integer.toString(col[i],16));

    }

    controller.change(new_c);

    html.setText(“#” + text.toString());

  }

  Color getColor() {

    return new Color(red.value(), green.value(), blue.value());

  }

}

class RGBChooser extends Panel {

  ColorSelector controller;

  Scrollbar colorScroll;

  TextField colorField;

  int c_value;

  RGBChooser(ColorSelector myController, int initial, String caption) {

    super();

    controller = myController;

    setLayout(new BorderLayout());

    colorField = new TextField(String.valueOf(initial));

    colorScroll = new Scrollbar(Scrollbar.VERTICAL, 255-initial, 0, 0, 255);

    set_value(initial);

    add(“East”, colorScroll);

    Panel temp_panel = new Panel();

    temp_panel.setLayout(new GridLayout(3,1));

    Label label1 = new Label(caption);

    temp_panel.add(label1);

    temp_panel.add(colorField);

    add(“Center”, temp_panel);

  }

  public boolean handleEvent(Event evt) {

    Integer in;

    if (evt.target == colorScroll) {

      in = (Integer) evt.arg;

      colorField.setText(String.valueOf(255-in.intValue()));

      set_value(255 - in.intValue());

      controller.colorChange();

      return true;

    } else if (evt.target == colorField) {

      String tmp;

      tmp = (String) evt.arg;

      in = Integer.valueOf(tmp);

      set_value(in.intValue());

      colorScroll.setValue(-1 * (in.intValue() - 255));

      controller.colorChange();

      return true;

    } else {

      return super.handleEvent(evt);

    }

  }

  int value() {

    return c_value;

  }

  void set_value(int initial) {

    c_value = initial;

  }

}
Here is the HTML applet tag for the ColorPicker:
<applet code=”ColorPicker.class” width=400 height=300 alt=”Color Picker”>

</applet>
The possibilities for applets are wide open. The ability to seamlessly deliver applications over a network to widely different operating system and computer types is a grand opportunity that will surely be exploited in many unforeseen ways. However, even with the potential Java represents, there are a few general considerations and future developments that should be kept in mind when developing applets.
Upon learning Java it is easy to envision large applets that could replace many of the functions of current programs. However, it is important to keep in mind the main limitation involved with Java applets: bandwidth. Currently, whenever an applet is run it must be downloaded from the network. Although this isn’t a problem for smaller applets, imagine using a a 14.4 modem and trying to run an applet that is several megabytes.
Many early applets suffer from a lack of user interaction. Audio players that drone on incessantly and animations that cannot be stopped that use large amounts of CPU time are just two examples of this problem. If you don’t want large amounts of negative user feedback, spend some time up from thinking about issues like this.
Finally, Sun and Netscape have announced that there will be hooks from the JavaScript scripting language (available in Netscape Navigator and many more products soon) into Java to allow JavaScript to control applets as disparate objects. This could quite likely spur a move in applet development to program small reusable components made to be scripted rather than run by themselves. JavaScript is explored in detail in Part IX, “JavaScript.”
We’ve covered a lot of ground in this chapter. We’ve looked at interface design, class design, and other applet programming issues. Nothing compares to experience when it comes to any kind of programming. Working on your own applets and learning through trial and error often provides invaluable experience. We’ve tried, however, to give you some examples of issues that will arise when you start programming your own applets. As your applets grow in complexity, you will likely encounter your own unique problems. The lesson to be learned here is that a time investment in planning pays off. Hopefully, keeping these basic design tenets in mind will enable you to create a variety of applets that can serve you and other users well. A little preplanning and forethought can save you time and frustration, and help you create innovative new applets.
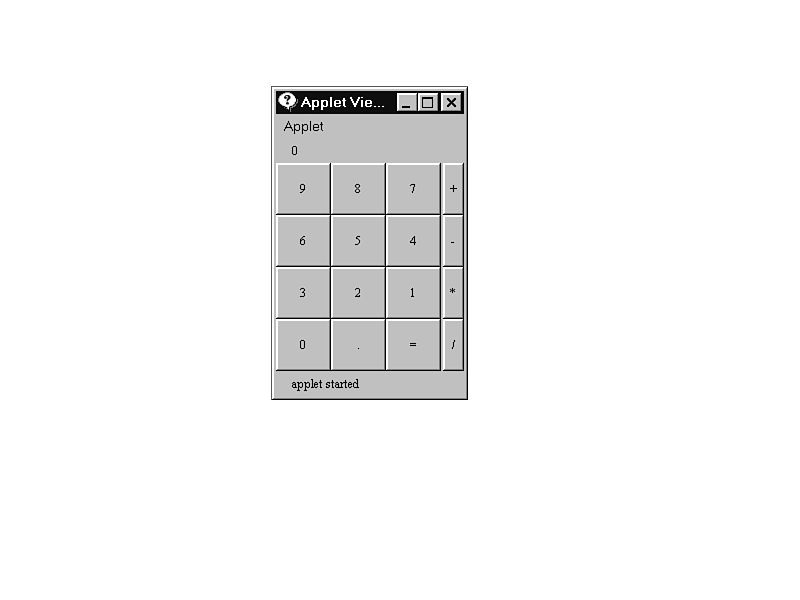 FIGURE 24.1.
  FIGURE 24.2.
 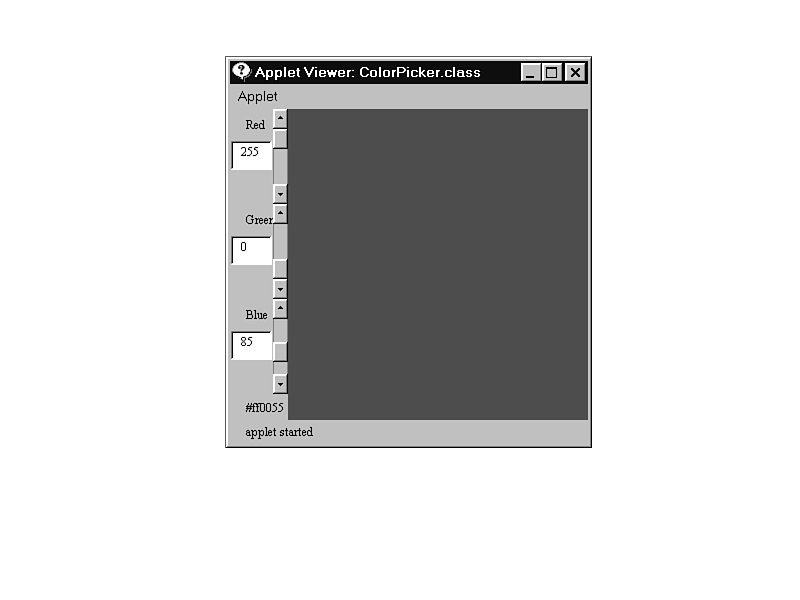 FIGURE 24.3.