 retrieval system without
prior written permission of the publisher except in the case of brief quotations
embodied in critical articles and reviews. Making copies of any part of
this book for any purpose other than your own personal use is a violation
of United States copyright laws. For information, address Que Corporation,
201 West 103rd Street, Indianapolis, IN 46290 or at support@mcp.com.
retrieval system without
prior written permission of the publisher except in the case of brief quotations
embodied in critical articles and reviews. Making copies of any part of
this book for any purpose other than your own personal use is a violation
of United States copyright laws. For information, address Que Corporation,
201 West 103rd Street, Indianapolis, IN 46290 or at support@mcp.com.
Notice: This material is excerpted from Special Edition Using HTML, 2nd Edition, ISBN: 0-7897-0758-6. This material has not yet been through the final proof reading stage that it will pass through before being published in printed form. Some errors may exist here that will be corrected before the book is published. This material is provided "as is" without any warranty of any kind.
Internet Assistant is an add-on HTML editor for the popular word processor
Word for Windows. Designed by Microsoft, it supports many features of the
main program. It offers an easy-to-access HTML editor for people familiar
with Word's interface. It also provides a new view for Word documents,
the Web Browse View.
In this chapter, you learn:
Web Browse View Internet Assistant is currently available in two versions 1.0z and 2.0z.
Both are directly available for download from Microsoft's home page (http://www.microsoft.com).
Version 1.0 is the first release of Internet Assistant that has some useful
HTML functionality. The 2.0 version adds much more functionality and more
HTML tags support.
The first limitation of Internet Assistant 1.0 is that it works only
on the English, German, and French versions of Word for Windows 6.0a and
6.0c. All other versions of Word do not work properly with version 1.0
of Internet Assistant. I do not want to imply that the first version is
limited in scope; it's still a useful product. The only noticeable limitation
that veteran Web authors may notice is that it supports only HTML Level
2. Netscapes and Microsoft's extensions, as well as HTML Level 3, are not
supported.
Like any good product, Internet Assistant 2.0 is an improvement on its
predecessor. This new version provides support for commonly used extensions,
Microsoft's Internet Explorer's extensions, as well as strict HTML Level
2 support. Internet Explorer is Microsoft's own Web browser, along with
supporting many extensions to HTML Level 2, it defines its own. This version
runs only on Word for Windows 95 and Word for NT in English, Italian, German,
and French.
Installing Internet Assistant on your computer is very easy. Just point
your favorite browser to http://www.microsoft.com/msoffice/freestuf/msword/download/ia/ia95/default.htm.
This site gives a brief overview of Internet Assistant, and lets you download
it. Internet Assistant requires 4 megabytes of disk space and Word for
Windows 95. After you download the self-extracting executable, simply double-click
it. You are then prompted with Microsoft's installation program, which
basically lets you choose whether or not to install Internet Assistant.
Internet Assistant is a seemless integration of providing HTML support
for an exceptional word processor. You don't need to be in a distinct view,
as with other add-ons, to use the HTML functionality. This capability makes
for a better overall application because it doesn't get in the way of restricting
your work. Word with Internet Assistant does have a new view, HTML Source,
but you don't need to be in this view to work with HTML documents. You
simply start up Word, and you can create your home page, if you want. If
you don't, you won't notice a difference because Internet Assistant is
so transparent. Internet Assistant basically just adds a Web browser to
Word and a new file format in which you can save your documents.
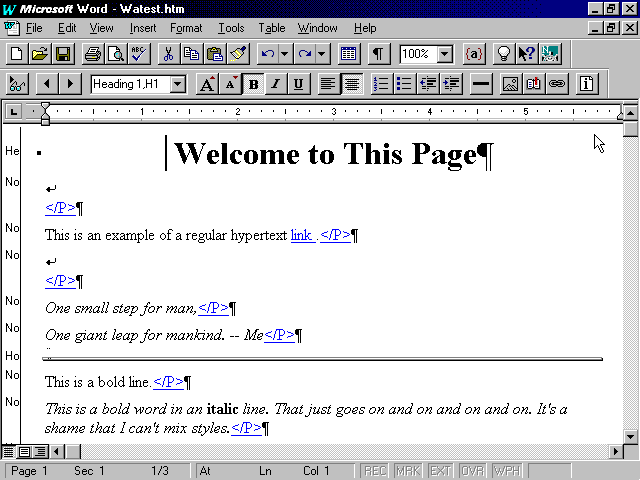
Word works in distinct "views," in that some options are only
available in a particular view. One of the new views that Internet Assistant
gives you is the HTML View. What HTML View offers you is better and easier
access to the HTML tools of Internet Assistant. The HTML view merely adds
or modifies toolbars and changes the menus (see
fig. 28.1). You can only get into this mode by loading in an HTML file
with Word. The toolbars in this view give you shortcuts to the most commonly
accessed HTML features. A few things you can do only in HTML view, such
as give the title of your home page, but by and large, most of the things
you can do in HTML view can be done outside of it as well.
Internet Assistant's HTML view offers a small, new toolbar.
Because Internet Assistant isn't always in use with Word, you manage
text through Word. That is, you use Word like you always do-same keystrokes,
same performance, same everything. There is no difference between the way
Internet Assistant deals with text and the way Word deals with text. The
only problem comes when you're dealing with links of any sort. Whenever
you select a link, the whole link becomes highlighted, and you can't easily
modify it.
Even in HTML view mode, the text manipulation is the same as using Word
by itself. You will notice, however, that you don't have font size control,
but that's because HTML doesn't recognize fonts and point sizes. You can
change the font size by using the Increase Font Size and Decrease Font
size buttons.
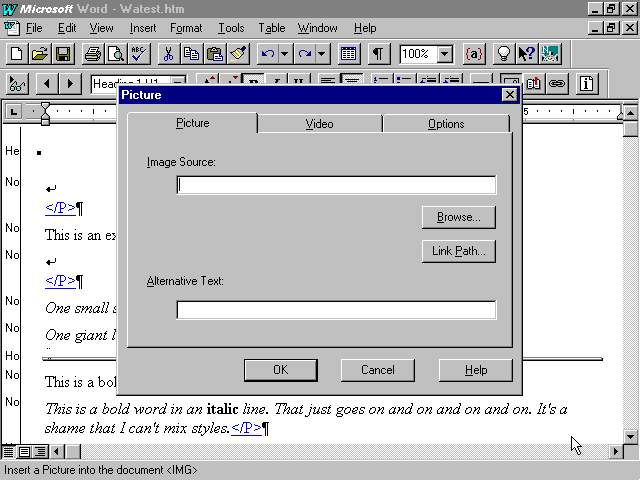
You can easily weave any GIF or JPEG file into your home page by using
Internet Assistant. Simply choose Insert, Picture. If you're not in HTML
view, you are then presented with Word's file selector dialog box. Simply
locate the graphic you want to insert, and Internet Assistant makes sure
that it becomes part of the HTML document. If you're in HTML view, however,
you are presented with Internet Assistant's Picture dialog box (see
fig. 28.2).
If you want to add any sort of graphic to your home page, you'll have to use this dialog box.
In the Image Source field, type the complete path to
the graphic you want to use. In the Alternative Text field,
type some sort of descriptive text for the picture. You can specify how
the text around the image should be aligned by clicking the Options
tab and using the Alignment with Text drop-down list.
If you know the height and width of the image, enter these specifications
into the Height and Width fields.If you
want to scale an image to a particular resolution, you can also use these
fields. The Web browser will automatically scale the image to your specified
size.
See Chapter 10, "Adding Graphics to Your Home Page," for information on what scaling an image will do.
If you're not sure about the exact path to the image, use the Browse button. Clicking this button opens
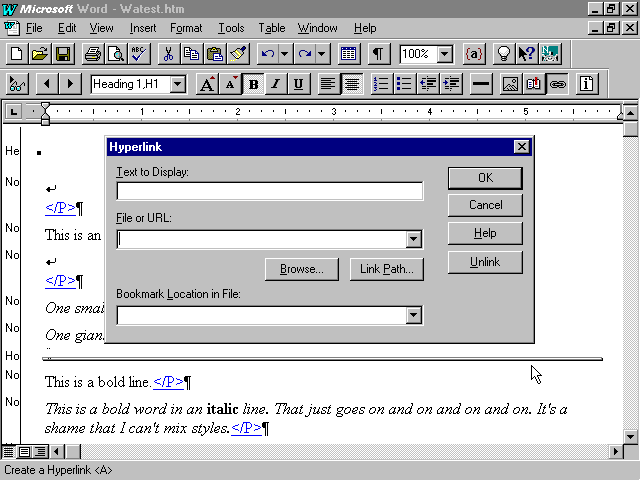
While you're designing your home page, you may need to put in a link.
You can easily do so by choosing Insert, Hyperlink.
The Hyperlink dialog box pops up (see fig. 28.3),
and if you've highlighted some text, it appears in the Text
to Display field. If you didn't highlight anything, that field will be
empty, and you can put in whatever visible text you want. In the File
or URL field, type the name of the URL or the absolute path for the local
file. If you're in the HTML view, you can easily access the Hyperlink dialog
box by clicking the Hyperlink button.
The Hyperlink dialog box gives you an easy interface to create a link.
Because the Hyperlink dialog box has no provision for creating a link associated to an image, what do you do? You simply can't create a new graphical link with Internet Assistant; you must have a graphic in place first. After you have a graphic, you can create the link.
To create a graphical link, follow these steps:
Display field is disabled, for obvious
reasons. Similarly, if you want to create a text and graphic link, put the graphic where you want in relation to the text. Next, highlight both the text and the graphic that you want to make into a link. Finally, open the Hyperlink dialog box to specify the URL to which you want to point.
For most HTML editors that try to show you what the home page will look like beforehand, links are always tricky for programmers. You can't treat them as individual HTML tags, to give the user flexibility to change the visible text. You must treat the links as an entire entity all its own and give some means of altering it. The same is true with Internet Assistant.
To alter a hyperlink, simply select the link, and open the Hyperlink dialog box again. The values for the particular fields will already be filled in, so simply change them to suit your needs.
To remove a hyperlink associated with some text, simply highlight the
text, open the Hyperlink dialog box, and click the Unlink
button.
As with any other good HTML editor, internal links and the ability to
jump to them are supported. An internal link is one in which a certain
location in an HTML document is specified as a destination point. This
destination must have a specific name attached to it so that URLs can refer
to it. Other Web pages can jump into that specific point if you specify
the URL for the Web page and append a # and then the destination
name. When jumped to, the line where the destination is specified is displayed
at the top of the browser. With Internet Assistant, Word's bookmarking
feature is the main point of working with internal jumps.
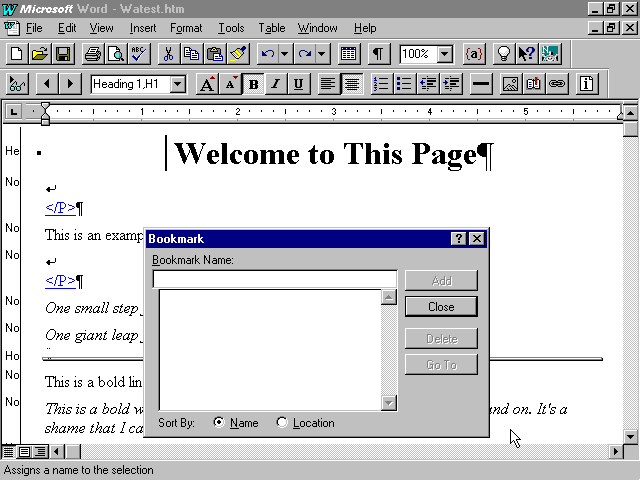
You can easily create a destination by putting your cursor where you
want the destination to be. Next, choose Edit, Bookmark,
or if you're in HTML view, click the Bookmark icon. The Bookmark dialog
box then appears with a list of existing bookmarks (see
fig. 28.4). Under the Bookmark Name text box, type
the name you want to give the internal link, and then click the Add
button.
Use Word's bookmarking features to help you create internal jumps.
If you want to remove a bookmark, simply open the Bookmark dialog box,
select the bookmark to be removed, and click the Delete
button.
The bookmarks created by Word are invisible. If you're not sure where a bookmark goes, open the Bookmark dialog box, select the bookmark, and click the
Go To button.
After a while, you'll have defined a few bookmarks that you want to
get to. Internet Assistant only lets you jump to a destination point within
the same Web page. You can do this with the help of Word's built-in bookmark
facility. When you want to create an internal jump, open the Hyperlink
dialog box. Next, use the Bookmark Location File drop-down
list to select the destination point you want.
Internet Assistant also offers good support for the more advanced HTML
tags. You can easily create forms, tables, and lists by using the menus
or toolbars. You don't have to be in HTML view to create tables, lists,
or forms. Some of the more advanced features of forms are available only
in HTML view. But considering that you'll probably have saved your HTML
document by this point, this isn't too unreasonable. (If you haven't, then
save your file as an HTML file, and get into HTML view.)
You go about creating tables in Internet Assistant the same way you
do in Word. Put your cursor somewhere in the document, and choose Table,
able, Convert Text to Table.
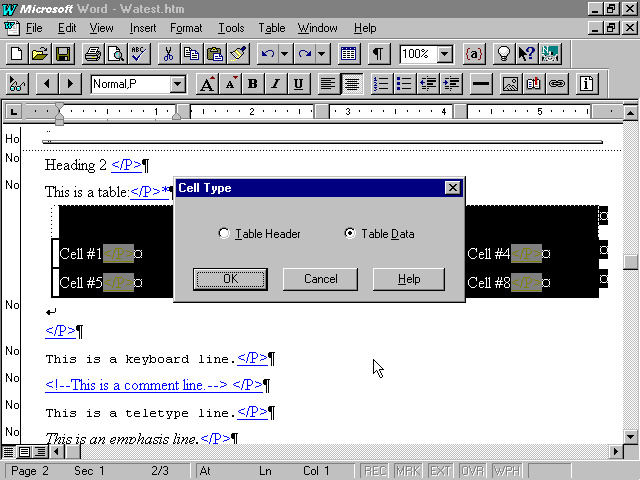
You can specify which cells are the table headings and which ones are
the data cells. Simply highlight the cells for which you want to define
the attributes, and choose Table, Cell Type.
The Cell Type dialog box then appears (see fig.
28.5). You can also add a caption to the table by highlighting the
table, selecting the Table menu heading, and then choosing
the Caption menu item. Simply type in the text you want
to appear as the caption of the table. You can also specify where you want
the caption to appear by clicking on the appropriate button.
Internet Assistant lets you define which cells are headings and which are data.
You can create forms only when you're in HTML view, and you can get
in that view only by loading in an HTML file. You can't load in a Word
document and simply go into HTML view. To create some common forms quickly,
bring in the Form toolbar (see fig. 28.6).
This is done by selecting the View menu heading, followed
by the Toolbars menu item. You'll be presented with a
dialog box which lists the available toolbars. Simply click on the "Forms"
entry. With this toolbar, unlike other HTML editors, you can't create a
group of check boxes. The icons on the toolbar create only one button,
check box, text form, whatever.
The Form toolbar lets you quickly create common form fields.
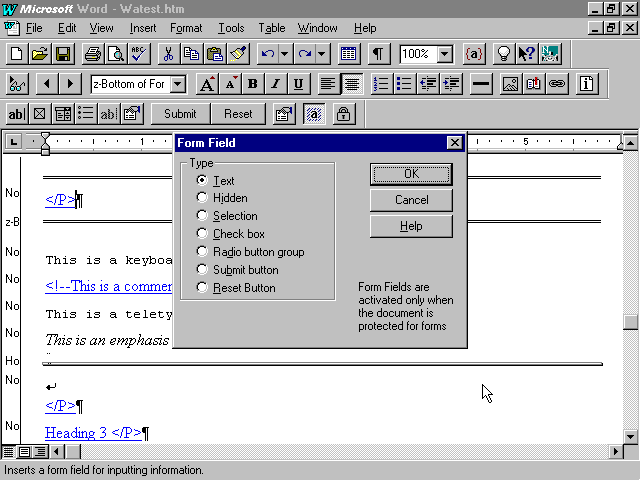
You can create a form control field by putting your cursor where you
want the control field to appear. Then click on the button on the Forms
toolbar, that represents the form control field you want to create. If
you don't want to use the toolbar, just choose Insert,
Form Field. The Form Field dialog box then appears (see
fig. 28.7).
You can use this dialog box, instead of the Form toolbar, to create forms.
Depending on the type of form control field you want to create, you
are prompted for different information. Check boxes are available by clicking
on the Check Box Form Field button, second from the left on the Forms toolbar.
This will bring up a dialog box, where you are prompted for the Name
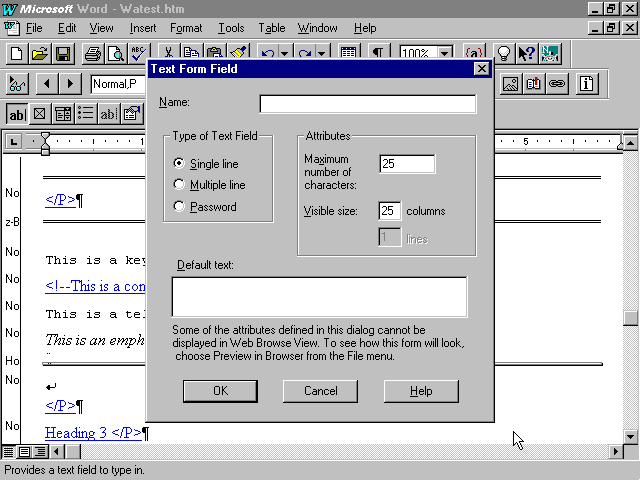
and Value of the new item you want to create. By clicking
on the leftmost button in on the Forms toolbar, you'll be creating a text
control field. Another dialog box will show up (see
fig. 28.8) and you are prompted for the name of the form as well as
attributes for it. If you want to create more control fields of any sort,
put your cursor where you want the control to go, between the start and
end form regions. Next, simply click on the button that represents the
form field you want to create.
You have to specify the names and attributes for each text form field you want to make.
List boxes are a bit more difficult to create than other forms because each entry in the list box must have a name and a value. Unlike the other forms, these entries must all be known when you're creating the list. You can't create a list box piecemeal, as you can with button and check box forms.
To create a list box, follow these steps:
To remove entries from the list box, select the item you want deleted
and click the Remove button. To move entries up and down,
first select the entry you want moved. Next, click the up or down arrow,
depending on where you want that entry to go. When you click on the Advanced
button, the dialog box is extended somewhat. The dialog will now have some
more options that allow you to create a list box that accepts multiple
entries, as well as defining a default entry (see
fig. 28.9). You can similarly create a group of radio buttons by using
the Radio Button Form Field icon.
The Advanced button extends the Selection Form Field dialog box to
let you do more sophisticated things.
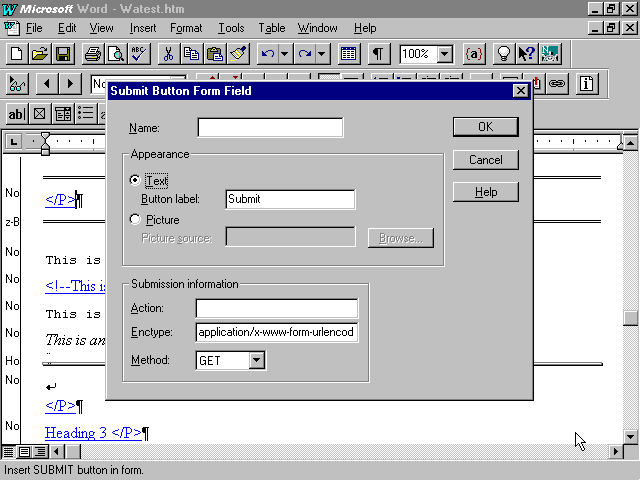
Finally, you may want to have some CGI program that can interpret the
interaction with the forms. Typically, only the Submit button actually
needs to access a CGI script. When you click the Submit icon on the Internet
Assistant toolbar, the Submit Button Form Field dialog box appears (see
fig. 28.10). Type the name you want to assign the Submit button in
the Name field. In the Action field, type the name of
the URL for the CGI script, and then click the OK button.
The only time you can define a CGI script for the Submit button is when you first create it.
Internet Assistant almost makes creating bulleted and numbered lists
easy. For bulleted lists, you can click on the Bulleted Lists icon and
create a new entry. Type the text for that line of the bulleted list, and
then press Enter. After you finish the list, just press the Enter key one
last time. Now click on the button you used to create the list to begin
with. If you clicked on the Bulleted List icon to create the list, click
on it again to stop the list. Similarly, just click on the Numbered List
icon to stop the numbered list you're creating. If the toolbar isn't available,
you can choose Format, Bullets to do
the same procedure.
Numbered lists are just as easy to create. You can use either the Numbered
List icon, or you can choose Format, Numbering.
As soon as you select either one, 1. appears on the line with
the cursor. Type whatever text you want for that particular line, and press
Enter. The numbering continues until you move the cursor off the line.
If you already have a list of items, you can easily convert it into either list type. Simply highlight the list of items you want to convert, and select the type of list you want. The entries are automatically bulleted or numbered, depending on which option you pick.
As with many other HTML editors trying to be distinctive, Internet Assistant
has some unique features, right? Sort of. One special Internet Assistant
feature is its extensive support for Microsoft's extensions to HTML. Unfortunately,
enough other HTML editors already provide support for these extensions.
Sadly, some of them do it better than Internet Assistant does.
One of Microsoft's extensions to HTML is the Marquee element. This element
allows the Web author to create a window with scrolling text. This text
can scroll either left to right, or vice versa, and is supported at the
browser level. That means that you don't have to write any CGI scripts
to accomplish this feat.
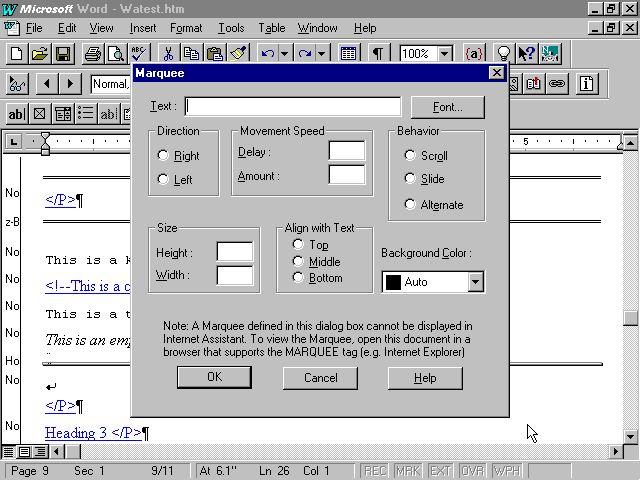
You can insert a marquee at the current line by choosing Insert,
Marquee. The Marquee dialog box then appears (see
fig. 28.11). In the Text field, type the string you want to have scroll
across the screen, and select the direction you want. The Movement Speed
and Delay fields both control the speed at which the marquee
scrolls by. The Amount field indicates how many pixels
you want the marquee to shift each time it's redrawn. The smaller the Amount
value, the smoother the text will move across the screen.
The Marquee dialog box lets you set various attributes for the marquee element.
The Behavior radio buttons dictate how the marquee text moves. If none
is specified, the Scroll behavior is used. This behavior
has the text starting completely off the marquee. The text then moves across
the marquee, and then completely off the marquee itself. The ernate behavior
works by having the text start in the marquee and then scroll across to
one side. After the text reaches this location, it scrolls back to the
other side.
The size of the marquee itself is defined by the value in the Size field.
The Height and Color drop-down
list.
You can easily specify the background sound for the current home page
with Internet Assistant. Choose Format, Background
Sound. The Background Sound dialog box then appears (see
fig. 28.12). Type the full path to the sound file in the wse button. Enter the number of times
you want the sound to be played back in the Playback loop
field. To get the sound to play an infinite amount of time, press the down
arrow as soon as the dialog box shows up.
Microsoft's extensions to HTML let you have a sound play in the background
when your page is accessed.
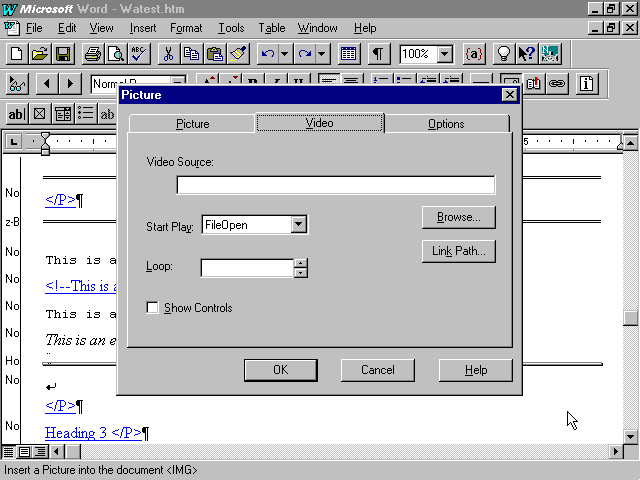
The Microsoft HTML extensions also provide for more multimedia file
support. Most browsers support the GIF and JPEG graphic file formats, but
Microsoft's HTML extensions allow for more file formats. You can insert
a multimedia file the same way you insert an inline image. The only difference
is that you should select the Video tab in the Picture dialog box (see
fig. 28.13).
See the earlier section, "Adding Graphics," on how to bring up the Picture dialog box.
Inside the Video Source field of the Video tab, enter
the full path for the Video for Windows AVI file you want to play. If you
don't know the path, you can click the Browse button to
find it. The Start Play drop-down list indicates when
the browser should start the AVI file. You can specify how often the multimedia
file is played back in the Loop field. If you press the down arrow as soon
as this dialog box shows up, you can have the file played an infinite number
of times. If you enable the Show Controls option, the
browser lets the user control the multimedia playback with a set of buttons.
The Video tab of the Picture dialog box lets you put multimedia files
into your home page.
Perhaps the most impressive feature of Internet Assistant is the Web
Browse view. This view basically turns Word into a simple World Wide Web
browser. You can go into the Web Browse view by clicking the Switch to
Web Browse icon ![]() .
The Web Browse view presents you with two new toolbars to help you navigate
through the Web (see fig. 28.14).
.
The Web Browse view presents you with two new toolbars to help you navigate
through the Web (see fig. 28.14).
The Web Browse view gives you a small number of controls to help you
get around the Web using Word.
You can also access the Web Browse view by opening up a URL. Just click on the
File menu heading, followed by the Open URL menu item.
The left and right arrow icons on the toolbar move you forward and back
through the list of URLs visited. When you click the URL button, you are
prompted for a URL. After you enter a URL, the Web Browse view tries to
open it up for display, just like a regular Web browser. The History button
shows a list of previously visited links and lets you jump back to a selected
one.
The toolbar even provides support for a collection of your frequently
visited links. Simply click the Add Favorite button to put the current
URL in that list. The Open Favorite button shows you your current list
of frequently visited sites. The Home, Stop, and Reload buttons behave
as they would in any other Web browser.


|

