 Java Gets Out of Its Box

We have seen in previous chapters that the applet sandbox is (at least in theory) a very safe place to run a program. However, one persons's "safe" is another person's "boring". To create effective client/server applications using Java often requires us to give the applet some freedom from the security of the sandbox.
The Java security model is built around the concept of a protection domain . The applet sandbox is a protection domain with very tight controls. By contrast the Java application environment is a protection domain with no controls at all, other than those imposed by the underlying operating system. What we are looking for is a protection domain that lies somewhere between the two.
As we have discussed, JDK 1.1 offers signed applets as a way to escape from the sandbox restrictions. Signed applets provide the mechanism for the protection domain we describe above.
 JAR Files and Applet Signing
One characteristic of the dynamic loading of class files is that a typical applet may involve a number of small network transfers. It may also involve the retrieval of other files, graphic images for example. Given the indifferent performance of many World Wide Web connections, this can be a serious performance hit. JDK 1.1 provides relief for this by introducing the JAR (Java Archive) format for packing everything into a single file. JAR also allows for compression, which can further improve performance.
JDK 1.1 provides the jar command line tool for creating and managing JAR files. If you know the UNIX tar command, jar will be very familiar. As an example, the following command will create an archive for the PointlessButton applet:
jar -cvf pbutton.jar PointlessButton.jar JamJar\examples\Button.jar
See The pbutton Archive shows the format of the pbutton.jar file that this creates
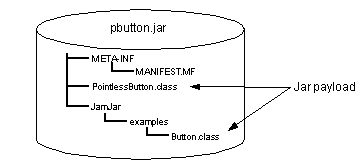
The pbutton Archive
The files that make up the payload of the JAR are packed into a copy of the original directory structure. The MANIFEST.MF file contains details of the "payload" of the JAR. This is what the manifest looks like in this case:
SHA-Digest: Sj15dptWhrZhiIFRNU27WRY1brc=
MD5-Digest: vB0/XzCeLLiykR///CBfUQ==
Name: JamJar/Examples/Button.class
SHA-Digest: Fo6pYkn6ZR17eessxEiN7fK5xpE=
MD5-Digest: Hzs6oj85/blmcTW1fNQm4Q==
The digest values recorded in the manifest are calculated from the contents of the payload files they refer to. They are used to validate the payload files when they are unpacked.
Jar signing allows you to generate digital signatures for any of the files in the archive. In fact, files can be signed by more than one signer. So, for example, an applet could be signed by the developer who created it and then also signed by the IT department of the company who use it. When the user loads the applet, he or she not only knows that the applet comes from a trustworthy source, but also knows that it has been approved for corporate use.
When you sign the files in a JAR, two new files are added to the META-INF directory:
Signer file This is very like the manifest file shown above, except that the digests in it are calculated from the manifest file entries, not from the actual contents of the payload files. The signer file may contain fewer entries than in the manifest file, because a signer does not have to sign every file in the archive. The file name is <signer ID>.SF, where <signer ID> is an arbitrary name for the creator of the signature. If the JAR has been signed by more than one signer, each will have a separate .SF file.
Digital signature file This is a binary file, containing the digital signature in PKCS7 format. 1 The signature file name depends on the type of signature algorithm used. For example, a DSA signature would be in a file named <signer ID>.DSA (other possibilities are .RSA, for a signature using an MD5 digest and RSA encryption and . PGP for a Pretty Good Privacy signature).
Current Implementations
The JAR format is quite new and at the time of writing there are some discrepancies between the way that different vendors have interpreted the signature part of the standard. There are also different philosophies in the way that signed JARs are used to elicit extra permissions from the client. In the Sun case, the browser is configured in advance to allow a signed applet to do certain things that are normally forbidden by the security manager. In the Netscape case the applet has to ask for the specific permissions it wants, using a special API. Microsoft has taken yet another approach, not using JARs at all.
Let's look at some examples of the different implementations.
JavaSoft Signed JAR Example
JDK 1.1 provides the javakey and jar commands for managing databases of public keys and for creating, signing and manipulating JAR archives. In this section we show how to use the commands to create three key databases:
We then use these keys to sign a JAR file containing an applet that attempts to read a file on the browser system.
In the following sections we show the command dialog as it appears on a Windows NT system, using bold type for commands and normal type for the system and command responses, like this:
Creating the Certificate Authority Key Database
The certificate authority is a principal in its own key database, with a self-signed certificate. We create it as follows:
- The first thing to do is to create a new key database. The key database is created implicitly when you add the first principal to it:
D:\work\sun_signed_jar> javakey -cs "JamJar CA" true
Created identity [Signer]JamJar CA[identitydb.obj][trusted]
This creates key database itentitydb.obj in your home directory.
D:\work\sun_signed_jar> javakey -gk "JamJar CA" DSA 1024
Generated DSA keys for JamJar CA (strength: 1024).
This can take a while to do. We ran it on a 75 MHz 486 machine and the command ran for 2 min 40 sec (the time is related to the key size). You can use the list option of javakey to check the results so far:
D:\work\sun_signed_jar> javakey -ld
Scope: sun.security.IdentityDatabase, source file: C:\users\default\identitydb.obj
[Signer]JamJar CA[identitydb.obj][trusted]
public and private keys initialized
No further information available.
- The key pair allows the CA to sign certificates, but we also need to generate a certificate for the CA itself, so that others can accept the CA's signatures. The first thing to do is to create a certificate information file, containing the distinguished name information for the CA and the certificate issuer. In this case, the certificate is self-signed, so the issuer and the subject are the same:
subject.real.name=Project JamJar Certificate Authority
We save this file as certinfo.jamjar.
D:\work\sun_signed_jar> javakey -gc certinfo.jamjar
Generated certificate from directive file certinfo.jamjar.
D:\work\sun_signed_jar> javakey -ld
Scope: sun.security.IdentityDatabase, source file: C:\users\default\identitydb.o
[Signer]JamJar CA[identitydb.obj][trusted]
public and private keys initialized
certificate 1 for : CN=Project JamJar Certificate Authority, OU=ISL,O=IBM, C=UK
from : CN=Project JamJar Certificate Authority, OU=ISL,O=IBM, C=UK
Creating the Server Key Database
Now we want to create a key database for our server:
- If we go ahead and use javakey to create the principal for the server, it will add it to the CA database. So first we must choose to use a different key database, by setting the identity.database directive in the main security properties file. (<JDK_root>\lib\security\java.security, where <JDK_root> is the directory where JDK 1.1 was installed). We added the following line:
identity.database=D:/work/sun_signed_jar/serverdb.obj
- The server has to know about the CA that signed its own certificate, so first we add the CA principal to the key database and import the CA certificate:
D:\work\sun_signed_jar> javakey -cs "JamJar CA" true
Created identity [Signer]JamJar CA[D:/work/sun_signed_jar/serverdb.obj][trusted]
D:\work\sun_signed_jar> javakey -ic "JamJar CA" cert.jamjar
Imported certificate from cert.jamjar for JamJar CA.
D:\work\sun_signed_jar> javakey -ld
Scope: sun.security.IdentityDatabase, source file: D:/work/sun_signed_jar/server
[Signer]JamJar CA[D:/work/sun_signed_jar/serverdb.obj][trusted]
certificate 1 for : CN=Project JamJar Certificate Authority, OU=ISL,O=IBM, C=UK
from : CN=Project JamJar Certificate Authority, OU=ISL,O=IBM, C=UK
Notice that in this case the list command shows a key database with no keys in it, just a public key certificate (this is slightly misleading, because the certificate contains the public key; the display should really say that there are no key pairs).
D:\work\sun_signed_jar> javakey -cs "Robusta"
Created identity [Signer]Robusta[D:/work/sun_signed_jar/serverdb.obj][not trusted]
D:\work\sun_signed_jar> javakey -gk "Robusta" DSA 512
Generated DSA keys for Robusta (strength: 512).
- Next we want to use the CA key pair to sign the server's public key. First we export the public key to a file:
D:\work\sun_signed_jar> javakey -ek Robusta pubkey.robusta
Public key exported to pubkey.robusta.
- We need to import this key into the CA's key database. To do this we comment out the identity.database entry that we added to java.security (above), create the server's principal in the CA database and import the public key:
D:\work\sun_signed_jar> javakey -cs "Robusta"
Created identity [Signer]Robusta[D:/work/sun_signed_jar/serverdb.obj][not trusted]
D:\work\sun_signed_jar> javakey -ik Robusta pubkey.robusta
Set public key from pubkey.robusta for Robusta.
- Now we can sign the server's certificate. The process is the same as for the CA certificate. First we create the certificate information file:
subject.real.name=All Java is secure but signed Java is Robusta
D:\work\sun_signed_jar> javakey -gc certinfo.robusta
Generated certificate from directive file certinfo.robusta.
- To use the certificate, we have to import it into the server's key database, which means that we first have to find out the number assigned to the certificate in the CA database and export the certificate to a file:
D:\work\sun_signed_jar> javakey -li Robusta
[Signer]Robusta[identitydb.obj][not trusted]
certificate 1 for : CN=All Java is secure but signed Java is Robusta
from : CN=Project JamJar Certificate Authority, OU=ISL,O=IBM, C=UK
D:\work\sun_signed_jar> javakey -ec Robusta 1 cert.robusta
Certificate 1 exported to cert.robusta.
- Finally, we switch the active key database back to the server (by restoring the identity.database entry in java.security) and then import the certificate:
D:\work\sun_signed_jar> javakey -ic Robusta cert.robusta
Imported certificate from cert.robusta for Robusta.
D:\work\sun_signed_jar> javakey -ld
Scope: sun.security.IdentityDatabase, source file: D:/work/sun_signed_jar/serverdb.obj
[Signer]JamJar CA[D:/work/sun_signed_jar/serverdb.obj][trusted]
certificate 1 for : CN=Project JamJar Certificate Authority, OU=ISL,O=IBM, C=UK
from : CN=Project JamJar Certificate Authority, OU=ISL,O=IBM, C=UK
No further information available.
[Signer]Robusta[D:/work/sun_signed_jar/serverdb.obj][not trusted]
public and private keys initialized
certificate 1 for : CN=All Java is secure but signed Java is Robusta OU=ISL, O=IBM, C=UK
from : CN=Project JamJar Certificate Authority, OU=ISL,O=IBM, C=UK
Creating and Signing a JAR File
To illustrate the use of the key databases we have a simple Java applet that attempts to perform an action normally prohibited by the sandbox; it reads a local file and displays the contents on screen. We need to package this in a JAR archive and then sign it.
D:\work\sun_signed_jar> jar -cvf jam.jar GetFile.class
adding: GetFile.class (in=2239) (out=1201) (deflated 46%)
D:\work\sun_signed_jar> jar -tf jam.jar
- We have to tell javakey which key pair to use for the signature (in fact, the key database only has one key pair in it, but javakey does not know that). To do this we create a signature directive file, as follows:
The signature.file directive does not define a real file, but the file name part of the signer and signature files that are placed in the META-INF directory of the JAR (see See JAR Files and Applet Signing ).
D:\work\sun_signed_jar> javakey -gs sign_directive.robusta jam.jar
Adding entry: META-INF/MANIFEST.MF
Creating entry: META-INF\ROBUSTA.SF
Creating entry: META-INF\ROBUSTA.DSA
Signed JAR file jam.jar using directive file sign_directive.robusta.
Notice the conflicting use of forward slash (/) and back slash (\) in the metadata files. In theory a JAR should use forward slashes only, but this mixed use does not seem to cause a problem.
- The result of performing the signature is a file named jam.jar.sig. Now we can put that on the Web server and reference it in a web page using the <APPLET> tag:
<APPLET CODE=GetFile.class archive=jam.jar.sig WIDTH=600 HEIGHT=600>
<PARAM NAME=FileToTry VALUE="c:\thingy">
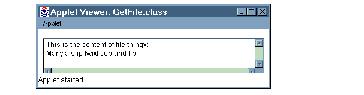
- Finally we can try to load the page into a Web browser (or, for testing purposes, the JDK 1.1 applet viewer). However, when we do so we get the same error as if it was a normal applet running under the sandbox restrictions:
sun.applet.AppletSecurityException: checkread
at sun.applet.AppletSecurity.checkRead(AppletSecurity.java:384)
at sun.applet.AppletSecurity.checkRead(AppletSecurity.java:346)
at java.io.FileInputStream.<init>(FileInputStream.java:58)
at GetFile.init(GetFile.java:15)
at sun.applet.AppletPanel.run(AppletPanel.java:287)
at java.lang.Thread.run(Thread.java:474)
You can see that the checkRead method of the security manager is throwing an exception. Why is this? The reason is that the client does not have the certificate that it needs to decrypt the JAR's signature, and hence establish trust in the signer.
According to the signature hierarchy the client should only need the JamJar CA certificate to authenticate the server (because JamJar CA signed the server's certificate). However, at the time of writing this did not work as expected for JDK 1.1. We found we had to add the server certificate to the client's key database, as follows:
- We set the key database to a new one for the client, by changing the identity.database directive in java.security:
identity.database=d:\work\sun_signed_jar\clientdb.obj
D:\work\sun_signed_jar> javakey -cs "Robusta" true
Created identity [Signer]Robusta[D:/work/sun_signed_jar/clientdb.obj][trusted]
D:\work\sun_signed_jar> javakey -ic "Robusta" cert.robusta
Imported certificate from cert.robusta for Robusta.
Running the Signed Applet
The applet viewer gives full access to any signed applet, which is acceptable because it is a test tool. A real browser needs to provide more control over access. HotJava, for example, allows you to set a range of different trust levels:
Untrusted This is like the normal sandbox environment, except that it is even more restricted because the applet cannot make any network connections.
High Security This is similar to the sandbox, with the addition of the ability for an applet to listen on network ports above 1024.
Medium Security Prompts the user whenever the applet tries to do something that is normally not allowed, so that the user can permit or deny it.
Low Security Allows the applet to do anything, without prompting the user.
Coming Next from JavaSoft:
JDK 1.2
From the example in the previous section, you can see that applet signing, as implemented in JDK 1.1, really only implements half of the process - it provides a mechanism for creating signed JAR files but it does not provide a real implementation of access control.
At the time of writing, JDK 1.2 is still under development and only limited information about its security model is publicly available. What is known is that Sun will develop the sandbox model with the following objectives in mind:
- To provide fine-grained access control . Under the present scheme you have to write customized SecurityManager and ClassLoader classes to do this. The intention is that the JDK and Java Runtime Environment (JRE) will provide much of this programming by default.
- To enable an easily configurable security policy . When the HotJava browser was introduced it provided some limited capabilities for modifying the restrictions of the sandbox. However, in the face of press coverage, later Java-capable browsers removed all such controls, leaving the restrictive virtual machine of today. The runtime environment needs to be fitted with controls that allow a user or administrator to define their security policy.
- To allow security checks to be extended to other Java programs . Under the present scheme, local code is always treated as being trusted, whereas applet code is not. The new model will apply consistently to local code as well, whether classes permanently installed on a browser that interact with applets or part of Java applications. This does not eliminate the concept of system code. There must always be a layer of trusted code that applet and local classes invoke when they need access to protected resources. What it does mean is that applets and applications can be subjected to the same set of controls.
Protection Domains
The JDK 1.2 security model will extend the concept of protection domains . These are logical boundaries within which a given security policy applies. A protection domain is defined by a set of permissions, which act as a set of filters to tie together:
- The code source, made up of an origin (where a piece of code comes from) and a principal (who the code is signed by).
- Resources (protected system or network elements)
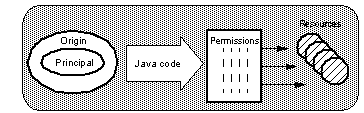
A Protection Domain
The way the permissions are applied will mirror the current SecurityManager function. That is, every attempt to access a protected resource will be routed to the access control function, which will examine the permissions of its protection domain and either return quietly or throw an exception (in fact it will have to trace back the execution thread to check all of the protection domains, so that unauthorized code cannot beat the system by calling an authorized function).
The elements for the protection domain will initially be controlled by a policy configuration file. So, for example, you could specify an entry in the file that would grant applet code from a specific site, signed by a named trusted signer, read-only permission to a specific file.
Each of the elements of the protection domain can be defined as tightly or as loosely as required. This means that at one extreme it will be possible to define a protection domain that re-creates the operation of the sandbox by specifying an origin of "any URL" and a principal of "unsigned."
Netscape Signed JAR Example
While Javasoft has been working on developing the security model for JDK 1.2, the major browser manufacturers have also been wrestling with ways to relax the access control applied to signed applets.
Netscape have embraced the JAR format and the opportunities that signing offers. In fact, they are using the format for other types of Web content, such as JavaScript programs, plug-ins and Web pages. However, at the time of writing you could not simply use a Netscape browser to access a JAR signed using the javakey command as described in See JavaSoft Signed JAR Example . There are two reasons for this:
- Netscape browsers require that the CA that signs a JAR file be predefined as a trusted root. The self-signed certificates used by javakey cannot be loaded into the browser.
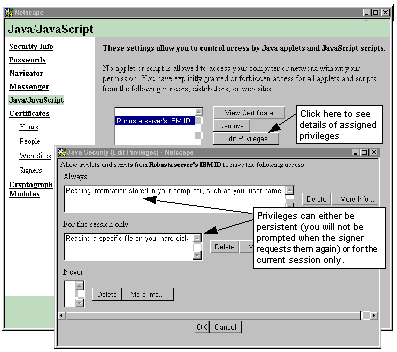
- The trust model implemented by HotJava works on an exception basis: the applet tries to do something that is forbidden, which causes a prompt to ask the user if it is acceptable. Netscape have implemented a more sophisticated model, in which the applet code requests the permissions it needs and in which it can control the period for which each permission is active.
In other words, the programmer decides in advance what permissions are needed, instead of trying to use the permissions and relying on the browser to handle the exception. Although this may seem like a small distinction, it does allow a more natural style of application. For example, if an applet attempts several privileged actions, the user can be prompted to allow access to all of them at once, instead of being repeatedly interrupted each time one of them is encountered in the code.
The ability to turn permissions on and off within the code is also important, because it reduces the exposure to an attack where another applet invokes the trusted applet's methods, thereby using the JAR signature illicitly.
The Netscape access control request mechanism is implemented as a Java class package named netscape.security . We illustrate the security model with an example of an applet that requests permission to read system properties and also to read a file on the browser disk. There are three parts to the setup: writing the applet to use the netscape.security extensions, installing and configuring the key pairs and certificates and then signing the JAR and running the applet.
Using the netscape.security Package
The netscape.security mechanism is based on privilege targets . These are definitions of operations that the applet may want to perform. Control over whether they should, or should not be permitted lies with a new security function, the privilege manager . This places indicators on the JVM stack to show what privileges the applet has been allowed. The Netscape version of the security manager then refers to the indicators when performing its authorization checking.
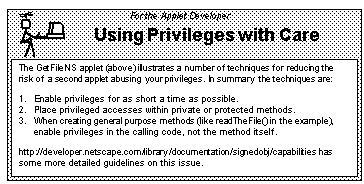
The package includes a large number of predefined privilege targets and also allows the programmer to register new targets. The applet shown in See GetFileNS.java (Part 1 of 2) requests access to two of the standard targets: access to system properties and read access to a local file.
GetFileNS.java (Part 1 of 2)
Now you are probably wondering why we requested access to read the local file but then did not do so. In fact we are going to need the file access later in the applet, in another thread. See GetFileNS.java (part 2 of 2) shows the second half of the applet, in which the FileRead privilege is used. This illustrates an oddity of the mechanism: the privilege manager grants privileges for the life of the applet, but the indicators are placed on the program stack, which is unique to each method and the methods it invokes. This means that you have to re-issue the enablePrivilege() request from the method where the privilege is actually exercised. However, as the privilege manager has kept track of what permissions have been granted, it will not ask the user again.
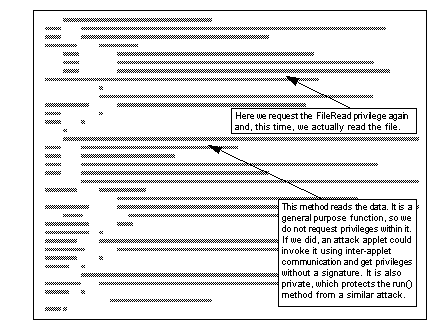
GetFileNS.java (part 2 of 2)
When you start to ease the restrictions in your browser you have to be aware that you may be opening yourself to attack. The applet itself is signed by someone you trust, based on the signature in the certificate, so it should not do anything dangerous directly. However, as we alluded to in the example above, another applet could get a free ride on the signature by using inter-applet communications to invoke methods that have had privileges granted to them. You will recall that such an attack can only be launched from an applet within the same context (that is, contained within the same document). This highlights an important point about signed applets: the signature implies a trustworthy programmer, not a trustworthy site .
Installing Keys and Certificates in Netscape
Now that we have written the code that will request and use special privileges, we need to install it in a signed JAR. But before we can generate a signature, we need a key pair and a certificate.
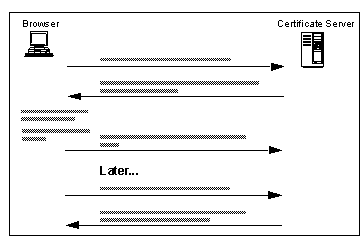
Public key signatures rely on a web of trust . That is, anyone receiving a signed message needs to have the certificates of certificate authorities that establish the trustworthiness of the signer. This does not only apply to signed Java, of course. One of the most widespread uses of digital signatures is in the Secure Sockets Layer (SSL), a general purpose protocol for encrypting Web data and authenticating the server and client.
To get around the problem of establishing the web of trust needed by SSL, the browser manufacturers provide key databases containing trusted roots (the certificates of a number of widely-accepted CAs) as part of the browser installation. This allows a browser to accept any signature that is supported by a certificate from one of the known CAs. But signed Java poses other problems:
- If you are creating a signed JAR for general use you can purchase a certificate from one of the well-known CAs. But if you are creating a local, intranet, application with a limited web of trust, you need a way for the signer and the browser to install the local CA certificate as a trusted root.
- As the signer of the code, you need the facility to generate a key pair and then acquire a certificate for your own public key and install it into your own key database.
Netscape has developed mechanisms to solve both of these problems. They are based on messages with special MIME types that trigger key management functions in the browser. The MIME types are:
- application/x-x509-ca-cert. This message delivers a new CA certificate. When it is received, the browser pops up a dialog in which the user can check the details of the certificate before installing it as a trusted root (see See Receiving a New CA Certificate ).
- application/x-x509-user-cert. This message delivers a new personal certificate. This does not make sense unless the browser has previously generated a key pair and provided distinguished name information to place in the certificate. Netscape uses a special HTML tag: <KEYGEN>, which causes the browser to generate the key pair. See Requesting a Certificate: the KEYGEN Mechanism shows how this works.
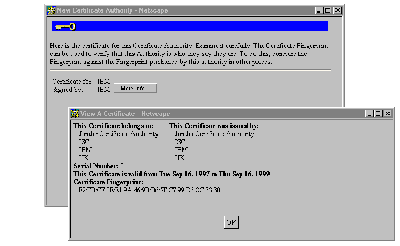
Receiving a New CA Certificate
In our example we used the Netscape Certificate Server product to generate and install a new CA key and a personal key for code signing. Any suitable key management software could be used, so long as it supports the special MIME types and KEYGEN tag. The IBM Registry product has this capability, for example, and it will also be available in a future release of the Lotus Go Web server.
In order to use the key pair for signing JAR files, it must be a X.509 v3 certificate with a special attribute set to indicate that it is suitable for code signing.
Signing JAR Files with Netscape JAR Packager
Now everything is in place to store the applet in a JAR and to sign it. Netscape provide a tool called the JAR Packager which makes this easy to do. At the time of writing the tool was available for download from the Netscape Developer Connection Web site.
We used the graphical version of the tool, which is a Java application invoked from Netscape Navigator (see See JAR Packager, Initial Screen ).
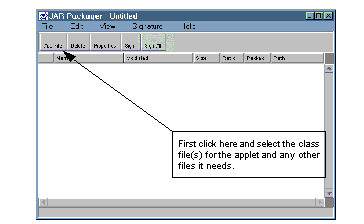
JAR Packager, Initial Screen
Once you have selected the file(s) that you want in the JAR, you can sign them all by clicking on the appropriate button (see See Signing the Files in a JAR ).
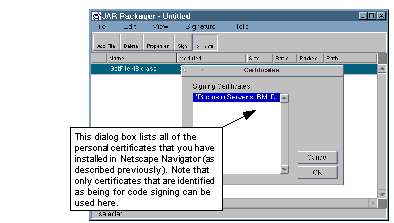
Signing the Files in a JAR
Now we can save the signed JAR file and quit the JAR Packager. If we look at the file with the jar command we see the expected structure of manifest, signer and signature files:
D:\work\ns_signed_jar>jar -tvf nsjam.jar
249 Tue Sep 16 20:08:12 GMT+01:00 1997 META-INF/MANIFEST.MF
250 Tue Sep 16 20:08:14 GMT+01:00 1997 META-INF/robusta.SF
1518 Tue Sep 16 20:08:26 GMT+01:00 1997 META-INF/robusta.RSA
3008 Tue Sep 16 20:08:26 GMT+01:00 1997 GetFileNS.class
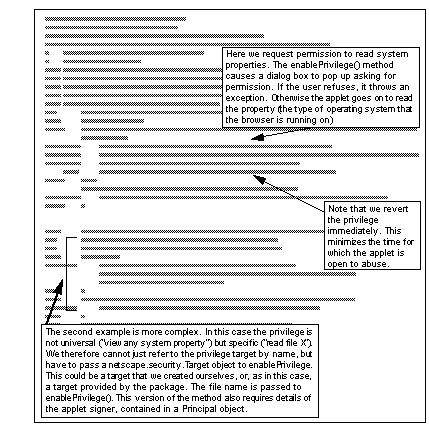
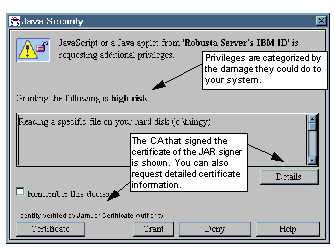
To use the JAR, we must place it on the Web server and reference it in an <APPLET> tag as we did in the javakey/jar example. When we load the page in a Netscape browser, each of the enablePrivilege() method calls causes a dialog box to pop up on the user's screen, as shown in See Applet Requests a Privilege .
Applet Requests a Privilege
See Signed Applet Running in Netscape shows the applet running successfully, after we gave it the two permissions it needed.
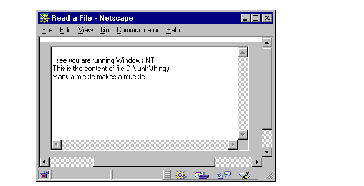
Signed Applet Running in Netscape
You can also review the permissions that you have given a particular signer, as shown in See Displaying Privileges Given to a Signer . Note that under this scheme there is no way to predefine permissions in this dialog; they only appear when a signed applet (or JavaScript script) requests privileges.
Microsoft and Signed Applets
At the time of writing, Sun Microsystems is locked in litigation with Microsoft over the way they have implemented Java in Internet Explorer 4.0. Part of that quarrel relates to the approach to signed applets. We will not discuss the rights and wrongs of that suit, but simply describe the way that Microsoft Internet Explorer works.
Externally, the most distinctive thing about the Microsoft approach is that it uses Cabinets (files with extension .cab, we will call them CABs for brevity) to contain the applets and other data, instead of JARs. This is not to say that Internet Explorer will not handle JAR archives, but it does not deal with signed JARs in any special way. CABs are also used for packaging the installation images of other Microsoft software. And, just as Netscape are using signed JARs to deliver many types of Web content, CABs are used by Microsoft to install ActiveX controls and other platform-specific code.
The Internet Explorer security model is built around Security Zones . These are groupings of applet sources, based on URLs. By default four zones are defined:
Intranet Web sites that are within the local, secure, network or are only accessed via secure (SSL) connections. Sites in this category may be defined by URL or by other attribute, for example, sites that are not reached through a proxy server.
Trusted sites A list of sites that are trustworthy, but which don't quite give the same level of reassurance that the intranet sites do.
Internet The great unwashed horde of Web sites.
Restricted sites Sites that you have reason to believe are actually dangerous.
Each of these zones has a security level associated with it of low, medium, high or custom. These apply for all sorts of Web elements, such as ActiveX controls, cookies, and user IDs as well as Java. The first three are related to a very specific set of permissions. The high security level is equivalent to the sandbox restrictions, the medium level adds the ability for an applet to use a scratchpad directory on the browser disk for storing and retrieving persistent data. The low level allows an applet unrestricted access. The custom level allows you (or an administrator) to set specific controls for different types of Web content.
Of course, a protection scheme based solely on URLs and IP addresses would be very risky. To be effective, the security model requires Java code to be delivered in signed CABs. Functionally, a signed CAB is like a signed JAR with one, important, exception: in addition to identifying the originator of the code, the signature on a CAB also defines the permissions that the code is requesting .
The best way to understand this is to illustrate it with an example.
Two Signed CAB Examples
Here are two examples of signed cabinets:
- A simple example that uses the base signature function
- A more complex example that uses the scratchpad facility of the Internet Explorer browser.
Simple Signed CAB Example
For the first example we create an applet that attempts to read a file on the browser disk. It uses basic Java I/O stream classes and will therefore normally fail with a security exception. There are three steps to placing this into a signed CAB.
Step 1: Create a Signing Certificate
The Microsoft Software Development Kit (SDK) for Java 2.0 provides a command-line tool, makecert , for generating a software developer certificate:
makecert -sk jamjarkey -n "CN=JamJar Software Co" JamJar.cert
This command generates a key pair called "jamjarkey" and places it in the Windows registry under HKEY_Current_User/Cryptography. It also creates a certificate request file, using the public key and the distinguished name information from the command.
Normally, the next step would be to send this to a CA for authentication and signing (Internet Explorer defines just one root CA, the Microsoft Authenticode Root CA, for software signing, but there is a technique to update the list, using ActiveX controls). However, in our case we are only signing the applet for test purposes, so we can use another tool from the SDK, cert2spc , to convert the certificate file into a valid certificate:
Step 2: Creating and Signing the CAB
Cabinet files are potentially much more complex than JARs, but for our purposes we can create a simple one using the cabarc tool:
cabarc N jamjar.cab GetFileMS.class
This creates a CAB file called jamjar.cab with just one file, our applet, in it. To sign this as a Java archive we use the signcode tool, again from SDK for Java. At this point we must decide what level of security the applet will ask for - low, medium or high. The rule is that if we ask for a lower level of security than the browser is configured to give us, the user will receive a prompt asking if the action should be allowed. So if we ask for a level of "medium" and the browser has the default configuration, the user will be prompted when our applet comes from an internet URL, but not when it comes from the intranet.
The command to perform the signature is:
signcode -j JavaSign.dll -jp medium -spc jamjar.cert -k jamjarkey jamjar.cab
Step 3: Using the CAB in a Web Page
The format for coding an APPLET tag using a CAB archive is different from the JAR version. This is the tag for our example:
<APPLET CODE=GetFileMS.class WIDTH=350 HEIGHT=200>
<PARAM NAME="cabbase" VALUE="jamjar.cab">
<PARAM NAME=FileToTry VALUE="C:\Temp\thingy">
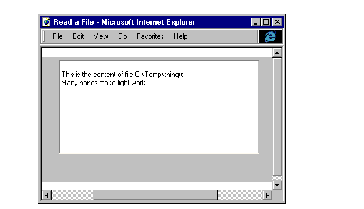
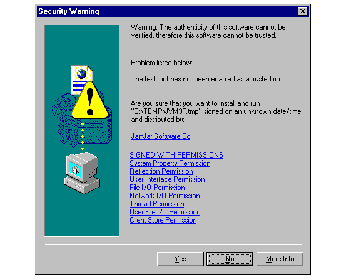
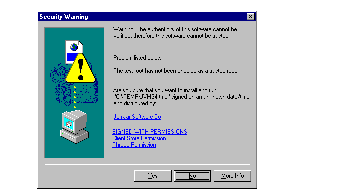
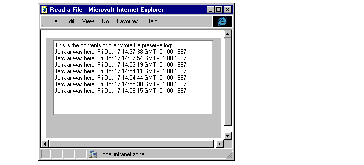
Now we can try the applet. When we first select the URL from Internet Explorer the popup dialog in See Warning from Internet Explorer appears. The security level we requested matches the level of the zone, so why does this happen? The reason is that Internet Explorer is warning us that the JamJar Software Co may not be trustworthy, because it does not own a valid software developer's certificate. Throwing caution to the winds we click on Yes and the applet runs as intended ( See Our Signed Applet Can Read a File ).
A More Complex Signed CAB Example
Not content with creating a method for delivering signed applets and requesting permissions, Microsoft has also produced classes that allow an applet to store and recover data from a limited disk cache on the browser. The rationale behind this is that for many developers the really irksome restriction imposed by the sandbox is the inability to store local configuration and state information.
The data caching function is in a class package called com.ms.io.clientstorage. The code snippet in See Section of Applet Using Client Storage Classes is an example from an applet that uses the package to write information into a file and then reads it.
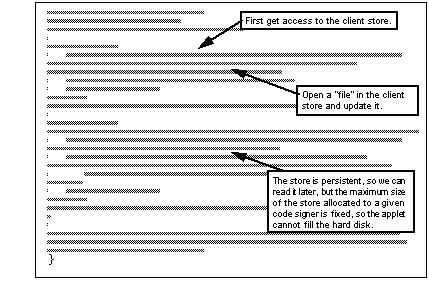
Section of Applet Using Client Storage Classes
We could place this applet in a signed CAB in the same way as the last example. However, when that applet loaded it told the user that we wanted a lot of permissions that, in fact, we did not (see See Warning from Internet Explorer ). This is because we specified a security level of "medium" in the signcode command. It would be friendlier if we could just ask for the things we really need.
The way to do this is to create an .INI file specifying the requested permissions and then feed it to signcode . See JamJar.ini Requests Permission for Client Storage and Threads shows the file we used.

Future Developments
In this chapter we have seen examples of four different approaches to the use of digital signatures for authenticating applet code and relaxing the constraints of the sandbox. The first, using the basic JDK 1.1 tools, is the first, unsophisticated foray into this area, but JDK 1.2 promises to fill in the missing function and set a standard for applet signing. The Netscape and Microsoft approaches are, as you would expect, strongly browser-centric. They both seek to reduce the impact of cryptography on the end user, not only for Java but also for other active Web content.
See Comparison of JavaSoft, Netscape and Microsoft Signed Applet Support summarizes the differences between the approaches.
Comparison of JavaSoft, Netscape and Microsoft Signed Applet Support
Clearly, there are some basic incompatibilities between the different mechanisms. This is not to say that the development of competing extensions to the security framework is a bad thing; just that there should be a base level of function at which they should all interoperate.
It may be that by the time you read this book, the differences described above will have been resolved by the vendors and a common base will have emerged. We hope so. One thing that is clear from the discussion is that any solution cannot simply concentrate on the mechanics of code-signing and requests for privileges. The problems of the end user are equally important. Solutions must answer questions like: how to tell the user, in a clear way, the permissions an applet requires, and how to install and maintain certificates for signers and CAs.