


The JavaScript language is not difficult to learn, but it does require knowledge of many of the syntax conventions of Java. An understanding of these conventions is necessary to adequately use JavaScript. It may be helpful to gain a thorough understanding of the Java syntax and conventions by reading some of the earlier chapters in this book before proceeding.
This section covers the basic components of the JavaScript language. These components include variables and values, data types, literals, properties, arrays, and comment statements. As the basic building blocks of JavaScript, an understanding of these fundamentals is the first step toward the mastery of the JavaScript language.
JavaScript variables are similar to variables in any other programming language; they hold values that you use in your application. JavaScript enables you to name your case-sensitive variables so you may reference them elsewhere in your code. You can name variables anything you wish. You may opt to use descriptive names such as number_of_times_clicked, or short, generic names such as foo. The only restrictions on variable names is that they must begin with a letter or underscore (_).
JavaScript variables can contain the following different types of values:
JavaScript also recognizes the null keyword for specifying null values for variables. JavaScript has reduced the confusion in deciding which data type to use for different types of numbers. JavaScript uses a single data type for numbers, which means that a JavaScript number can contain the equivalent of integers, reals, and doubles without the need for specialized types. In addition, JavaScript handles Date objects with this same data type, further simplifying code development under JavaScript.
The var statement is used to declare variables in JavaScript. Each variable is given a name and optionally an initial value. Outside of a function, the var statement is optional, but it is highly recommended that you always use var to avoid the possibility of overwriting local variables with global variables. Local variables are generally declared within a function with the intention that only the function will be able to use the variable. Global variables are declared outside of any function, making the variable available to any function. Therefore, to avoid conflict, the var statement will ensure your variables safety in these situations. Following is the syntax for the var statement:
var varname [= value] [..., varname [= value] ]
Multiple variables may be declared from one var statement. The following example demonstrates this:
var num_cans = 10, price_per_can = 2.0;
JavaScript fully supports variables of different data types, but does so loosely to enable you, the programmer, to more quickly develop applications without the headache of strict type specification prior to execution. JavaScript applications can handle a great number of different types of data, but JavaScript manages to do this with only three distinct data types. In addition, JavaScript can decide for you what data type your variable should be during script execution.
Converting between different types is very easy and straightforward. Data types are converted automatically when your JavaScript application runs. JavaScript follows one simple rule when converting types; it performs the conversion from left to right. In other words, the right-hand operand will be converted to the type of the left-hand operand. No matter how complex the conversion, JavaScript always follows this left-to-right approach.
For example, if you had the following variables:
Then performed the following statements:
The first statement would convert var2 to a string, because the operand on the left, var1, is a string. The result would be that x would contain the string “1020”. In contrast, the second statement would convert var1 to a number, because the operand to its left, var2, is a number. The two numbers would then be added together to form the result of 30 in y.
As you saw in the previous example, JavaScript can convert strings that contain numeric characters into numbers quite easily. If a string contains non-numeric values, such as “Paul”, and you try to set a number variable to contain that value, JavaScript will generate an error because it cannot convert “Paul” into a numeric value.
Many times when creating new variables, you need to specify an initial value. These types of fixed values are called literals. Literals are not variables, but rather, constant expressions of values for data types. For example, some literal values could include
24

72.745

“programming is fun”
When expressing literal values for integers, you may use three different bases. You may use decimal (base 10), hexadecimal (base 16), or octal (base 8) format. To specify a decimal literal, simply use a series of digits without any leading zeros. For example
42 (a decimal literal)
To specify an octal literal, precede the number with a leading 0 (zero). Octal literals can only include digits 0-7. For example
010 (an octal literal)
Finally, when specifying a hexadecimal literal, precede the number with a leading 0x (or 0X). Hexadecimal literals can include all digits (0 - 9) and the letters a-f and A-F. For example:
0xFF (a hexadecimal literal)
A floating-point literal is specified by the following parts: a decimal integer, a decimal point, another decimal integer, an exponent, and a type suffix. The exponent is specified by using an e or E followed by an integer that can be signed by proceeding it with a - or a +. A floating-point literal should have at least one digit plus either a decimal point or e or E. For example
4.25 (floating point literals)

.4e3

2E-8

-6.2e9
A Boolean literal is specified by one of two values: true or false. Finally, string literals are specified by using zero or more characters enclosed in double or single quotes. For example
“banana” (string literals)

‘pear’

“goodbye \t forever”
As in the last example, string literals can also contain special characters. Following is a list of the JavaScript special characters for string literals:
\b (backspace)
\f (form feed)
\n (new line character)
\r (carriage return)
\t (tab character)
JavaScript objects, discussed later in this chapter, generally have properties associated with them. Object properties can be either variables or functions. These properties can be accessed in two different ways. The first approach to accessing the properties of objects is as follows:
objectName.propertyName
Once you have an object, creating properties for that object is as simple as assigning a value to a property name. For example, suppose you had an object named person. To give the person object some properties, you would simply use the following statements:
person.name = “John”;

person.age = 24;

person.height = 68;

person.weight = 155;
These statements would add the four properties name, age, height, and weight to the person object.
Because JavaScript uses the same data structure for the storage of properties and arrays, they generally are treated as the same thing. In other words, they are so closely related that you may access properties through arrays and vice versa. For example, you could access the properties mentioned in the prior section as follows:
person[“name”] = “John”;

person[“age”] = 24;

person[“height”] = 68;

person[“weight”] = 155;
In addition, you may also use array indices to access your properties; for example, to access the “name” property in the person object, since it is the first property, you can use the following:
person[0] = “John”
As you can see, JavaScript is very lenient in the use and access of object properties. This simplicity in the JavaScript allows you to spend more time on the development of applications, rather than specifics of the language. Listing 42.1 is an example of a simple JavaScript function that assists in the creation of arrays.
function MakeArray(n) {

   this.length = n;

   for (var i = 1; i <= n; i++) {

     this[i] = 0 }

     return this

     }

}
To use this function, simply use the JavaScript new command, for example
myarray = new MakeArray(10);
This creates an array called myarray with 10 elements, with all elements initially set to zero.
Comments in source code are commonly used by the script author to explain what the program is doing. In addition, the comment statement is also useful in helping to make JavaScript code hidden to browsers that do not support JavaScript. The syntax for the comment statement is as follows:
Notice that single-line comments may use either the // or the /* */ pair. Multiple-line comments must use the /* */ pair. Everything after the // on the same line, or within the /* */ pair will be ignored by JavaScript. For example, using the code from Listing 42.1, you could hide the code from non-Netscape browsers as follows:
<SCRIPT>

<!-- This line begins the comment, hiding the following code from non-Netscape Âbrowsers

function MakeArray(n) {

   this.length = n;

   for (var i = 1; i <= n; i++) {

     this[i] = 0 }

     return this

     }

}

// --> This ends the commenting. Note the // that hide the HTML comment code from ÂJavaScript

</SCRIPT>
JavaScript currently contains 53 reserved words. These words cannot be used for variable, function, method, or object names. Some of the words are not currently being used by JavaScript, but rather are reserved for future use. Table 42.1 contains the list of current reserved words.
Table 42.1. JavaScript reserved words.
| abstract | extends | int | super |
| boolean | false | interface | switch |
| break | final | long | synchronized |
| byte | finally | native | this |
| case | float | new | throw |
| catch | for | null | throws |
| char | function | package | transient |
| class | goto | private | true |
| const | if | protected | try |
| continue | implements | public | var |
| default | import | return | void |
| do | in | short | while |
| double | instanceof | static | with |
| else |
JavaScript looping and conditional statements allow for a great variety of tasks to be performed in your application. Using any of JavaScript’s looping statements, you can repeat a series of statements until a certain condition is met. Additionally, with conditional statements, you can limit the execution of JavaScript code based on a certain criteria, or update information based on yet another criteria. Following are the current JavaScript looping statements:
for

while
There are many uses for these statements. Listing 42.2 illustrates a simple example of looping and conditional statements.
<HTML>

<BODY>

<SCRIPT>

for(var i=0;i<10;i++) {

     document.write(“You are on number “ + i + “!<BR>”);

     if(i == 5)

          document.write(“You are halfway there.<P>”);

}

</SCRIPT>

</BODY>

</HTML>
This example will loop 10 times using the for loop and print the words You are on number followed by the current number. When the loop reaches 5, an if statement is checking for that value, and when it finds that the loop is on 5, the if statement prints the words You are halfway there. (See Figure 42.1.)
 FIGURE 42.1.
Looping and conditional statement example.
When performing looping or conditional statements in JavaScript, you may need to use a comparison of two values to continue or to terminate your loop or condition. In JavaScript, when performing a comparison, you must use a comparison operator between the two values you are comparing. What you get in return is a Boolean value representing the outcome of the comparison. The operators allowed in a JavaScript comparison are shown in Table 42.2.
The for statement enables you to create a loop in JavaScript that can initialize a statement, update an expression, and loop until a condition is met. This statement consists of three optional expressions. These expressions are all enclosed in a single set of parenthesis and are separated by a semicolon (;). Following the for loop statement is a block of code to be executed in the loop. The syntax for a for loop follows:
for ([initial statement]; [condition]; [update expression]) {

     statements

}
The initial statement in a for loop may also contain a variable declaration, which is accomplished using the var keyword. This section is generally used to initialize a variable counter. This section, like the other sections in a for loop, is optional. The condition statement in a for loop is evaluated each time the loop completes its block of code. If the condition fails, the loop terminates. Otherwise, the update expression is executed. The update expression generally will increment a counter. Following is an example of a for statement:
for (var i = 0; i < 10; i++) {

     total = total + i;

     display_total(total);

}
This example will run through 10 iterations before ending the for loop. During each iteration i is incremented by 1—using i++—until the statement i < 10 is no longer true. Note that for single-line code blocks, the brace pairs ({ }) are not needed.
The JavaScript for...in statement is not to be confused with the for statement. The for...in statement iterates a variable over all properties of an object. The for...in syntax is as follows:
for (var in obj) {

     statements

}
Notice the in keyword between the var and the obj. This keyword sets var to the first property of obj. As the statement progresses, it will move through all of the properties of obj, until reaching the last one. Upon reaching the last property, the for statement will exit.
Here is an example:
function display_properties_of_object(obj, obj_name) {
var result = “”;
i = “94";
for (i in obj)
result += obj_name + “.” + i + “ = “ + obj[i] + “\n”;
return result;
}
This example will run through all of the properties of obj and display them as well as the property’s value. Notice that for a single statement following the for...in statement, braces ({ }) are not required.
The while statement in JavaScript is very similar to the for statement, but is more simple to use. The while statement will keep executing a block of code it contains until the condition it is testing is false. Following is the syntax for the while statement:
while (condition) {

     statements

}
Following is an example of the while statement in use:
money = 0.00;

while (money < 100.00) {

      money += 5.00;

 }
This example continues to loop until the variable money reaches its goal of 100.00. Note that the second zero after the decimal point is not needed, but is used to make code reading easier and to signify to the code reader that we are using currency. The extra zero has no effect on the final outcome of the program.
In a while or for loop, a break statement terminates the loop and continues executing the code following the terminated loop. The syntax of a break statement is the statement itself with no other options:
break
Here’s an example of a break statement that terminates when a variable reaches a certain limit:
function func(x) {

     var i = 0;

     while (i < 5) {

          if (i == 2)

               break;

          i++;

     }

     return i*x;

}
In this example, when the variable i reaches the value of 2, the while loop terminates.
The continue statement terminates the execution of the current block in a loop and continues the loop with the next iteration. The syntax of a continue statement is the statement itself with no other options:
continue
Here’s an example of a continue statement that terminates when a variable reaches a certain limit:
function func(x) {

     var i = 0;

     while (i < 5) {

          if (i == 2)

          continue;

          i++;

     }

     return i*x;

}
In this example, when the variable i reaches the value of 2, the while loop skips the i++ line and continues the loop.
The if...else is JavaScript’s conditional testing statement. This statement enables you to test a condition and if it is true, execute a block of code. Optionally you can execute a block of code if the statement evaluates to false. This is done using the else statement. The if...else statement may be nested. Following is the syntax for the if...else statement:
if (condition) {

     statements

} [else {

     else statements

}]
An example of this statement follows:
if ( rate_book(javascript_book) == “*****”) {

     good = true;

} else

     good = false;
Again, as in other JavaScript statements, if a single statement follows the if or else statement, the use of the brace pairs ({ }) is optional.
A conditional expression in JavaScript is a way to test a value whose result can be one of two values. For example
old_enough = (age >= 16) ? “Drive Home” : “Walk Home”
This statement first tests the condition within the parenthesis. If age is indeed greater than or equal to 16, then the first value after the question mark (?) is chosen. Otherwise, if the comparison is false, the second value after the question mark is chosen. If age were set to 17, old_enough would be set to Drive Home.
The JavaScript with statement enables you to specify an object as the default object when executing statements within its block of code. The syntax for the with statement is as follows:
with (object) {

     statements

}
An example of the with statement that uses the Math object as the default object follows:
with (Math) {

     a = PI * r*r;

     x = r * cos(theta);

     y = r * sin(theta);

}
In JavaScript, as in other languages, operators are used to perform actions between two operands. For example, when assigning values to variables, you would use assignment operators; when adding numbers together, you would use arithmetic operators; and when concatenating two strings together, you would use string operators. This section briefly covers all the different types of operators that are available to you in JavaScript.
Assignment operators are used to assign a value from a right operand to its left operand. The most basic and widely used assignment operator is the equal sign (=). It assigns the value of the right operand to the left result. For example: x=100 would assign 100 to the variable x. Like in C and C++, in JavaScript there are some shorthand notations for assignments. For example
x += y is equal to x = x + y

x -= y is equal to x = x - y

x <<= y is equal to x = x << y
This shorthand applies to all the arithmetic and bitwise operators.
The JavaScript string operators include the comparison operators mentioned previously as well as the concatenation operator (+) for concatenating two strings together. For example, the following statement
“Java” + “Script”
would result in the string
“JavaScript”
You may also use the shorthand notation for string concatenation. For example, if a string str1 contains the value “Java”, the following statement
str1 += “Script”
would also result in the string “JavaScript”.
JavaScript supports eight basic arithmetic operators. Table 42.3 lists the operators, their function, and an example.
Table 42.3. Arithmetic operators.
| Operator | Function Performed | Example |
|---|---|---|
| + | Addition | x = a + b |
| - | Subtraction | y = a - b |
| * | Multiplication | x = a * b |
| / | Division | y = a / b |
| % | Modulus | 12 % 5 = 2 |
| ++ | Increment | x++ |
| -- | Decrement | y-- |
| - | Unary negation | x = -y |
Logical operators enable you to test two Boolean values and return a Boolean value based on the two tested. There are three logical operators. Table 42.4 shows these operators.
Table 42.4. Logical operators.
| Operator | Function Performed | Example |
|---|---|---|
| && | AND, true if both are true | expr1 && expr2 |
| || | OR, true if either is true | expr1 || expr2 |
| ! | NOT, negates operand | !expr |
Bitwise operators perform bitwise operation on their operands. That is, rather than treat their operands as numbers, they are treated as a set of bits (zeros and ones). Bitwise operators perform their operation at the bit level in JavaScript, but return their results as a number. Table 42.5 shows the JavaScript bitwise operators and their functions.
Table 42.5. Bitwise operators.
| Operator | Function Performed | Example |
|---|---|---|
| & | Bitwise AND. Returns a one if both operands are ones | x = a & b. |
| | | Bitwise OR. Returns a one if either operand is one | y = a | b. |
| ^ | Bitwise XOR. Returns a one if one but not both operands are one | x = a ^ b. |
| << | Shifts bits left specified times. | x = a << 4 |
| >> | Shifts bits right specified times. | y = b >> 5 |
| >>> | Zero-fill right shift. | x = a >>>2 |
When shifting bits to the left with <<, excess bits on the left are discarded and zero bits are shifted in from the right.
When shifting bits to the right with >>, excess bits on the right are discarded and copies of the leftmost bit are shifted in from the left.
When zero-fill shifting bits to the right with >>>, excess bits on the right are discarded and zero bits are shifted in from the left.
When JavaScript is evaluating an expression, a precedence is chosen for the order of evaluation. For example, the statement:
a = (b + c) * d;
would first perform the operation inside of the parenthesis, the addition of b and c then multiply that result with d, then assign the result to a. The following list shows the precedence of JavaScript operators from lowest to highest:
comma ,

assignment = += -= *= /= %= <<= >>= >>>= &= ^= |=

conditional ?:

logical-or ||

logical-and &&

bitwise-or |

bitwise-xor ^

bitwise-and &

equality == !=

relational < <= > >=

shift << >> >>>

addition/subtraction + -

multiply/divide/modulus * / %

negation/increment ! ~ - ++ --

call, member () [] .
JavaScript is based on the object-oriented model of Java. It follows then, that JavaScript is also object-oriented. In JavaScript, an object is an entity whose properties are JavaScript variables or other objects. Functions can also be associated with objects. These functions can perform actions specific to that object, such as a Math object having a sin() function. When JavaScript functions are associated with objects, they are then referred to as methods. This section covers JavaScript functions and objects and how to create them.
In JavaScript, the function statement is used to create new functions. Functions each have their own unique name as well as an optional parameter list. JavaScript functions play an important role in the development of applications. Functions are a set of JavaScript procedures that enable you to perform specific actions and can be called anywhere in your current application. When using Netscape Navigator, for example, any function that has been defined in the current page may be called.
When defining your own functions, the function statement is used. For example
function center_string(msg) {

     document.write(“<CENTER>” + msg + “</CENTER>”);

}
The preceding function would center any string that was passed to it when called. For example
<SCRIPT LANGUAGE=”JavaScript”>

center_string(“Hello World”);

</SCRIPT>
When using functions in your HTML code, it is generally a good idea to place your functions in the <HEAD>..</HEAD> portion of the page. That way, when the page is loaded, any functions that may be needed for the page will be loaded already.
Functions may also return values upon completion. This is accomplished by using a return statement that specifies the return value. Functions cannot be nested; that is, you cannot place functions within other functions or themselves. Following is the syntax of the function statement:
function name([param] [, param] [..., param]) {

     statements

}
The params indicate that you may use one or more parameters in a JavaScript function. Following is an example of a function statement in use:
function rate_book(rating) {

     var i;

     var result = “”;

     for (i = 0; i < rating; i++)

          result += “*”;

     return result;

}
The preceding example declares a function that returns a string of stars (“*”) based on the rating number you give it.
The JavaScript return statement is used to send back values from a function once it has completed. The syntax for a return statement is simply
return expressions
An example of the return statement in use can be seen in the function example above, as well as the following example:
function cubeit( x ) {

     return x * x * x;

}
This example will return the cube (x3) of the value passed into the cubeit() function.
Once your functions have been created, calling them is a simple process. You may call functions directly, as in
doSomething();
You may call functions through an object by using an object’s methods.
JavaScript methods are functions that have been associated with an object. You can define a function as an object’s method in the same way you would define a normal property, but instead of using a literal or variable value, you would use a function name. The next section discusses creating JavaScript objects.
To call a function that has been set as part of an object, you would use the same procedure as if you were accessing a property of the object, for example
object.methodname(params);
Creating a new object in JavaScript requires two steps. In the first step, you must create a function for that object. In the second step, you must create an instance of that object with the keyword new. For example, to create the person object referenced in the previous section, you would write the following function:
function person(name, age, height, weight) {

     this.name=name;

     this.age=age;

     this.height=height;

     this.weight=weight;

}
The this keyword lets the function know to refer to itself when making the property assignments. When defining functions, you may also use other objects as properties in that function.
Now that you have written the function, creating a new object is very straightforward. For example, to create a new person object, you would use the following statement:
aperson = new person(“Paul”, 24, 68, 155);
This statement would create an object called aperson whose values would be assigned to those passed in the statement. You are not limited to the number of new objects that you can create.
Adding methods to your objects involves specifying the function to use for your method in the definition of the object. For example, if you wanted to add a method called printstats to the previous object, you would use the following:
function person(name, age, height, weight) {

     this.name=name;

     this.age=age;

     this.height=height;

     this.weight=weight;

     this.printstats = printstats;

}
The printstats function would have to be defined in order to specify it as a method in an object. Adding a method to an object definition ensures that all newly created objects contain the method. To add a method to a single instance of an object, that is, to only the object you are using and not to the definition itself, you could use the following statement:
object.printstats = printstats;
This would have the same effect when called as the method in the object definition above, but would not carry across to newly created objects.
Whenever you load a page into Netscape’s Navigator, whether the page has JavaScript in it or not, Navigator automatically creates a number of objects that correspond to the page. These objects contain all the information that is pertinent to that page including the contents of the page, color information, frame information, and other information.
Navigator objects give the JavaScript programmer great control and flexibility over the page that is being viewed and interacted with by the user. The three most useful of the Navigator objects are the window object, the document object, and the form object.
In addition to these newly created objects, JavaScript contains three objects that are always available to you. These objects are the string object, the Math object, and the Date object, which are discussed at the end of this section.
When any document is loaded into the Netscape Navigator program, a new collection of objects is instantly created to describe the current document and browser window. These objects are created in a hierarchy. Figure 42.2 illustrates the hierarchy of these objects.
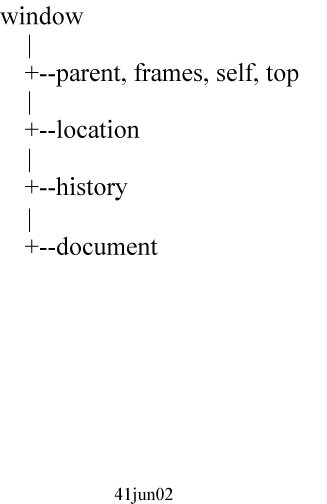 FIGURE 42.2.
The hierarchy of Navigator objects.
The window object is the top-level object in the Navigator object hierarchy. It contains properties that apply for the entire window. If you are using frames, there will be a window object for each frame window on your page. The location object contains properties for the current URL for the page. The history object contains properties for any previously visited URLs.
The document object contains properties for the content in the current page. It contains properties for such things as the title of the page, its colors, and its location. The document object also contains other objects such as the forms and forms’ elements on a page, links on the page, and anchors on the page. Figure 42.3 illustrates the hierarchy for the document object.
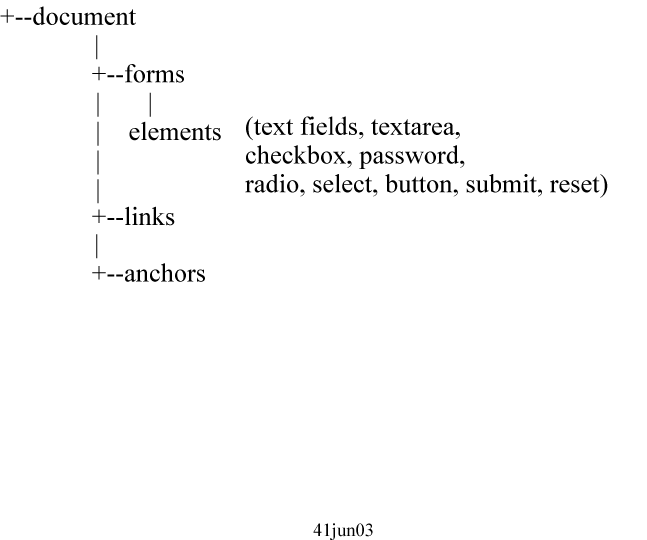 FIGURE 42.3.
The hierarchy for the document source.
The window object is the top-level, “parent” object to all other Navigator objects. It enables you to do some very nifty things. For example, you can pop up a dialog window when a user clicks the wrong button, or open a context-sensitive help window when the user requires additional assistance. The window object has properties for all of the frames in your framesets as well. In addition, you can also control the status message at the bottom of the Navigator window using this object. This is a useful feature for providing content-sensitive clues to what the user is pointing to.
Some of the more useful properties of the window object are frames and status. Using the frames property enables you to access the individual documents of the frameset in JavaScript. For example, let’s say you had a document with two frames, one called frame1 and the other called frame2. Using the following statement
window.frames[‘frame1’].document.bgColor = “red”;
would set the background color of frame1 to red. Because the window object is the top-level object, you may omit the window object when referring to properties or objects of the window. For example, the preceding statement could also be written as this:
frames[‘frame1’].document.bgColor = “red”;
The status property of the window object enables you to display a message on the status bar of the Navigator window. For example, the following statement
window.status = “Programming JavaScript is Fun!”;
would set the status bar of the Navigator window to Programming JavaScript is Fun!
The window object also contains some useful methods for interacting with the user. For example, the alert() and confirm() methods enable you to display a message to the user in a small pop-up window. For example, the statement
window.alert(“What are you doing!”);
would pop up a window with the message What are you doing! in it. The user could then click the OK button to proceed.
If you seek some sort of confirmation from the user, you can use the confirm() method. It enables you to receive back a true or false depending on the response of the user. For example, the statement
window.confirm(“Are you sure you want to leave?”);
would pop up a window with the message Are you sure you want to leave? in it. The user could then click the OK button, which would return a Boolean true value, or the CANCEL button, which would return a Boolean false value. Your JavaScript code could then perform different tasks based on the user’s response.
Another interesting method of the window object is the open() method. With this method, your HTML documents can open their own Navigator windows and write content to them on the fly. The open() method is called in the following way:
windowVar = window.open(“URL”, “windowName”, [“windowFeatures”])
An example of all three of these methods in an actual HTML document is given in the next chapter.
The document object is perhaps the most useful and powerful of the Navigator objects. With the document object, your JavaScript code can generate HTML code on the fly, as well as react to a user entering or leaving your page. For example, the following code segment will generate HTML code depending on the time of day:
<SCRIPT>

     now = new Date();

     if(now.getMinutes() > 17 || now.getMinutes() < 6)

          document.write(“It’s dark out here!”);

     else

          document.write(“All I do is work.”);

</SCRIPT>
In the preceding example, if the current time is after 5 P.M., the message It’s dark out here! gets printed on the page. Otherwise, the message All I do is work. is displayed.
The document object contains many useful properties. Some of these properties include the link colors: alinkColor, linkColor, and vlinkColor; the document colors: bgColor and fgColor; and general document information like title, referrer, and a collection of all forms in the document.
These properties can be accessed directly, as in any JavaScript property. For example, to set the link colors in the current document, you could use the following statements:
document.linkColor = “blue”;

document.alinkColor = “red”;

document.vlinkColor = “purple”;
To check the referrer of the current document, you could simply view the value from the following statement:
wherefrom = document.referer;
Another very powerful property in the document object is the forms property. This property allows for full access to all the field values, which enables you to both read and write to them. The forms object is discussed in more detail further in this chapter.
Some of the most useful methods in the JavaScript language come from the document object. The document object only contains a few methods: clear, close, open, write, and writeln; but these are generally used the most. Specifically, the write and writeln methods enable you to generate text in your current document. The writeln method is identical to the write method except that it also appends a newline character to the end of the string. Using these methods is easy, for example
document.write(“Hello World”);

document.writeln(“How are you?”);
The open and close methods enable you to clear the entire contents of a document so that you may begin writing into them without having any other information in the window prior to your writing.
Another very important Navigator object is the form object. With this object, you can name your forms and check, modify, or create values in the forms. This is a very powerful tool. This object enables you to check the value of form fields before a form is submitted to the server.
The forms property enables you to access all of the form field information from the current forms on the page. For example, say you had a form named myform with two text fields called field1 and field2. You could access the values of these fields as such:
value1 = document.forms[0].field1.value;

value2 = document.forms[0].field2.value;
Notice the zero as the index into the forms property. This specifies the first form in the document. If you had multiple forms, you would use each successive number to access the respective form. You can also access the form by name directly. For example, using the previous example as a reference:
value1 = document.myform.field1.value;

value2 = document.myform.field2.value;
The form object contains an object for each field in the form to which you are referring. The available objects for each of the fields are: checkbox, hidden, radio, reset, submit, text, and textarea.
All these objects contain a name and value property; that is, you can access the name and value of a particular field with the following statement:
document.myform.field.name;

document.myform.field.value;
Some of the objects contain extra information. For example, both the radio and checkbox field types contain a checked property to state whether or not the form element has been checked. For example, you could check to see if a checkbox had been checked with the following statements:
if(document.myform.mycheckbox.checked == true)

     document.write(“Checked”);

else

     document.write(“Not checked”);
The form object only has one method, submit. Using this method, you can submit the form to the URL that was specified in the ACTION property of the FORM tag. For example, in the following form
<FORM ACTION=”doit.cgi”></FORM>
the submit method of the form object would cause the browser to submit the form to the doit.cgi program.
JavaScript contains other built-in objects and functions so that you do not have to create them. These functions are commonly used and most languages provide some sort of build-in support for them. The JavaScript language currently contains three built-in objects: the string object, the Math object, and the Date object.
The string object is created whenever you create a variable and assign it a string value. For example, the statement
astring = “JavaScript is Fun”;
would create a string object called astring. String literals are also string objects. The methods to the string object are located in the object reference section of this chapter.
The Math object contains mathematical functions and methods. Your JavaScript program can call them directly. These methods include sin, tan, random, and pow. For example, the following statement sets the variable sinanswer to the sine of 1.2456:
sinanswer = Math.sin(1.2456);
The Date object is used for working with dates and times. Even though JavaScript does not have a date data type, JavaScript still enables you to work quite extensively with date and time elements. To create a new Date object, you would use the following syntax:
datevar = new Date(parameters);
The parameters for the Date object can be any of the following:
Notice that we used 11 instead of 12 for the month. In JavaScript, seconds, minutes, hours, day, and months all begin with 0, not 1.
JavaScript also contains a few built-in functions. Perhaps the most useful is the eval function. This function takes as its parameter a string or numeric expression. If the parameter is a numeric expression, it is evaluated and the result returned. If the expression is a string expression, it is first converted into a numeric expression, then evaluated and the result returned. The benefit of this function is in accepting expressions from forms, for example, and being able to evaluate them directly.
Events are actions that occur when a user performs some type of action. For example, when a user clicks on a button, that can trigger an event to occur under JavaScript. When running JavaScript applications under the Netscape Navigator, they generally are largely event-driven. For example, when checking values in a form, the JavaScript application does not check the input until the user types a key, hits return, or some other action is performed. JavaScript contains several events that are triggered when a user performs certain actions. This section covers those events.
Creating event handlers under JavaScript is easy. Event handlers are embedded in documents as attributes of HTML tags. In order words, many of the current HTML tags can have event handlers associated with them. For example
<INPUT TYPE=”button” VALUE=”GO” onClick=”makeitgo(this.form)”>
Because of the new JavaScript attribute onClick for the INPUT tag, this statement calls the function makeitgo() when the button is clicked. Browsers that do not support JavaScript will ignore the extra attribute. JavaScript contains a total of nine event handlers. Table 42.6 shows these event handlers and when they occur:
Table 42.6. JavaScript events and event handlers.
Besides the actual event handlers, many objects have methods that can simulate an event occurring. For example, the button object has a click method that emulates the button being clicked by a user. These emulated clicks, however, will not signal an event handler.
The click event occurs when an object in a form that has the capability to be clicked, such as a button form element or a submit form element, is clicked by the user. The onClick event handler can then call a function or execute JavaScript code in place. For example, the following statement
<input type=”button” name=”Click Me” onClick=”alert(‘You have clicked me!’);”>
will cause an alert window to open whenever the user clicks on the button. In addition, a custom function could be called instead, for example
<input type=”button” name=”Click Me” onClick=”confirmClick()”>
This would call the function confirmClick when the user clicked on the button. Of course, the function would need to exist in the current document for this to work.
The submit event occurs when a user submits a form. The onSubmit event handler can then call a function or execute JavaScript code in place. For example, the following statement
<form name=”myform” action=”doit.cgi” onSubmit=”confirmSubmission()”>
calls the function confirmSubmission when the user selects the submit button for this form. This enables you to preprocess any information and check the values of any fields prior to calling the URL stated in the action attribute, in this case, doit.cgi.
Your function or statement in an onSubmit event handler must return true to allow the form to be submitted; return false to prevent the form from being submitted.
The change event occurs when a select, text, or textarea field loses focus and its value has been modified. The onChange event handler can then call a function or execute JavaScript code in place. For example, the following statement
<input name=”phone” onChange=”checkPhone(this.form)”>
calls the function checkPhone when the user loses focus on the text input field by moving to another field. This enables you to preprocess the information instantly and check the value of the field prior to form submission.
Notice how we passed this.form to the function. As you will see in the next chapter, this allows your function to access the form values directly.
The load event occurs when Netscape Navigator finishes loading a window or all frames within a <FRAMESET>. The onLoad event handler can then call a function or execute JavaScript code in place. For example, the following statement
<body onLoad=”alert(‘Welcome to my site!’)”>
displays an alert with the message Welcome to my site! as soon as the page finishes loading. This event is very useful for making sure that the entire page has been loaded prior to continuing on to some other action.
The other events, including mouseover and unload, work much the same way as the main events discussed previously. Each event can be handled by an event handler in your document. Using these event handlers can greatly increase the interactivity and flexibility with which you can create dynamic content using JavaScript.
For example, using the unload event, you can tell your users goodbye when they leave your site. A simple example might be
<body onUnload=”alert(‘Thank you for visiting!’)”>
which opens an alert window with the message Thank you for visiting! when they leave the current document.
JavaScript contains color string literals that can be used in place of their corresponding RGB color values. These literals can be used in the JavaScript alinkColor, bgColor, fgColor, linkColor, and vlinkColor properties and the fontcolor method. In your HTML code, you may also use these literals to define the COLOR attributes of the BODY and FONT tags. For example, <FONT COLOR=”blue”>color</FONT>. Table 42.7 is the list of current color string literals with their corresponding RGB values.
Table 42.7. Color string literals.
| aliceblue | ghostwhite | navajowhite | |
| antiquewhite | gold | navy | |
| aqua | goldenrod | oldlace | |
| aquamarine | gray | olive | |
| azure | green | olivedrab | |
| beige | greenyellow | orange | |
| bisque | honeydew | orangered | |
| black | hotpink | orchid | |
| blanchedalmond | indianred | palegoldenrod | |
| blue | indigo | palegreen | |
| blueviolet | ivory | paleturquoise | |
| brown | khaki | palevioletred | |
| burlywood | lavender | papayawhip | |
| cadetblue | lavenderblush | peachpuff | |
| chartreuse | lawngreen | peru | |
| chocolate | lemonchiffon | pink | |
| coral | lightblue | plum | |
| darkblue | lightgrey | royalblue | |
| darkcyan | lightpink | saddlebrown | |
| darkgoldenrod | lightsalmon | salmon | |
| darkgray | lightseagreen | sandybrown | |
| darkgreen | lightskyblue | seagreen | |
| darkkhaki | lightslategray | seashell | |
| darkmagenta | lightsteelblue | sienna | |
| darkolivegreen | lightyellow | silver | |
| darkorange | lime | skyblue | |
| darkorchid | limegreen | slateblue | |
| darkred | linen | slategray | |
| darksalmon | magenta | snow | |
| darkseagreen | maroon | springgreen | |
| darkslateblue | mediumaquamarine | steelblue | |
| darkslategray | mediumblue | tan | |
| darkturquoise | mediumorchid | teal | |
| darkviolet | mediumpurple | thistle | |
| deeppink | mediumseagreen | tomato | |
| deepskyblue | mediumslateblue | turquoise | |
| dimgray | mediumspringgreen | violet | |
| dodgerblue | mediumturquoise | wheat | |
| firebrick | mediumvioletred | white | |
| floralwhite | midnightblue | whitesmoke | |
| forestgreen | mintcream | yellow | |
| fuchsia | mistyrose | yellowgreen | |
| gainsboro | moccasin |
Learning JavaScript requires knowledge of the fundamentals of the language including how to create and use variables and values, the different data typ
Looping is achieved in JavaScript using the for, for...in, and while statements, while using the continue and break statement to break out of a loop or skip to the next iteration of a loop. JavaScript conditional expressions are achieved using the if...else statement. Lastly, the for...in statement iterates across an object and the with statement is used for specifying the default object in a group of statements.
The JavaScript operators enable you to perform variable assignments, mathematical calculations, string operations, bitwise operations, and logical operations.
JavaScript functions enable you to create a set of statements that can be used as your basic building block for JavaScript applications. These functions can then be used to create objects.
JavaScript contains many built-in objects that are useful for modifying your pages or for retrieving information from forms on those pages. These built-in objects include Date objects, string objects, and Math objects for performing more sophisticated mathematical operations such as sin() and cos().
JavaScript also contains a full set of events that can be caught by your JavaScript application. These events enable you to handle button clicks, page reloads, or even when someone leaves your page.
The next chapter illustrates many of the functions of JavaScript that have been discussed in this chapter.