


Creating games with Java is a lot like creating games with other languages. You need to deal with the design of movable objects (often referred to as sprites), the design of a graphics engine to keep track of the movable objects, and double buffering to make movement look smooth. This chapter will cover methods for creating these standard building blocks of games using Java.
Thankfully, Java takes care of a lot of the dirty work that you would need to do if you were writing a game in another language. For instance, Java provides built-in support for transparent pixels, making it easier to write a graphics engine that can draw nonrectangular objects. Java also has built-in support for allowing several different programs to run at once—perfect for creating a world with a lot of creatures, each with its own special methods for acting. However, the added bonuses of Java can turn into handicaps if they are not used properly. This chapter will deal with using the advantages of Java to write games and how to avoid the pitfalls that accompany the power.
A graphics engine is essential to a well-designed game in Java. A graphics engine is an object that is given the duty of painting the screen. The graphics engine keeps track of all objects that are on the screen at one time, the order in which to draw the objects, and the background to be drawn. By far, the most important function of the graphics engine is the maintenance of movable object blocks.
So what’s the big fuss about movable object blocks (MOBs)? Well, they make your life infinitely easier if you’re interested in creating a game that combines graphics and user interaction, as most games do. The basic concept of a movable object is that the object contains both a picture that will be drawn on the screen and information that tells you where it is on the screen. To make the object move, you simply tell it which way to move and you’re done—it takes care of the redrawing.
The bare-bones method for making a movable object block in Java is illustrated by Listing 32.1. As you can see, the movable object consists merely of an image and a set of coordinates. You might be thinking, “Movable objects are supposed to take care of all the redrawing that needs to be done when they are moved. How is that possible with just the code from Listing 32.1?” Redrawing will be the graphics engine’s job. Don’t worry about it for now; we’ll cover it a little later.
import java.awt.*;

public class MOB {

     public int x = 0;

     public int y = 0;

     public Image picture;

          public MOB(Image pic) {

               picture=pic;

          }

}
As you can see in Listing 32.1, the constructor for our movable object block (MOB) takes an Image and stores it away to be drawn when needed. After we’ve instantiated an MOB (that is, after we’ve called the constructor), we have a movable object that we can move around the screen just by changing its x and y values. The engine will take care of redrawing the movable object in the new position, so what else is there to worry about now?
One thing to consider is the nature of the picture that is going to be drawn every time the movable object is drawn. Consider the place where the image probably will originate. In all likelihood the picture either will come from a GIF or JPEG file, which has one very important consequence—it will be rectangular. So what? Think about what your video game will look like if all of your movable objects are rectangles. Your characters would be drawn, but so would their backgrounds. Chances are, you’ll want to have a background for the entire game, so it would be unacceptable if the unfilled space on character images covered up your background just because the images were rectangular and the characters were of another shape.
When programming games in other languages, this problem often is resolved by examining each pixel in a character’s image before drawing it to see whether it’s part of the background. If the pixel is not part of the background, it’s drawn as normal. If the pixel is part of the background, it’s skipped and the rest of the pixels are tested. Pixels that aren’t drawn usually are referred to as transparent pixels. If this seems like a laborious process to you, that’s because it is. Fortunately, Java has built-in support for transparent colors in images, which simplifies your task immensely. You don’t have to check each pixel for transparency before it’s drawn because Java can do that automatically! Java even has built-in support for different levels of transparency. For example, you can create pixels that are 20 percent transparent to give your images a ghostlike appearance. For now, though, we’ll just deal with fully transparent pixels.
Java’s capability to draw transparent pixels makes the task much easier of painting movable objects on the screen. But how do you tell Java what pixels are transparent and what pixels aren’t? You could load the image and run it through a filter that changes the ColorModel, but that would be doing it the hard way. Fortunately, Java supports transparent GIF files. Whenever a transparent GIF file is loaded, all of the transparency is preserved by Java. That means your job just got a lot easier.
Now the problem becomes how to make transparent GIFs. This part is easier than you think. Simply use your favorite graphics package to create a GIF file (or a picture in some other format that you eventually can convert to a GIF file). Select a color that doesn’t appear anywhere in the picture and fill all areas that you want to be transparent with the selected color. Make a note of the RGB value of the color that you use to fill in the transparent places. Now you can use a program to convert your GIF file into a transparent GIF file. I personally use Giftool, available at http://www.homepages.com/tools/index.html, to make transparent GIF files. You simply pass to Giftool the RGB value of the color you selected for transparency and Giftool makes that color transparent inside the GIF file. Giftool also is useful for making your GIF files interlaced. Interlaced GIF files are the pictures that appear with block-like edges initially and keep getting more defined as they continue to load.
Now you have movable objects that know where they’re supposed to be and don’t eat up the background as they go there. The next step is to design something that will keep track of your movable objects and draw them in the proper places when necessary. This will be the job of our GraphicsEngine class. Listing 32.2 shows the bare bones of a graphics engine. This is the minimum that you would need to handle multiple movable objects. Even this leaves outseveral things that nearly all games need, but we’ll get to those things later. For now, we’ll concentrate on how this bare-bones system works in order to give you a solid grasp of the basic concepts.
import java.awt.*;

import java.awt.image.*;

public class GraphicsEngine {

  Chain mobs = null;

  public GraphicsEngine() {}

  public void AddMOB (MOB new_mob) {

    mobs = new Chain(new_mob, mobs);

  }

  public void paint(Graphics g, ImageObserver imob) {

    Chain temp_mobs = mobs;

    MOB mob;

    while (temp_mobs != null) {

      mob = temp_mobs.mob;

      g.drawImage(mob.picture, mob.x, mob.y, imob);

      temp_mobs = temp_mobs.rest;

    }

  }

}

class Chain {

  public MOB mob;

  public Chain rest;

  public Chain(MOB mob, Chain rest) {

    this.mob = mob;

    this.rest = rest;

  }


}
Before we detail how the GraphicsEngine class works, let’s touch on the Chain class. The Chain class looks rather simple—and it can be—but don’t let that fool you. Entire languages such as LISP and Scheme have been built around data structures that have the same function as the Chain class. The class is simply a data structure that holds two objects. Here, we’re calling those two objects item and rest because we are going to use Chain to create a linked list. The power of the Chain structure—and those structures like it—is that they can be used as building blocks to create a multitude of more complicated structures. These structures include circular buffers, binary trees, weighted di-graphs, and linked lists, to name a few. Using the Chain class to create a linked list will be suitable for our purposes.
To understand what a linked list is, think of a train as an example of a linked list: The train could be considered to be the first car followed by the rest of the train. The rest of the train could be described as the second car followed by the remaining cars. This description could continue until you reached the last car which would be described as the caboose followed by nothing. To compare this analogy with the code for the class Chain, a Chain is analogous to a train. A Chain can be described as a movable object followed by the rest of the Chain, just as a train could be described as a car followed by the rest of the train. And just as the rest of the train could be considered a train by itself, the rest of the Chain can be considered a Chain itself, and that’s why the rest is of type Chain.
From the looks of the constructor for Chain, it appears that you need an existing Chain to make another Chain. This makes sense when you already have a Chain and want to add to it, but how do you start a new Chain? To do this, create a Chain that is an item linked to nothing. How do you link an item to nothing? Use the Java symbol for nothing—null—to represent the rest Chain. If you take a look at the code, that’s exactly what we did. Our instance variable mobs is of type Chain and it is used to hold a linked list of movable objects. Look at the method AddMOB from Listing 32.2. Whenever we want to add another movable object to the list of movable objects that we’re controlling, we simply make a new list of movable objects that has the new movable object as the first item and the old Chain as the rest of the list. Notice that the initial value of mobs is null, which is used to represent nothing.
How do we use the list of movable objects once AddMOB has been called for all of the movable objects we want to handle? Take a look at the paint method. The first thing to do is copy the pointer to mobs into a temporary Chain called temp_mobs. Note that the pointer is copied, not the actual contents. If the contents were copied instead of the pointer, this approach would take much longer and would be much more difficult to implement. “But I thought Java doesn’t have pointers,” you might be thinking at this point. That’s not exactly true; Java doesn’t have pointer arithmetic, but pointers still are used to pass arguments, although the programmer never has direct access to these pointers.
temp_mobs now contains a pointer to the list of all of the movable objects to be drawn. The task at hand is to go through the list and draw each movable object. The variable mob will be used to keep track of each movable object as we get to it. The variable temp_mobs will represent the list of movable objects we have left to draw (that’s why we started it off pointing to the whole list). We’ll know all of our movable objects have been drawn when temp_mobs is null, because that will be like saying the list of movable objects left to draw is empty. That’s why the main part of the code is encapsulated in a while loop that terminates when temp_mobs is null.
Take a look at the code inside the while loop of the paint method. The first thing that is done is assigning mob to the movable object at the beginning of the temp_mobs Chain so that there is an actual movable object to deal with. Now it’s time to draw the movable object. The g.drawImage command draws the movable object in the proper place. The variable mob.picture is the picture stored earlier when the movable object was created. The variables mob.x and mob.y are the screen coordinates where the movable object should be drawn; notice that these two variables are looked at every time the movable object is drawn, so changing one of these coordinates while the program is running has the same effect as moving it on the screen. The final argument passed to g.drawImage, imob, is an ImageObserver that is responsible for redrawing an image when it changes or moves. Don’t worry about where to get an ImageObserver from; chances are, you’ll be using the GraphicsEngine class to draw inside a Component (or a subclass of Component such as Applet), and a Component implements the ImageObserver interface so that you can just pass the Component to GraphicsEngine whenever you want to repaint.
The final line inside the while loop shortens the list of movable objects that need to be drawn. It points temp_mobs away from the Chain that it just drew a movable object off the top of and points it to the Chain that contains the remainder of the MOBs. As we continue to cut down the list of MOBs by pointing to the remainder, temp_mobs will eventually wind up as null, which will end the while loop with all of our movable objects drawn. (See Figure 32.1 for a graphical explanation.)
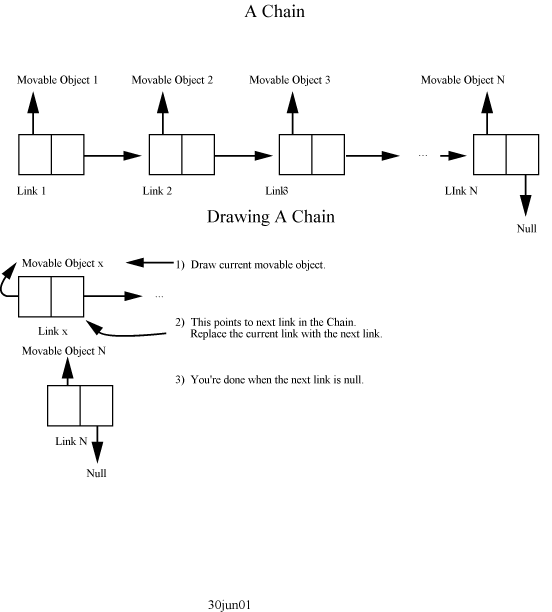 FIGURE 32.1.
A graphical representation of a Chain.
The graphics engine we just built certainly had some important things left out, but it will work. Let’s go over how to install the GraphicsEngine inside a Component first, and then go back and improve on the design of the graphics engine and the MOB. It would be a good idea to type in and compile Listings 32.1 through 32.3 now so that you can get an idea of what the code does. Compile the code by saving each listing into its own file and then using the javac command. In addition to compiling the code in Listings 32.1 through 32.3, you also will need to create an HTML file as shown in Listing 32.4. As the final step, you will need to place a small image file to be used as the movable object in the same directory as the code and either rename it to one.gif or change the line inside the init method in Listing 32.3 that specifies the name of the picture being loaded.
import java.awt.*;

import java.applet.Applet;

import java.net.URL;

public class Game extends Applet {

  GraphicsEngine engine;

  MOB picture1;


  public void init() {

    try {

      engine = new GraphicsEngine();

      Image image1 = getImage(new URL(getDocumentBase(), “one.gif”));

      picture1 = new MOB(image1);

      engine.AddMOB(picture1);

    }

    catch (java.net.MalformedURLException e) {

      System.out.println(“Error while loading pictures...”);

      e.printStackTrace();

    }

  }


  public void update(Graphics g) {

    paint(g);

  }


  public void paint(Graphics g) {

    engine.paint(g, this);

  }


  public boolean mouseMove (Event evt, int mx, int my) {

    picture1.x = mx;

    picture1.y = my;

    repaint();

    return true;

  }

}
<html>

<head>

<title>GraphicsEngine Example</title>

</head>

<body>

<h1>GraphicsEngine Example</h1>

<applet code=”Game.class” width=200 height=200>

</applet>

</body>

</html>
Once you have the example up and running, the image you selected should appear in the upper-left corner of the applet’s window. Pass your mouse over the applet’s window. The image you have chosen should follow your pointer around the window.
Let’s go over how the code works that linked the GraphicsEngine into the applet called Game. Our instance variables are engine, which controls all of the movable objects we can deliver, and picture1, a movable object that draws the image chosen.
The init method is fairly straightforward. You initialize engine by setting it equal to a new GraphicsEngine. Next, the image that you chose is loaded with a call to getImage. This line creates the need for the try and catch statements that surround the rest of the code in order to catch any invalid URLs. After the image is loaded, it is used to create a new MOB, and picture1 is initialized to this new MOB. The work is completed by adding the movable object to engine so that engine will draw it in the future. The remaining lines (the lines inside the catch statement) are just there to provide information about any errors that occur.
The update method is used to avoid flickering. By default, applets use the update method to clear the window that they live in before they repaint themselves with a call to their paint method. This can be a useful feature if you’re changing the display only once in a while, but with graphics-intensive programs this can create a lot of flicker because the screen refreshes itself frequently. Because the screen refreshes itself so frequently, once in a while it will catch the applet at a point where it has just cleared its window and hasn’t had a chance to redraw itself yet. This will result in a flicker.
The flicker was eliminated here simply by leaving out the code that clears the window and going straight to the paint method. If you have run this example applet, you probably have already noticed that not clearing the screen might solve the problem of flickering, but it creates another problem—your movable object is leaving streaks! Don’t worry, though, the streaks will be eliminated a little later when we introduce double buffering into our graphics engine.
As you can see, the Game.paint method consists of one line—a call to the paint method in engine. It might seem like a waste of time going from update to paint to engine.paint just to draw one image. Once you have a dozen or more movable objects on the screen at once, however, you’ll appreciate the simplicity of being able to add the object in the init methodand then forget about it the rest of the time, letting the engine.paint method take care ofeverything.
Finally, we have the mouseMove method. This is what provides the tracking motion so that the movable object follows your pointer around the window. There are, of course, other options for user input that will be discussed later. The tracking is accomplished simply by setting the coordinates of the movable object to the position of the mouse. The call to repaint just tells the painting thread that something has changed, and the painting thread will call paint when it gets around to it, so you don’t need to worry about redrawing any more. To finish up, true is returned to inform the caller that the mouseMove event was taken care of.
Now that the framework has been laid for a functional graphics engine, it’s time to make improvements. Let’s start with movable objects. What should be considered when thinking about the uses that movable objects have in games? Chances are, sooner or later you’ll want to write a game with a lot of movable objects. It would be much easier to come up with some useful properties that you want all your movable objects to have now so that you don’t have to deal with each movable object individually later.
One area that merits improvement is the order in which movable objects are painted. What if you had a ball (represented by a movable object) that was bouncing along the screen, and you wanted it to travel in front of a person (also represented by a movable object)? How could you make sure that the ball was drawn after the person every time, thus making it look like the ball is in front? You could make sure that the ball is the first movable object added to the engine, thus ensuring that it’s always the last movable object painted. However, that could get hairy if you have 10 or 20 movable objects that all need to be in a specific order. Also, what if you wanted the same ball to bounce back across the screen later on, but this time behind the person? The method of adding movable objects in the order you want them drawn obviously wouldn’t work, because you would be switching the drawing order in the middle of theprogram.
What is needed is some sort of prioritization scheme. The improved version of the graphics engine implements a scheme where each movable object has an integer that represents itspriority. The movable objects with the highest priority number get drawn last and thus appear in front.
Listing 32.5 shows the changes that need to be made to the MOB class to implement prioritization. Listing 32.6 shows the changes that need to be made to the GraphicsEngine class, and Listing 32.7 shows the changes that need to be made to the Game applet. Several other additional features also have been added, and we’ll touch on those later.
The heart of the prioritization scheme lies in the new version of GraphicsEngine.paint. The basic idea is that before any movable objects are drawn, the complete list of movable objects is sorted by priority each time. The highest priority objects are put at the end of the list so that they are drawn last and appear in front, and the lowest priority objects are put at the beginning of the list so that they are drawn first and appear in back. A bubble sort algorithm is used to sort the objects. Bubble sort algorithms usually are slower than other algorithms, but they tend to be easier to implement. In this case, the extra time taken by the bubble sort algorithm is relatively negligible because the majority of time within the graphics engine is eaten up just by displaying the images.
Compile and run the extended versions of the code in Listings 32.5, 32.6, and 32.7. After doing so, look at the init method in the Game class and pay particular attention to the priorities assigned to each movable object. From looking at the mouseMove method, you should be able to see that the first five movable objects line up in a diagonal line of sorts as long as you move your mouse slowly. If you move your mouse slowly, you should see that three of the first five movable objects are noticeably in front of the other two. This should make sense if you examine the priorities they were assigned inside the Game.init method.
You also will notice that the bouncing object is always in front of the objects that you control with your mouse. This is because it was assigned a higher priority than all of the other objects. Try hitting the S key. The first object that your mouse controls now should be displayed in front of the bouncing object. Take a look at the Game.keyDown method to see why this occurs. You will see that pressing the S key toggles the priority of picture1 between a priority that is lower than the bouncing object and a priority that is higher than the bouncing object.
import java.awt.*;

public class MOB {

  public int x = 0;

  public int y = 0;

  public Image picture;

  public int priority = 0;

  public boolean visible = true;


  public MOB(Image pic) {

    picture=pic;

  }

}
import java.awt.*;

import java.awt.image.*;

public class GraphicsEngine {

  Chain mobs = null;

  public Image background;

  public Image buffer;

  Graphics pad;


  public GraphicsEngine(Component c) {

    buffer = c.createImage(c.size().width, c.size().height);

    pad = buffer.getGraphics();

  }

  public void AddMOB (MOB new_mob) {

    mobs = new Chain(new_mob, mobs);

  }

  public void paint(Graphics g, ImageObserver imob) {

    /* Draw background on top of buffer for double buffering. */


    if (background != null) {

      pad.drawImage(background, 0, 0, imob);

    }

    /* Sort MOBs by priority */

    Chain temp_mobs = new Chain(mobs.mob, null);

    Chain ordered = temp_mobs;

    Chain unordered = mobs.rest;

    MOB mob;

    while (unordered != null) {

      mob = unordered.mob;

      unordered = unordered.rest;

      ordered = temp_mobs;

      while (ordered != null) {

     if (mob.priority < ordered.mob.priority) {

       ordered.rest = new Chain(ordered.mob, ordered.rest);

       ordered.mob = mob;

       ordered = null;

     }

     else if (ordered.rest == null) {

       ordered.rest = new Chain(mob, null);

       ordered = null;

     }

    else {

       ordered = ordered.rest;

     }

      }

    }

    /* Draw sorted MOBs */

    while (temp_mobs != null) {

      mob = temp_mobs.mob;

      if (mob.visible) {

     pad.drawImage(mob.picture, mob.x, mob.y, imob);

      }

      temp_mobs = temp_mobs.rest;

    }

    /* Draw completed buffer to g */


    g.drawImage(buffer, 0, 0, imob);

  }

}

class Chain {

  public MOB mob;

  public Chain rest;

  public Chain(MOB mob, Chain rest) {

    this.mob = mob;

    this.rest = rest;

  }


}
import java.awt.*;

import java.applet.Applet;

import java.net.URL;

public class Game extends Applet implements Runnable {

  Thread kicker;

  GraphicsEngine engine;

  MOB picture1, picture2, picture3, picture4, picture5, picture6;


  public void init() {

    try {

      engine = new GraphicsEngine(this);

      engine.background = getImage(new URL(getDocumentBase(), “background.jpg”));

      Image image1 = getImage(new URL(getDocumentBase(), “one.gif”));

      picture1 = new MOB(image1);

      picture2 = new MOB(image1);

      picture3 = new MOB(image1);

      picture4 = new MOB(image1);

      picture5 = new MOB(image1);

      picture6 = new MOB(image1);

      picture1.priority = 5;

      picture2.priority = 1;

      picture3.priority = 4;

      picture4.priority = 2;

      picture5.priority = 3;

      picture6.priority = 6;

      engine.AddMOB(picture1);

      engine.AddMOB(picture2);

      engine.AddMOB(picture3);

      engine.AddMOB(picture4);

      engine.AddMOB(picture5);

      engine.AddMOB(picture6);

    }

    catch (java.net.MalformedURLException e) {

      System.out.println(“Error while loading pictures...”);

      e.printStackTrace();

    }

  }


  public void start() {

    if (kicker == null) {

      kicker = new Thread(this);

    }

    kicker.start();

  }

  public void run() {

    while (true) {

      picture6.x = (picture6.x+3)%size().height;

      int tmp_y = (picture6.x % 40 - 20)/3;

      picture6.y = size().width/2 - tmp_y*tmp_y;

      repaint();

      try {

     kicker.sleep(50);

      }

      catch (InterruptedException e) {

      }

    }

  }

  public void stop() {

    if (kicker != null && kicker.isAlive()) {

      kicker.stop();

    }

  }

  public void update(Graphics g) {

    paint(g);

  }


  public void paint(Graphics g) {

    engine.paint(g, this);

  }


  public boolean mouseMove (Event evt, int mx, int my) {

    picture5.x = picture4.x-10;

    picture5.y = picture4.y-10;

    picture4.x = picture3.x-10;

    picture4.y = picture3.y-10;

    picture3.x = picture2.x-10;

    picture3.y = picture2.y-10;

    picture2.x = picture1.x-10;

    picture2.y = picture1.y-10;

    picture1.x = mx;

    picture1.y = my;

    return true;

  }

  public boolean keyDown (Event evt, int key) {

    switch (key) {

    case ‘a’:

      picture6.visible = !picture6.visible;

      break;

    case ‘s’:

      if (picture1.priority==5) {

     picture1.priority=7;

       }

      else {

    picture1.priority=5;

      }

      break;

    }

    return true;

  }

}
Two big features also implemented in the improved code were double buffering and the addition of a background image. This is accomplished entirely in GraphicsEngine. Notice the changes in the constructor for GraphicsEngine. The graphics engine now creates an image so that it can do off-screen processing before it’s ready to display the final image. The off-screen image is named buffer, and the Graphics context that draws into that image is named pad.
Now take a look at the changes to the paint method in GraphicsEngine. Notice that up until the end, all of the drawing is done into the Graphics context pad instead of the Graphics context g. The background is drawn into pad at the beginning of the paint method and then the movable objects are drawn into pad after they have been sorted. Once everything is drawn into pad, the image buffer contains exactly what we want the screen to look like; so we draw buffer to g, which displays it on the screen.
Another feature that was added to the extended version of the movable objects was the capability to make your movable objects disappear when they aren’t wanted. This was accomplished by giving MOBs a flag called visible. Take a look at the end of GraphicsEngine.paint to see how this works. This feature would come in handy if you had an object that you only wanted to show part of the time. For instance, you could make a bullet as a movable object. Before the bullet is fired, it is in a gun and should not be visible, so you set visible to false and the bullet isn’t shown. Once the bullet is fired it can be seen, so you set visible to true and the bullet is shown. Run the Game applet and try pressing the A key a few times. As you can see from the keyDown method, hitting the A key toggles the visible flag of the bouncing object between true and false.
By no means do the features shown in Listings 32.5, 32.6, and 32.7 exhaust the possibilities of what can be done with the structure of movable objects. Several additional features could easily be added, such as a centering feature for movable objects so that they are placed on the screen based on their center rather than edge, an animation feature so that a movable object could step through several images instead of just displaying one, the addition of velocity and acceleration parameters, or even a collision-detection method that would allow you to tell when two movable objects have hit each other. Feel free to extend the code as needed to accommodate your needs.
We haven’t actually written a game in this chapter, but we have laid the foundation for writing games. You now have objects that you can move around the screen simply by changing their coordinates. These tools have been the building blocks for games since the beginning ofgraphics-based computer games. Use your imagination and experiment. If you need more help extending the concepts described here concerning the creation of games with movable objects and their associated graphics engines, pick up a book that’s devoted strictly to game programming. Tricks of the Game-Programming Gurus, (Sams Publishing) is a good example.
We’ve spent all this time learning how to do the graphics for a game in Java, but what about sounds? Sound in Java is not yet complicated. The Java development team worked hard on the first release of Java, but they unfortunately didn’t have time to incorporate a lot of sound support.
Check out java.applet.AudioClip to discover the full extent of sound use in the 1.0 release of Java. There are only three methods: loop, play, and stop. This makes life somewhat easier because the interface is so simple. Use Applet.getAudioClip to load an AudioClip in the AU format and you have two choices: Use the play method to play it at specific times or the loop method to play it continuously. The applications for each are obvious. Use the play method for something that’s going to happen once in a while, such as the firing of a gun, and use the loop method for something that should be heard all of the time, such as background music or the hum of a car engine.
When thinking about the design of your game, there are some Java-specific design issues that you must consider. One of Java’s most appealing characteristics is that it can be downloaded through the Web and run inside a browser. This networking aspect brings several new considerations into play. Java also is meant to be a cross-platform language, which has important ramifications in the design of the user interface and games that rely heavily on timing.
When picking a user interface, there are several things you should keep in mind. Above all, remember that your applet should be able to work on all platforms because Java is a cross-platform language. If you choose to use the mouse as your input device, keep in mind that regardless of how many buttons your mouse has, a mouse in Java only has one button. Java can read from any button on a mouse, but it considers all the buttons to be the same button. The Java development team made the design choice to have only one button so that Macintosh users wouldn’t get the short end of the stick.
If you use the keyboard as your input device it is even more critical for you to remember that although the underlying platforms might be vastly different, Java is platform-independent. This becomes a problem because the different machines that Java can run on might interpretkeystrokes differently when more than one key is held down at once. It might seem worthwhile to throw a supermove in your game that knocks an opponent off the screen, activated by holding down four secret keys at the same time. However, doing this might destroy the platform independence of your program, because there could be other platforms that don’t handle four keystrokes at once. The best way to go would be to design a user interface that doesn’t call into question whether it is truly cross-platform. Try to get by with only one key at a time, and stay away from control and function keys in general since they could be interpreted as browser commands by different browsers that your applet runs in.
Because one of the main features of Java is that it can be downloaded and run across the Net, the limitations imposed by this method bear some investigation. First, please keep in mind that most people with a network connection aren’t on the fastest lines in the world. You might be ready to develop the coolest animation ever for a Java game, but keep in mind that nobody will want to see it if it takes forever to download. It is a good idea to avoid extra frills when they are going to be costly in terms of downloading time.
One trick that you can use to get around a lengthy download time is to send everything that you can for downloading in the background. For instance, you could send level one of your game for downloading, start the game, and while the user plays level one, levels two and up could be sent for downloading in a background thread. This task is simplified considerably with the java.awt.MediaTracker. To use the MediaTracker class, simply add all of your images to a MediaTracker with the addImage method and then call checkAll with true as an argument.
Opening a network connection can take a significant amount of time. If you have 32 or 40 pictures to send for downloading, the time this takes can quickly add up. One trick that will help you decrease the number of network connections you have to open is to combine several smaller pictures into one big picture. This decreases the number of pictures you have to send for downloading. You can use a paint program or image editing program to create a large image that is made up of your smaller images placed side by side. You then can send for downloading the large image only. This decreases the number of network connections you need to open and might also decrease the total number of bytes contained in the image data. Depending on the type of compression used, if the smaller images that make up your larger image are similar, you probably will achieve better compression by combining them into one picture. Once the larger picture has been loaded from across the network, the smaller pictures can be extracted by using the java.awt.image.CropImageFilter class to crop the image for each of the original smaller images.
Another thing that needs to be kept in mind with applets is timing. Java is remarkably fast for an interpreted language, but graphics handling usually leaves something to be desired when it comes to rendering speed. Your applet probably will be rendered inside a browser, which slows it down even more. If you are developing your applets on a state-of-the-art workstation, please keep in mind that there are a large number of people who will be running Java inside a Web browser on much slower PCs. When your applets are graphics-intensive it’s always a good idea to test them on slower machines to make sure that the performance is acceptable. If you find that an unacceptable drop in performance occurs when you switch to a slower platform, try shrinking the Component that your graphics engine draws into. You also might want to try shrinking the images used inside your movable objects because the difference in rendering time is most likely the cause of the drop in performance.
Another thing to watch out for is poor threading. A top-of-the-line workstation might allow you to push your threads to the limit, but on a slow PC computation time is often far too precious, and improperly handled threading can lead to some bewildering results. Notice in the run method in Listing 32.7 that we tell the applet’s thread to sleep for 50 milliseconds. You might want to try taking this line out and seeing what happens. If you’re using the AppletViewer or a browser, it will probably lock up or at least appear to respond very slowly to mouse clicks and keystrokes. This happens because the applet’s thread, kicker, is eating up all of the computation time and there’s not much time left over for the painting thread or the user input thread. Threads can be extremely useful, but you have to make sure that they are put to sleep once in a while to give other threads a chance to run.
In this chapter we developed a basic graphics engine with Java that can be used for game creation. This graphics engine incorporated movable objects with prioritization and visibility settings, double buffering, and a background image. Creating the graphics engine itself didn’t actually accomplish the construction of a game because constructing one game would have been of limited use. The construction of a tool that can be expanded to produce a multitude of games is far more useful.
This chapter also touched on issues that need to be kept in mind when developing games with Java. It is important to remember that Java is a cross-platform language and therefore will be run on different platforms. This basically means that when you develop your games you should be aware that people will want to run them on machines that might not be as capable as your machine.