


This chapter shows how to put Java’s networking classes to use in applets and applications. Before getting into the examples, a short overview is presented of the capabilities and limitations of the different network classes. If you have never done any network programming, this should help you decide on what type of connection class you need to base your application. This overview should help you to pick the Java classes that will best fit your networking application. An overview of Java security, as it relates to network programming, is also given.
The examples show you what each of the Java networking classes does and how to use them. The first example is an applet that retrieves a specified URL and displays the contents in a window using the URL and URLConnection classes. Next is a client for the Finger protocol that demonstrates the use of Socket objects. The TCPServer example shows how to use a ServerSocket to write a simple TCP-based server. The last two examples use the DatagramSocket and DatagramPacket in both server and client roles.
The answer to this question depends on what you are trying to do and what type of application you are writing. The different network protocols have their own advantages and disadvantages. If you are writing a client for someone else’s protocol, the decision probably has been made for you. If you are writing your own protocol from scratch, the following should help you decide what transport method (and hence, what Java classes) best fit your application.
This class is an example of what can be accomplished using the other, lower-level network objects. The URL class is best suited for applications or applets that need to access content on the World Wide Web. If all you need to use Java for is writing Web browser applets, the URL and URLConnection classes in all likelihood will handle your network communications needs.
The URL class enables you to retrieve a resource from the Web by specifying the Uniform Resource Locator for it. The content of the URL is fetched and turned into a corresponding Java object (such as a String containing the text of an HTML document). If you are fetching arbitrary information, the URLConnection object provides methods that will try to deduce the type of the content either from the filename in the URL or from the content stream itself.
The Socket class provides a reliable, ordered stream connection (that is, a TCP/IP socket connection). The host and port number of the destination are specified when the Socket is created.
The connection is reliable because the transport layer (the TCP protocol layer) acknowledges the receipt of sent data. If one end of the connection does not get an acknowledgment back within a reasonable period of time, it will resend the unacknowledged data (a technique known as Positive Acknowledgment with Retransmission, often abbreviated as PAR). Once you have written data into a Socket, you can assume that the data will get to the other side (unless you receive an IOException, of course).
Ordered stream means that the data arrive at the opposite end in the exact same order that you write the data. However, because the data are a stream, write boundaries are not preserved. What this means is that if you write 200 characters, the other side might read all 200 at once. It might get the first 10 characters one time and the next 190 the next time data are received from the socket. In either case the receiver cannot tell where each group of data was written.
The reliable stream connection provided by Socket objects is well suited for interactive applications. Examples of protocols that use TCP as their transport mechanism are telnet and FTP. The HTTP protocol used to transfer data for the Web also uses TCP to communicate between hosts.
A ServerSocket object represents what Socket-type connections communicate with. Server sockets listen on a given port for connection requests when their accept() method is called. The ServerSocket offers the same connection-oriented, ordered stream protocol (TCP) that the Socket object does. In fact once a connection has been established, the accept() method will return a Socket object to talk with the remote end.
A DatagramSocket provides an unreliable, connectionless, datagram connection (that is, a UDP/IP socket connection).
Unlike the reliable connection provided by a Socket, there is no guarantee that what you send over a UDP connection actually gets to the receiver. The TCP connection provided by the Socket class takes care retransmitting any packets that might get lost. Packets sent through UDP simply are sent out and forgotten, which means that if you need to know that the receiver got the data, you will have to send back some sort of acknowledgment. This does not mean that your data will never get to the other end of a UDP connection. If a network error happens (your cat jiggles the Ethernet plug out of the wall, for instance) then the UDP layer will not try to send it again or even know that the packet did not get to the recipient.
Connectionless means that the socket does not have a fixed receiver. You may use the same DatagramSocket to send packets to different hosts and ports, whereas a Socket connection is only to a given host and port. Once a Socket is connected to a destination it cannot be changed. The fact that UDP sockets are not bound to a specific destination also means that the same socket can listen for packets as well as originating them. There is no UDP DatagramServerSocket equivalent to the TCP ServerSocket.
Datagram refers to the fact that the information is sent as discrete packets rather than a continuous ordered stream. The individual packet boundaries are preserved. It might help to think of it as dropping fixed-size postcards in a mailbox. For example, if you send four packets, the order in which they arrive at the destination is not guaranteed to be the same in which they were sent. The receiver could get them in the same order they were sent or they could arrive in reverse order. In any case, each packet will be received whole.
Given the above constraints, why would anyone want to use a DatagramSocket? There are several advantages to using UDP, as follows:
The NFS (Network File System) protocol version two, originally developed by Sun with implementations available for most operating systems, is an example application that uses UDP for its transport mechanism. Another example of an application where a DatagramSocket might be appropriate would be a multiplayer game. The central server would need to communicate to all of the players involved, and would not necessarily need to know that a position update got to the player.
| NOTE |
|---|
| An actual game that uses UDP for communication is Netrek, a space combat simulation loosely based on the Star Trek series. Information on Netrek can be found using the Yahoo subject catalog at http://www.yahoo.com/recreation/games/internet_games/netrek/. There is also a Usenet newsgroup, news:rec.games.netrek. |
Now that you know what the classes are capable of, you can choose the one that best fits your application. Table 29.1 sums up what type of connection each of the base networking classes creates. The direction column indicates where a connection originates: “Outgoing” indicates that your application is opening a connection out to another host; and “Incoming” indicates that some other application is initiating a connection to yours.
Table 29.1. Low-level connection objects summarized.
| Class | Connection Type | Direction |
|---|---|---|
| Socket | Connected, ordered byte stream (TCP) | Outgoing |
| ServerSocket | Connected, ordered byte stream (TCP) | Incoming |
| DatagramSocket | Connectionless datagram (UDP) | Incoming or Outgoing |
You need to look at the problem you are trying to solve, any constraints you have, and the transport mechanism that best fits your situation. If you are having problems choosing a transport protocol, take a look at some of the RFCs that define Internet standards for applications (such as HTTP or SMTP). One of them might be similar to what you are trying to accomplish. As an alternative, you could be indecisive and provide both TCP and UDP versions of your service, duplicating the processing logic and customizing the network logic. Trying both transport protocols with a pared-down version of your application might give you an indication that better serves your purposes. Once you’ve looked at these factors you should be able to decide what class to use.
One of the purposes of Java is to enable executable content from an arbitrary network source to be retrieved and run securely. To enable this, the Java runtime enforces certain limitations on what classes obtained through the network may do. You should be aware of these constraints because they will affect the design of applets and how the applets must be loaded. You will need to take into consideration whatever security constraints are imposed by your target environment and your development environment, as well, when designing your application or applet.
For example, Netscape Navigator 2.0 allows code loaded from local disk more privileges than code loaded over a network connection. A class loaded from an HTTP daemon may only create outgoing connections back to the host from which it was loaded. If the class had been loaded from the local host (that is, it was located somewhere in the class search path on the machine running Navigator), it would be able to connect to an arbitrary host. Contrast this with the appletviewer provided with Sun’s Developer’s Kit. The appletviewer can be configured to act similarly to Navigator or to enforce no restrictions on network connectivity.
If you need full access to all of Java’s capabilities, there is always the option of writing a stand-alone application. A stand-alone application (that is, one not running in the context of a Web browser) has no restrictions on what it is allowed to do. Sun’s HotJava Web browser is an example of a stand-alone application.
| NOTE |
|---|
| For a more detailed discussion of Java security and how it is designed into the language and runtime, take a look at Chapter 40, “Java Security.”
In addition, Sun has several white paper documents and a collection of frequently asked questions available at http://www.javasoft.com/sfaq/. |
These checks are implemented by a subclass of java.lang.SecurityManager. Depending on the security model, the object will allow or deny certain actions. You can check beforehand whether a capability your applet needs is present by calling the SecurityManager yourself. The java.lang.System object provides a getSecurityManager( ) method that returns a reference to the SecurityManager active for the current context. If your applet needs to open a ServerSocket, for instance, you can call the checkListen( ) method yourself and print an error message (or pop up a dialog box) alerting the users and referring them to installation instructions.
The URL class lets your Java code access resources from anywhere on the World Wide Web. We’ll start off by creating an applet that fetches a URL and displays the raw contents in a window. This first applet will use the URLConnection class method getInputStream( ) to read in the raw data.
Next, we’ll modify the applet to use the getContent( ) method to convert the resource into an appropriately typed Java object.
 FIGURE 29.1.
The urlFetcher applet.
The applet will be relatively straightforward. The user interface will be a location field for the entry of the URL to fetch along with two buttons: one to fetch the URL, and one to clear out the URL field. Below this will be a java.awt.TextArea object that will hold the content retrieved. Two read-only fields will go below the text to show the content type and size. These fields and the area will be member variables so that their setText( ) methods can be used to indicate changes when a new URL is retrieved. To let the user know what is happening, we’ll use the Applet method showStatus( ).
Functionally the applet will be broken into four parts:
We’ll start by outlining the overall structure of the applet. Specific methods or blocks of code will be represented by comments, and the exact code will be shown as it is developed. This format will be used for the examples throughout the rest of the chapter. The member variables of the class are used to hold the different text fields and the main text area so that methods can update them as necessary. They are set to null to start with, and the UI objects are allocated in makeUI( ), as follows:
import java.applet.Applet;

import java.awt.*;

import java.net.*;

import java.io.*;

public class urlFetcher extends Applet {

  TextField urlField = null;

  TextArea contentArea = null;

  TextField contentType = null;

  TextField contentSize = null;

  // init( ) Method

  // makeUI( ) Method

  // doFetch( ) Method

  // handleEvent( ) Method

}
All the initialization needed for this applet is to call our method to construct the user interface and then see whether a starting URL was specified as a parameter to the applet. If a URL was specified, we’ll set the text of urlField and call our doFetch( ) method to have it loaded, as follows:
public void init( ) {

  makeUI( );

  if( getParameter( “URL” ) != null ) {

    urlField.setText( getParameter( “URL” ) );

    doFetch( );

  }
This method allocates all of the user interface objects and inserts them into our applet’s window. No networking code is used here, just AWT objects, so there won’t be any commentary.
public void makeUI( ) {

  setLayout( new BorderLayout( ) );

  Panel p = new Panel( );

  contentArea = new TextArea( 24, 80 );

  Font fCourier = new Font( “Courier”, Font.PLAIN, 12 );

  contentArea.setFont( fCourier );

  contentArea.setEditable( false );

  p.add( contentArea );

  add( “Center”, p );

  p = new Panel( );

  p.add( new Label( “Location:” ) );

  urlField = new TextField( 40 );

  p.add( urlField );

  p.add( new Button( “Fetch” ) );

  p.add( new Button( “Clear URL” ) );

  add( “North”, p );

  p = new Panel( );

  p.add( new Label( “Content Type:” ) );

  contentType = new TextField( 20 );

  contentType.setEditable( false );

  p.add( contentType );

  p.add( new Label( “Content Size:” ) );

  contentSize = new TextField( 10 );

  contentSize.setEditable( false );

  p.add( contentSize );

  add( “South”, p );

  repaint( );

}
This method is where we put the URL and URLConnection classes to use, so we’ll go into a bit more detail. First we will rough out the skeleton for the method.
public void doFetch( ) {

  URL target = null;

  // Construct a URL

  try {

    // Get a URLConnection and InputStream

    // Read and Display the content

  } catch( IOException e ) {

    showStatus( “Error fetching \”” + target

      + “\”: “ + e );

    return;

  }

}
The first step in fetching the resource is to construct a URL from the text that the user entered in the urlField. If the URL is valid, we’ll display a status to let the user know what is happening. Otherwise, the constructor will throw a MalformedURLException. In this case we’ll take the exception text and display that and then return. If the applet is being loaded through the network, the URL cannot point to a host other than the one that the class was loaded from. To cope with this, we’ll catch any SecurityExceptions that might occur and display an appropriate message.
try {

  target = new URL( urlField.getText( ) );

  showStatus( “Fetching \”” + target + “\”” );

} catch( MalformedURLException e ) {

  showStatus( “Bad URL \”” + urlField.getText( ) + “\”: “

             + e.getMessage( ) );

  return;

} catch( SecurityException e ) {

  showStatus( “Security Error: “ + e.getMessage( ) );

  return;

}
The next step is to get a URLConnection from the URL just created. This object provides information about the stream being retrieved. It also has methods for obtaining an InputStream (and OutputStream, where appropriate) for the connection. At the same time we will allocate a byte array, an int, and a String for use reading the data. Remember that this code is contained inside a try and catch block that will handle any IOExceptions that might occur, as follows:
String content = “”;

URLConnection con = target.openConnection( );

byte b[] = new byte[ 1024 ];

int nbytes;

BufferedInputStream in =

  new BufferedInputStream( con.getInputStream( ), 2048 );
First, we will read all of the data from the BufferedInputStream just created. Before doing this, the setText( ) method will be called with an empty string to clear out the previous contents, if any. The following while loop then reads 1024 bytes at a time. We use the String constructor, which takes the number of bytes to read from array. The read( ) method returns the amount of data that actually were read, and this number is passed to the constructor. This string then is appended to the text already in the TextArea.
contentArea.setText( “” );

while( (nbytes = in.read( b, 0, 1024 )) != -1 ) {

  content = new String( b, 0, 0, nbytes );

  contentArea.appendText( content );

}
Next, we will use the URLConnection that was obtained to find the content type of the data (see Chapter 31, “Extending Java with Content and Protocol Handlers,” for a discussion of MIME types) and the length of the data. In general, these methods will return null or -1 to indicate that the attribute can’t be determined. Finally, we will display a status method to let the user know that the content has been retrieved.
String type = con.getContentType( )

if( type == null ) {

  type = “Unknown”;

}

contentType.setText( type );

int size = con.getContentLength( );

if( size == -1 ) {

  size = content.length( );

}

contentSize.setText( Integer.toString( size ) );
As the final step, we’ll write the event dispatcher for our applet. All that our applet is interested in are action events. These will be generated either by the user pressing the Enter key in the URL field or by pressing one of the two buttons. For any other event we will return false because we don’t handle it.
public boolean handleEvent( Event e ) {

  switch( e.id ) {

  case Event.ACTION_EVENT:

    {

      if( e.target instanceof TextField

         || e.arg.equals( “Fetch” ) ) {

        doFetch( );

        return true;

      }

      if( e.arg.equals( “Clear URL” ) ) {

        urlField.setText( “” );

        return true;

      }

    }

    default:

      return false;

  }

}
That’s all there is to using URL objects. All the source code is available on the CD-ROM as urlFetcher. Keep in mind that if you load this applet from an HTTP daemon rather than from local disk, you will only be allowed to fetch URLs from the same server. This applet is used again in Chapter 31, “Extending Java with Content and Protocol Handlers.”
The Socket class probably will solve most of your raw network access needs. In this section, we’ll demonstrate how to use the class with a client for a standard Internet service. The example also will lay the groundwork for writing TCP servers with ServerSockets, as well as being the basis for the protocol handler example in Chapter 31.
The first example of using Socket objects will be a client for the Finger protocol. This protocol is used to request information about users from a multiuser system, such as the last time they accessed the system or their real names. Most UNIX variants provide a Finger server to handle requests, and there are programs for Windows and Macintosh platforms that provide the same service. There is a client program, usually called Finger, or the service can be accessed by connecting to the server’s port with a telnet application.
The Finger protocol is defined in RFC 762. The server listens on TCP port 79. It expects either a user name to retrieve information about, followed by ASCII carriage return and linefeed characters, or just the carriage return and linefeed characters if information is sought on all users currently logged in. The information will be returned as ASCII text in a system-dependent format (although most UNIX variants will give similar information).
The fingerClient class will be very simple. It will have a member to hold the Socket we use to communicate, and two String objects to hold the user name and host we want information about. Because the protocol is so simple, we’ll do all of the communication in a method called getInfo(). This method will send the query and return the results to the caller as a String. Instead of throwing any exceptions, we will catch them and return an error message to the caller.
To illustrate how to use the client class, we’ll have a fingerApplet that will display for whom Finger is being used, what host we are querying, and a TextArea to display the results of the getInfo( ) call.
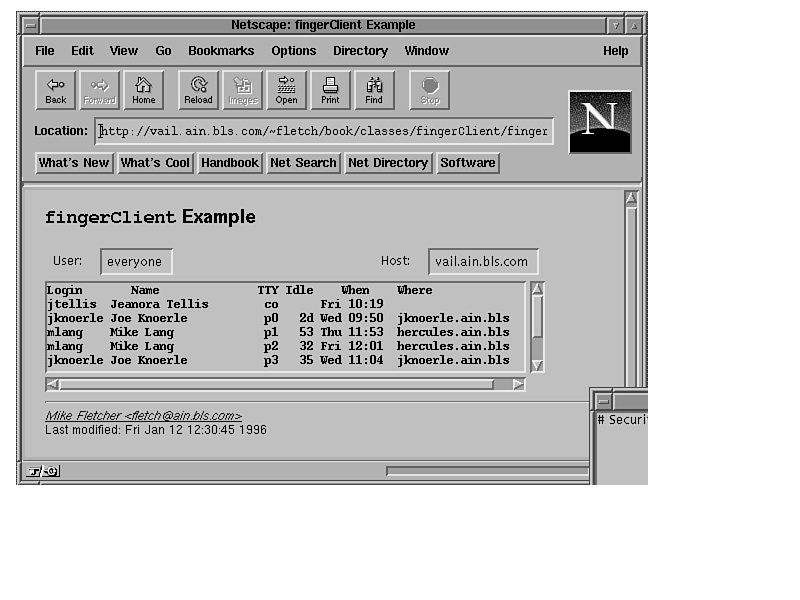 FIGURE 29.2.
The finished fingerClient applet.
The first thing to do is lay out the overall skeleton of the client class.
import java.net.*;

import java.io.*;

public class fingerClient {

  Socket s;

  String host = null;

  String user = null;

  public static final int fingerPort = 79;

  // Constructors

  // The getInfo( ) method

}
We will have two constructors: one that takes only a host name, and one that takes a host name and the name of a user. The constructors simply will copy the information into the appropriate member variables, as follows:
fingerClient( String h ) {

  host = h;

  user = “”;

}

fingerClient( String h, String u ) {

  host = h;

  user = u;

}
This is the method that does the actual work of contacting the Finger daemon and reading back the information. It will throw an UnknownHostException if it cannot open a Socket to the specified host. If an error occurs while reading data from the socket, an IOException will be thrown. We’ll start as follows by declaring the method and defining local variables: a String to hold our return value and a StringBuffer to build the return value in; a PrintStream to send our request to the Finger daemon; and a BufferedInputStream to read the response.
public String getInfo( )

  throws IOException, UnknownHostException {

  String retval = “”;

  StringBuffer strBuf = new StringBuffer( );

  BufferedInputStream in = null;

  PrintStream out = null;
Next, we will create a Socket object to the Finger port on the host specified. After doing so, we will create our I/O streams using the getOutputStream( ) and getInputStream( ) methods of the Socket, as follows:
s = new Socket( host, fingerPort );

out = new PrintStream( s.getOutputStream( ) );

in = new BufferedInputStream( s.getInputStream( ) );
The next step is to send our request and read back the results. The request is sent by sending the user name we want information about, followed by a carriage return and linefeed. The PrintStream method println( ) takes care of appending the carriage return and linefeed pair for us. After the request has been sent, we read back data from the server with a while loop into our StringBuffer. If an I/O error occurs, we’ll print an error message to System.err and throw the exception again.
out.println( user );

try {

  byte b[] = new byte[ 1024 ];

  int nbytes;

  while( (nbytes = in.read( b, 0, 1024 )) != -1 ) {

    strBuf.append( new String( b, 0, 0, nbytes ) );

  }

} catch( IOException e ) {

  System.err.println( “Error during read: “

                     + e );

  throw e;

}
All that is left to do now is to close our socket and return the String (constructed from the StringBuffer) to our caller, as follows:
  s.close( );

  s = null;

  retval = strBuf.toString( );

  return retval;

}
The following source code is an applet that uses the fingerClient developed earlier. This applet can be embedded in your home page to let people know the last time you logged in and whether you currently are online. It will default to using Finger for everyone on the host the page is loaded from. Keep in mind that because of Java’s security constraints, you only will be able to ask the machine running the HTTP daemon for Finger information if the fingerClient class is loaded over the network. One way around this is to have the fingerClient.class file located on your local machine somewhere in the CLASSPATH searched by your browser. The complete source for the fingerApplet class is given in Listing 29.1 (as well as on the CD-ROM).
import java.applet.Applet;

import java.awt.*;

public class fingerApplet extends Applet {

  public void init( ) {

    fingerClient c = null;

    String info = null;

    String host = null;

    String user = null;

    if( getParameter( “host” ) != null ) {

      host = getParameter( “host” );

    } else {

      host = “localhost”;

    }

    if( getParameter( “user” ) != null ) {

      user = getParameter( “user” );

    } else {

      user = “”;

    }

    c = new fingerClient( host, user );

    try {

      info = c.getInfo( );

    } catch( Exception e ) {

      info = “Problem fingering “

        + (user.equals( “” ) ? “everyone” : user)

        + “@” + host + “\n” + e );

    }

    setLayout( new BorderLayout( ) );

    TextField tmp = null;

    Panel lp = new Panel( );

    lp.add( new Label( “User:” ) );

    tmp = new TextField( (user.equals(“”) ? “everyone” : user ) );

    tmp.setEditable( false );

    lp.add( tmp );

    Panel rp = new Panel( );

    rp.add( new Label( “Host:” );

    tmp = new TextField( host );

    tmp.setEditable( false );

    rp.add( tmp );

    Panel p = new Panel( );

    p.setLayout( new BorderLayout( ) );

    p.add( “West”, lp );

    p.add( “East”, rp );

    add( “North”, p );

    TextArea t = new TextArea( 80, 4 );

    Font fCourier = new Font( “Courier”, Font.BOLD, 12 );

    t.setFont( fCourier );

    t.setEditable( false );

    add( “Center”, t );

    t.setText( info );

    repaint( );

}
An example of the HTML tags needed to use the fingerApplet follows. The parameters should be changed to reflect the user and host you want information for. Remember that if no user name is given, the fingerClient will retrieve information about all users logged in. If no host name is given, the applet will default to using Finger on the host that the applet code was retrieved from.
<applet code=”fingerApplet.class” width=”500" height=”300">

<param name=”host” value=”kremvax.gov.su”>

<param name=”user” value=”gorby”>

</applet>
This section will build on the concepts established in the previous one. You can’t use ServerSocket objects very well unless you know how to handle the Socket objects that represent the individual connections your server receives. If you skipped over the discussion using the Socket class, go back and read it.
Our example TCP server will listen for incoming connections on a given port (5000 by default—a nice, high port number). When it receives a connection, it will read data from the socket and write the data back. Figure 29.4 shows what the finished client applet will look like.
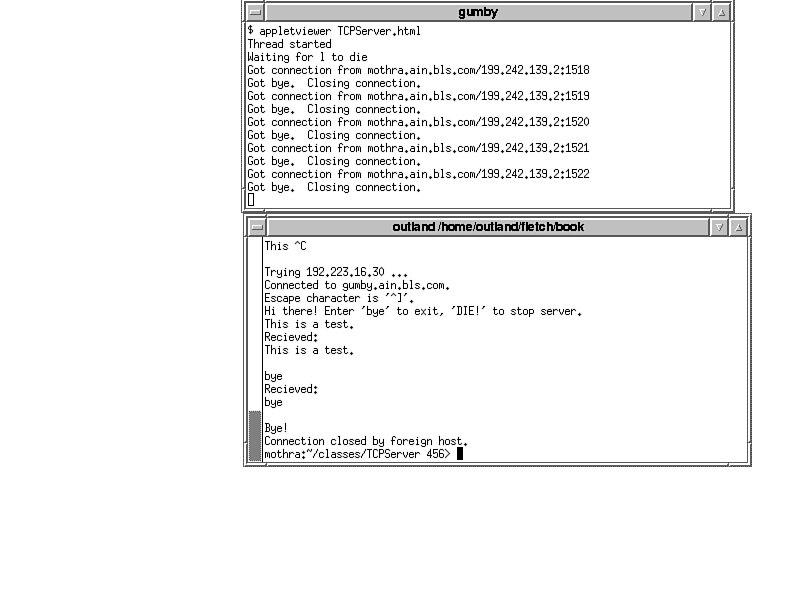 FIGURE 29.3.
The finished TCP Server applet.
The server will run in its own thread. It will open a ServerSocket when it is constructed. The constructor will accept the port number to listen for connections on. The server object will implement the Runnable interface. This allows other threads to continue while the server thread is blocked waiting for an incoming connection. In addition to the normal start( ) and stop( ) methods, we also will implement a join( ) method to allow another thread to wait for us to exit.
The run( ) method will call the accept( ) method on our socket. This method will return a Socket representing the incoming connection. The server will display a message showing where the connection originated to System.err. It next will obtain I/O streams for the Socket and display a welcome message. We then will enter a while loop reading data from the Socket and writing it back until one of two strings are received: bye, which will cause the connection to be closed and the server to wait for the next connection; and DIE!, which will cause the server thread to exit. We also will have an applet wrapper to allow the server to be started inside of a Web browser environment.
We’ll start out by outlining the overall structure of the server class.
import java.io.*;

import java.net.*;

public class TCPServer implements Runnable {

  Thread serverThread = null;

  ServerSocket s = null;

  int port = 5000;

  // Constructor

  // Runnable / Thread methods

  // run( ) Method

}
The constructor will take one argument: the port number to listen for connections on. It then will try to allocate a ServerSocket on that port. If an exception occurs, we will display an error message and then throw the exception again.
public TCPServer( int p ) throws IOException {

  port = p;

  try {

    s = new ServerSocket( port );

  } catch( IOException e ) {

    System.err.println( “Exception allocating ServerSocket: “

                       + e );

    throw e;

  }
Next, we will implement the methods to start and stop the server thread. These will be used again and again in the rest of the classes in this chapter, so we’ll go into a bit of detail here. All of these methods are defined as synchronized so that only one thread of execution may be accessing a given TCPServer object at a time. This prevents one thread from calling the stop( ) method while another is in the start( ) method (which could cause a NullPointerException). The first method will start a new server thread running if one is not already. The method also will allocate a new ServerSocket if s does not hold one already. This allows for the server to be stopped and restarted.
public synchronized void start( ) {

  if( serverThread == null ) {

    serverThread = new Thread( this );

    serverThread.setPriority( Thread.MAX_PRIORITY / 4 );

    serverThread.start( );

  }

  if( s == null ) {

    try {

      s = new ServerSocket( port );

    } catch( IOException e ) {

      System.err.println( “Exception allocating ServerSocket: “

                         + e );

      return;

    }

  }

}
The next method stops a server thread of execution, if one exists. It also will close our ServerSocket if we have one.
public synchronized void stop( ) {

  if( serverThread != null ) {

    serverThread.stop( );

    serverThread = null;

  }

  if( s != null ) {

    try {

      s.close( );

      s = null;

    } catch( IOException e ) {

      System.err.println( “Exception closing ServerSocket: “

                         + e );

      return;

    }

  }

}
Last, we have the join( ) method. This method will block the calling thread until the serverThread finishes its execution. It does not need to be marked as synchronized because multiple threads may all be waiting for our thread to exit, and we do not manipulate any member variables. The method will throw InterruptedException if another thread interrupts the one trying to join. If there is no thread to wait for, the method will return immediately.
public final void join( ) throws InterruptedException {

  if( serverThread != null ) {

    serverThread.join( );

  }

  return;

}
The run( ) method is where all of the server work is done.
public void run( ) {

  InputStream in = null;

  PrintStream out = null;

  Socket con = null;

  while( serverThread != null ) {

    // Wait for an incoming connection

    // Get I/O Streams for the Socket

    // Talk to the client

  }

  // Close the ServerSocket

}
Once the server is up and running, the first thing to do is hurry up and wait. The ServerSocket accept( ) method will block our thread until a client contacts our port requesting a connection. When one does, the method will return a Socket object representing the new connection. We’ll print where the connection is coming from to System.err. If there is an error accepting the connection, we’ll print an error message and return, terminating the server thread.
try {

  con = s.accept( );

} catch( IOException e ) {

  System.err.println( “Error on accept: “ + e );

  return;

}

System.err.println( “Got connection from “

                   + con.getInetAddress( ) + “:”

                   + con.getPort( ) );
Now that we have someone to talk to, we need to allocate stream objects so that the server can send and receive information to the client. We’ll use a plain InputStream to receive information from the other end, and a PrintStream for writing back to the client.
try {

  out = new PrintStream( con.getOutputStream( ) );

  in = con.getInputStream( );

} catch( Exception e ) {

  System.err.println( “Error building streams: “ + e );

}
We will start by printing a welcome message to the client. This message also will inform the client how to end the connection.
out.println(

  “Hi there! Enter ‘bye’ to exit, ‘DIE!’ to stop server.” );
Having welcomed the user, we go into a while loop, reading whatever they send us and parroting it back to them. We check each group of data to see whether it contains either of the commands we understand (bye or DIE!). If it does, we take the appropriate action and set the done flag to true.
try {

  int nbytes;

  boolean done = false;

  byte b[] = new byte[ 1024 ];

  while( !done && ((nbytes = in.read( b, 0, 1024 )) != -1 ) {

    String str = new String( b, 0, 0, nbytes );

    out.println( “Received:\n” + str );

    if( str.trim().compareTo( “bye” ) == 0 ) {

      System.err.println( “Got bye.  Closing Connection.” );

      done = true;

    }

    if( str.trim( ).compareTo( “DIE!” ) == 0 ) {

      System.err.println( “Exiting.” );

      stop( );

      return;

    }

    out.println( “Bye!” );

    out.flush( );

  }

} catch( Exception e ) {

  System.err.println( “Error reading: “ + e );

}
The last thing to do before going back to listen for the next connection is to close the Socket for the current connection. The while loop then will go back to the top and start over again.
try {

  con.close( );

} catch( Exception e ) {

  System.err.println( “Error on close: “ + e );

}
We now will show the source for the wrapper applet in its entirety in Listing 29.2. The code is also on the CD-ROM in the TCPServer directory.
import java.applet.Applet;

import java.awt.*;

import java.io.*;

// Wrapper for Listen class

public

class TCPServerApplet extends Applet {

  TCPServer serv = null;

  public void init( ) {

    int port = 5000;

    try {

      String param = getParameter( “port” );

      if( param != null ) {

        port =

          Integer.valueOf( param ).intValue();

      }

    } catch( Exception e ) {

      ;

    }

    try {

      serv = new TCPServer( port );

    } catch( IOException e ) {

      System.err.println( “Error starting server: “ + e );

      return;

    }

    serv.start( );

    TextArea statusArea = new TextArea( 80, 4 );

    setLayout( new BorderLayout( ) );

    statusArea.setText( statusMessage );

    statusArea.setEditable( false );

    add( “Center”, statusArea );

    System.err.println( “Thread started” );

    System.err.println( “Waiting for l to die” );

    // Join with server thread

    try {

      serv.join( );

    } catch ( InterruptedException e ) {

      System.err.println( “join interrupted: “ + e );

    }

    serv = null;

  }

  public static void main( String args[] ) {

    (new TCPServerApplet( )).init( );

    System.exit( 0 );

  }

}
Keep in mind that this is a single threaded server (that is, there’s only one thread handling clients). This means that only one client at a time may talk to the server. Any other clients will not receive a connection until after the current client has been serviced. In a real server application, you would want to be able to handle multiple clients simultaneously. For an example of how to do this, see the echoUDPServer example later in this chapter.
Another detail to remember is that Java’s security system will not let code loaded over the network open a ServerSocket in an applet context. If your applet needs access to ServerSocket objects, it must be loaded from the local disk.
Communicating with a DatagramSocket takes a different mindset from the TCP-based Socket and ServerSocket classes. Whereas the latter two classes function similarly to reading data from a file, the fixed-size messages of the UDP protocol are an entirely different matter. With a stream socket, you have to provide some means of delineating the beginning and end of messages. But when you use UDP, each message arrives in its own discrete package.
Our first example application using the DatagramSocket is to create a client that talks to a server process for the Echo Service. This service, defined in RFC 862, accepts connections through TCP and UDP. Whatever you send to the server is copied and sent back verbatim. It is mainly a sanity-checking mechanism. You can connect to the server and make sure that traffic is reaching the destination host.
 FIGURE 29.4.
The finished echoUDPCClient applet.
This example will consist of two classes: a class to communicate with the echo server, and a subclass of Applet to provide a user interface.
The first class, which we’ll call echoUDPClient, will handle all interaction with the server. In order to display our status, the constructor will take a reference to a java.awt.TextComponent. The constructor also will accept a host name to connect to, defaulting to the local host if it is unavailable. The class will implement the Runnable interface so that the user interface can continue processing events. The run( ) method will perform the following steps:
The second class, which will be called echoUDPApplet, will have three UI components: a TextArea for the echoUDPClient to display its results in, a Button to stop the client object, and a second Button to start a new echoUDPClient object.
We’ll develop the client UDP class first. After the skeleton and constructors, the miscellaneous utility methods will be given. Next the methods implementing the Runnable interface and the run() method are shown.
We’ll start off the class with the requisite import statements. All of the I/O and networking packages will be included, as well as the AWT TextComponent so that we know how to display results.
import java.io.*;

import java.net.*;

import java.awt.TextComponent;
Next, set up the skeleton for the class and the member variables. A static final member will be defined to specify the port that the echo service listens on (from the RFC).
public class echoUDPClient implements Runnable {

  Thread echoThread = null;

  TextComponent results;

  InetAddress targetHost;

  public static final int echoPort = 7;

  // Constructors

  // Misc. methods

  // Thread control methods

  // run( ) Method

}
The echoUDPClient has two constructors, both requiring a TextComponent where results will be shown, and one allowing the host to be contacted to be specified. Both constructors may throw the UnknownHostException if the host name cannot be resolved into an IP address by the InetAddress class.
echoUDPClient( TextComponent r, String host ) throws UnknownHostException {

 results = r;

  targetHost = InetAddress.getByName( host );

}

echoUDPClient( TextComponent r) throws UnknownHostException {

  results = r;

  targetHost = InetAddress.getLocalHost( );

}
In the miscellaneous methods section there is one entry, the setMessage( ) method that will display our status in the TextComponent passed when the object was constructed.
public void setMessage( String msg ) {

  results.setText( msg );

}
Before getting into the run( ) method, the start( ) and stop( ) methods need to be defined. The start method will create a new thread from the object (if one does not already exist), set the created thread’s priority to a low value, and start the thread executing. The stop method will stop the thread associated with the object if it is running, set the echoThread member to null (so we know that a thread isn’t currently running), and display a message using setMessage( ) to let the user know we’re stopping. Keep in mind that both of these methods need to be synchronized to prevent creating multiple threads by accident.
public synchronized void start( ) {

  if( echoThread == null ) {

    echoThread = new Thread( this );

    echoThread.setPriority( Thread.MAX_PRIORITY / 4 );

    echoThread.start( );

  }

}

public synchronized void stop( ) {

  if( echoThread != null ) {

    echoThread.stop( );

    echoThread = null;

  }

  setMessage( results.getText( ) + “\nEcho Client Stopping.” );

}
The run( ) method does all of the work in the echoUDPClient class. You might want to refer back to the design section to refresh your memory. The first thing to do is to declare the method and local variables. The two local variables are a DatagramSocket to hold our connection, and a counter to keep track of how many packets we send.
public void run( ) {

  DatagramSocket s = null;

  int counter = 0;

  // Allocate a DatagramSocket

  while( echoThread != null ) {

    // Allocate and Send a DatagramPacket

    // Wait For Reply DatagramPacket

    // Display Results and Sleep Three Seconds

  }

  return;

}
Allocate a DatagramSocket
Because our object is not a server, we do not care what local port number our socket is connected on. If a socket cannot be created and an exception is thrown, we will display the error message using setMessage( ) and return (which will cause the client thread to terminate).
try {

  s = new DatagramSocket( );

} catch( Exception e ) {

  String errorMessage =

    “Error creating DatagramSocket: “ + e;

  setMessage( errorMessage );

  return;

}
Allocate and Send DatagramPacket
The next code fragment will increment the counter, create a message and DatagramPacket to hold it, and send the message to the destination. Our error handling is rather simple: Ignore it and go back to the top of the while loop. In a real application you would want to try to resend the message.
To create the message from a String, we’ll be using the getBytes( ) method of that class. Next we’ll create a DatagramPacket using this byte array, the InetAddress we found in the constructor, and the class constant echoPort.
counter++;

String messageText = “This is message: “ + counter + “.”;

byte messageBytes[] = new byte[ messageText.length( ) ];

messageText.getBytes( 0, messageText.length( ), messageBytes, 0 );

DatagramPacket sendPacket =

  new DatagramPacket( messageBytes, messageBytes.length,

                      targetHost, echoUDPClient.echoPort );
Now that we have our datagram, we need to send it off. In case there is a problem sending the packet, we’ll watch for an IOException with a try and catch block.
try {

  s.send( sendPacket );

} catch( IOException e ) {

  String errorMessage =

    “Error receiving packet: “ + e;

  setMessage( errorMessage );

  continue;

}
Wait for Reply DatagramPacket
Now that the echo request has been sent, we need to prepare a DatagramPacket to receive the reply from the server.
Byte receiveBuf[] = new byte[ 1024 ];

DatagramPacket receivePacket =

  new DatagramPacket( receiveBuf, 1024 );
You probably noticed that the buffer allocated is much larger than any reply we’re likely to receive. Because we sent the message and know the exact size of the reply (the same message), why not allocate a buffer of that same size? In general, you might not know the exact size of the datagram you will be receiving. It almost never hurts to overestimate and make the buffer a bit larger.
The code to receive a message from the socket looks almost identical to that for sending. Again, if the receive( ) method throws an exception we print the error in our results window and go back to the beginning of the while loop.
try {

  s.receive( receivePacket );

} catch( IOException e ) {

  String errorMessage =

    “Error receiving packet: “ + e;

  setMessage( errorMessage );

  continue;

}
Display Results and Sleep Three Seconds
If we get to this point, we successfully have sent a packet to the echo server and gotten a reply back. We will create a String from the raw byte array of the packet and display it using setMessage( ).
String replyMessage = “Got back “ + receivePacket.getLength( )

  + “ bytes:\n”

  + (new String( receivePacket.getData( ), 0 ));

setMessage( replyMessage );
Before looping, we need to put in a bit of a delay so we don’t overwhelm the machine we’re asking to echo back to us (and so the network administrator doesn’t come hunting for the person flooding the network with traffic). We’ll use the Thread class method sleep( ) to put the client thread to sleep for 3,000 milliseconds (three seconds). The call will be enclosed in a try and catch block in case an InterruptedException is thrown, but we’ll just ignore these exceptions if they do occur.
try {

  Thread.sleep( 3000 );

} catch( InterruptedException e ) {

  ;    // Ignore interruption

}
The applet wrapper for the echoUDPClient does not do any networking on its own, so again we’ll just have a listing of its source instead of a play-by-play explanation.
import java.applet.Applet;

import java.awt.*;

public

class echoUDPApplet extends Applet {

  TextArea resultsText;

  String host;

  echoUDPClient c;

  public void init( ) {

    String param;

    // Get parameters, setting to defaults if needed

    param = getParameter( “host” );

    if( param != null ) {

      host = param;

    } else {

      host = “localhost”;

    }

    makeUI( );

    restartClient( );

  }

  public void destroy( ) {

    // Stop the client if it is running

    if( c != null ) {

      c.stop( );

    }

  }

  public boolean handleEvent( Event e ) {

    switch( e.id ) {

    case Event.ACTION_EVENT:

      {

        if( e.arg.equals( “Restart client” ) ) {

          restartClient( );

          return true;

        }

        if( e.arg.equals( “Stop client” ) ) {

          stopClient( );

          return true;

        }

      }

    default:

      return false;             // Signal that we didn’t handle it

    }

  }

  public void stopClient( ) {

    if( c != null ) {

      c.stop( );

      c = null;

    }

  }

  public void restartClient( ) {

    stopClient( );

    try {

      c = new echoUDPClient( resultsText, host );

      c.start( );                        // Start the echo thread running

    } catch( Exception e ) {

      String errorMessage = “Error creating echoUDPClient: “ + e;

      resultsText.setText( errorMessage );

    }

  }

void makeUI( ) {

    setLayout( new BorderLayout( ) );

    resultsText = new TextArea( 80, 4 );

    add( “Center”, resultsText );

    Panel buttonPanel = new Panel( );

    buttonPanel.add( new Button( “Restart client” ) );

    buttonPanel.add( new Button( “Stop client” ) );

    add( “South”, buttonPanel );

  }

}
Because UDP is an unreliable protocol, we’ll have no idea from the send( ) call alone whether our packet gets to the remote host. It could go wandering off into the ether(net) and never reach the destination. If the echo server never receives a packet from us, we certainly won’t be getting a reply. But wait—the call to the receive( ) method blocks the calling thread. If the echo server never sends us a packet, the client will be stuck waiting for a message that will never come.
For this simple example it is acceptable to ignore this unlikely situation, but a real application would need to watch out for it and take appropriate action. One possible solution would be to put a wrapper class that runs in its own thread around the network client object. The calling thread could stop the thread of the wrapper class after a time-out and check for received data.
The following applet tag shows how the UDP client could be embedded in an HTML page. Remember that the Java security constraints might keep the applet from working unless the code is loaded from the local disk.
<applet code=”echoUDPApplet.class” width=”500" height=”200">

<param name=”host” value=”www.fnord.net”>

</applet>
Server applications using UDP sockets do not look much different from client applications. The last example in this chapter will be a server for the same echo protocol the preceding client was created for. This application will listen for packets on a port and send them back verbatim. The final applet is shown in Figure 29.5.
 FIGURE 29.5.
The TCP/IP protocol stack.
This application will be split into three classes: an echoUDPServer class that will handle receiving packets, an echoObject class that will return replies to their source, and an applet wrapper echoUDPServerApplet that will run a server in an applet context (security constraints permitting). Because servers are most often run in a stand-alone context, the server will use System.err to display all output rather than a GUI interface. With the AppletViewer this output will be shown on the terminal or DOS shell where it was started, while Netscape Navigator will print the output to the Java console window.
The echoUDPServer class will open a socket on a port specified in the constructor (in order to enable us to run on any port we want). This will enable the server to run on UNIX platforms without disturbing the system’s echo service or requiring the server to be run by root.
| NOTE |
|---|
| The default port setting for our client object is the official echo port, port seven. For the server the default will be port 7007. To use the client together with the server, you need to change the echoPort constant in the echoUDPClient class and recompile it. If you are using a Windows 95 or Windows NT platform, you should be able to specify the default port (7) when you run the server applet and use the client unmodified. |
Each echoObject will run in its own thread. Although this is not strictly needed for such a simple service, a more complex server might want to allocate a new socket for each client and let that thread handle all communications with that particular host.
We will start off by developing the echoObject class that will respond to echo requests. This class should go in the same source file as echoUDPServer.
The echoObject will have one constructor that will take the server’s DatagramSocket (to send the reply with) and the datagram that we are replying to (which has the address and port the packet came from). These objects will be copied into member variables.
Because the object is Runnable, we also need to define start( ) and stop( ) methods and a Thread variable to hold the thread for the object.
import java.io.*;

import java.net.*;

class echoObject implements Runnable {

  Thread echoThread = null;

  DatagramSocket s = null;

  DatagramPacket source = null

  public echoObject( DatagramSocket s, DatagramPacket src ) {

    this.s = s;

    source = src;

  }

  public synchronized void start( ) {

    if( echoThread == null ) {

      echoThread = new Thread( this );

      echoThread.setPriority( Thread.MAX_PRIORITY / 8 );

      echoThread.start( );

    }

  }

  public synchronized void stop( ) {

    if( echoThread != null ) {

      echoThread.stop( );

      echoThread = null;

    }

  }

  // run( ) Method

}
The run( ) method first retrieves the data from the received packet and prints it to System.err. We use the getLength( ) method rather than the length member of the byte[] because the DatagramSocket will set it to the number of bytes actually received rather than the size of the buffer.
public synchronized void run( ) {

  String messageText = new String( source.getData( ), 0,

                                  0, source.getLength( ) );

  System.err.print( “Sending reply to “ );

  System.err.println( source.getAddress( )

                     + “:” + source.getPort( ) );

  System.err.println( “Data: “ + messageText );

  System.err.println( messageText.length( ) + “ Bytes” );
Next, we will allocate a new DatagramPacket to send back to the source. We first allocate a byte[] to hold the data and copy the bytes from the String. Then we allocate the packet using the InetAddress and port number from the source packet.
  Byte messageBytes[] = new byte[ source.getLength( ) ];

  messageText.getBytes( 0, messageText.length( ), messageBytes, 0 );

  DatagramPacket reply =

    new DatagramPacket( messageBytes, messageText.length( ),

                        source.getAddress( ), source.getPort( ) );
Finally, we will use the socket to send the reply back. If there is an exception sending the packet we will print it out to the error stream. After sending the datagram the method returns, ending the thread.
  try {

    s.send( reply );

  } catch( IOException e ) {

    System.err.print( “Error sending reply to “ );

    System.err.print( source.getAddress( ) + “:”

                     + source.getPort( ) );

    System.err.println( “,.Exception was: “ + e );

  }

  return;

}
The UDP server class will look familiar after having developed the echoUDPClient and TCPServer classes. Each server object will run in its own thread, with the run( ) method containing the bulk of the code. The server will create an echoObject to service the request.
The constructor takes the port number to run on as the argument and allocates the socket to listen on. The port number isn’t stored in a member because the socket provides it through the getLocalPort( ) method. We also define the usual thread variable, and start and stop methods.
import java.io.*;

import java.net.*;

// echoObject code goes here

public

class echoUDPServer implements Runnable {

  Thread serverThread = null;

  DatagramSocket s = null;

  public static final int echoPort = 7007;

  public echoUDPServer( int port ) throws SocketException {

    s = new DatagramSocket( port );

  }

  public synchronized void start( ) {

    if( serverThread == null ) {

      serverThread = new Thread( this );

      serverThread.setPriority( Thread.MAX_PRIORITY / 4 );

      serverThread.start( );

    }

  }

  public synchronized void stop( ) {

    if( serverThread != null ) {

      serverThread.stop( );

      serverThread = null;

    }

  }

  // run( ) Method

}
The run method loops forever until the thread is stopped. It starts by printing a message to System.err, noting what port it is listening on. Next is the main while loop where incoming packets are dispatched. Finally, the socket is closed before returning.
public synchronized void run( ) {

  System.err.println( “echoUDPServer Started on port “

                     + s.getLocalPort( ) );

  while( serverThread != null ) {

    // Allocate a packet to receive into

    // Wait for a packet

    // Print out the packet

    // Allocate an echoObject and start it.

  }

  try {

    s.close( );

  } catch( Exception e ) {

    System.err.println( “Error closing socket: “ + e );

  }

  return;

}
Allocate a Packet to Receive Into
The first thing to do in the while loop is to allocate a packet so that the socket has something to receive data into.
byte  recvBytes[] = new byte[ 8192 ];

DatagramPacket incomingPacket =

  new DatagramPacket( recvBytes, recvBytes.length );
Wait for a Packet
Now that we have somewhere to put it, we will call the receive( ) method and wait for a packet to come in. The method will block the executing thread until a packet is received. Keep this in mind when using the receive( ) method in a thread that you don’t want blocked (such as the same thread as your user interface). If there is an error while receiving a packet, we simply print the exception and continue back to the top of the while loop.
try {

  s.receive( incomingPacket );

} catch( IOException e ) {

  System.err.println( “Error receiving: “ + e );

  continue;

}
Print the Packet
The next bit of code prints the received packet to System.err.
System.err.print( “Got packet from “ );

System.err.println( incomingPacket.getAddress( )

                   + “:” + incomingPacket.getPort( ) );

String str = new String( incomingPacket.getData( ), 0 );

System.err.println( “Data: “ + str );
Allocate an echoObject
The last step the while loop takes is to create a new echoObject to send back the reply. This object will send the echo reply back to the client while the server thread goes back to listening for new requests.
echoObject handler =

  new echoObject( s, incomingPacket );

handler.start( );
Because the echoUDPServer class prints all messages to the System.err stream, we don’t need much of an interface. The following applet does nothing more than creating a new server object and printing a message telling the user where to look.
import java.applet.Applet;

import java.awt.TextArea;

import java.awt.BorderLayout;

public

class echoUDPServerApplet extends Applet {

  public void init( ) {

    echoUDPServer srv = null;

    String statusMessage = null;

    int port = 0;

    if( getParameter( “port” ) != null ) {

      port = Integer.valueOf( getParameter( “port” ) ).intValue( );

    } else {

      port = echoUDPServer.echoPort;

    }

    try {

      srv = new echoUDPServer( port );

      srv.start( );

      statusMessage = “Server running on port “ + port + “.\n”;

      statusMessage += “Watch the Java console for information.”;

    } catch( Exception e ) {

      statusMessage = “Error creating server: “ + e;

    }

    TextArea statusArea = new TextArea( 80, 4 );

    setLayout( new BorderLayout( ) );

    statusArea.setText( statusMessage );

    statusArea.setEditable( false );

    add( “Center”, statusArea );

  }

}
The following tag will start an echo server running on port 7007. Remember that the compiled class files need to be located somewhere in the CLASSPATH for wherever you are using to view the applet. Otherwise, you will get a SecurityException when the echoUDPServer tries to allocate a DatagramSocket.
<applet code=”echoUDPServerApplet.class” width=”500" height=”200">

<param name=”port” value=”7007">

</applet>
You now should know enough to strike out on your own and develop networking applets and applications. For simple Web-based applets, the urlFetcher example should show you all you need to know. The other examples can be altered and used as the core of new applications. For example, the TCPServer could be rewritten to service Finger requests for hosts that don’t already have a finger daemon (such as Windows 95 boxes).
To see more examples of how to put the networking classes to use, check out Chapter 31, “Extending Java with Content and Protocol Handlers.” The fingerClient is used to enable Java to understand URLs of the form finger://hostname/user, and the urlFetcher applet is extended.