
by Bill Rowley
As one of the earliest (and best priced) commercially available Java integrated development environments, Symantec’s Cafe quickly became quite popular. Along with that popularity, though, comes a reputation as a product that is difficult to learn. By exploring the features and capabilities of Cafe, this chapter can help you jump-start your Java programming using Cafe.
The purpose of this chapter is to explain to you the usage and customization of Cafe. Do not expect any Java code fragments or Java applets—there won’t be any.
![]()
![]()
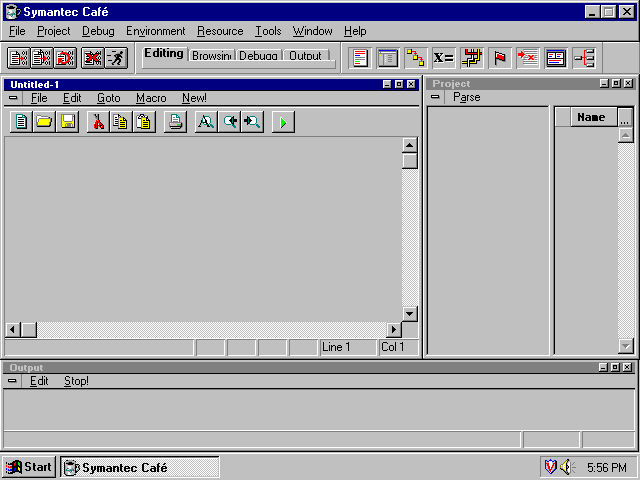
Okay, you’ve heard a lot about Java and its potential. You’ve thought, “Hey! I can do that!” and you downloaded a copy of the Sun Java Development Kit (JDK). You wrote a Java program or two using a text editor (such as Notepad or Wordpad) to key in the source and the JDK command-line interface to compile and run it. You may even have tried to use the JDK debugger. Now you’re frustrated and asking yourself, “What’s the deal here? Java on the Net is so cool, but programming in Java is a real drag! There must be a better way!” Well, there is a better way and it’s shown in figure 52.1. Welcome to Symantec Cafe.
Start enjoying Java at Cafe!
Cafe is an Integrated Development Environment, or IDE, specifically designed for use with the Java language. An IDE is a set of tightly coupled tools that work together to help programmers write, compile, test, and manage programs and projects. Cafe is available for the Windows 95, Windows NT, and the Macintosh operating systems.
![]()
![]()
As noted previously, an IDE consists of a group of tools that work together to assist the programmer in his development tasks. Table 52.1 lists the major components that make up Cafe, along with a brief description of each one.
Table 52.1 Components of Cafe
| Component | Description/Usage |
| Toolbar | The main control of Cafe. It provides access to all of the other components. |
| Workspaces | Tabbed folders of pre-defined window layouts. |
| AppExpress | Project-starting wizard that walks you through the creation and file setup of a new Java project. |
| Cafe Studio | Easy-to-use visual designer for creating graphical user interfaces to your Java programs. |
| Project Manager | Graphically organizes and manages source files associated with a project. |
| Source Editor | Full-featured text editor for adding or modifying Java code or HTML. |
| Class Editor | Three-paned window that graphically organizes classes, class members, and source code of the class members. |
| Hierarchy Editor | Displays and lets you edit class relationships in a tree diagram. |
| Compiler | Symantec’s own optimized Java compiler. |
| Debugger | Lets you visually trace and manipulate Java programs as they execute. |
| Just-In-Time Compiler | Speeds Java execution within Cafe and Appletviewer by converting Java bytecode into platform-native code. |
| Parser | Running in a background thread, the Parser tracks changes in the source code so that each component is always using the current code. |
| Help | Standard Windows-type, context-sensitive help files. |
| JDK | Sun Microsystems Java Development Kit Version 1.0.2. |
Like many Web-related products, you have several choices of where to purchase Cafe. Symantec sells Cafe on CD-ROM through computer stores, mail-order outlets, and just about anywhere else that software is sold. Cafe can also be purchased electronically and downloaded through the Internet. Current retail price per copy is between $100 and $130 U.S. dollars.
![]()
![]()
One benefit of buying Cafe through the Internet is that it insures that you receive the most current version.
To purchase a copy of Cafe through the Internet, follow these steps:
Point your Web browser at the Cafe home page, http://cafe.symantec.com
Click the link labeled Symantec Cafe for Windows 95/NT (or Macintosh) to take you to the index page.
Click the link labeled Online Purchase and Update Center to take you to the Subscription Center.
Click the link labeled Purchase Cafe and then follow the instructions.
![]()
![]()
If you bought Cafe on CD-ROM, the odds are good that the version on the CD is 1.0. This first release version is not very stable and has other strange quirks that make it difficult to use. Of course, you can always check the box labeling or the CD-ROM for the version number, but the best way is to check the installed software itself. Here is how to determine the version of Cafe that you have:
Start Cafe.
Choose Help, About Symantec Cafe. The Cafe Logo box appears (refer to fig.
52.1).
Look for the Symantec Cafe - Version x.xx near the bottom of the logo box.
As of this writing, the most current release version is 1.20. Don’t worry if you have a prior version, because along with Cafe you also receive a one-year subscription for updates and fixes from Symantec. In the package with the CD-ROM should be a card that explains the Subscription Center and lists the User ID and Password assigned to your copy of Cafe.
To upgrade your version of Cafe following the instructions listed under the “Here’s how to access the Subscription Center at Java Central” heading on the card won’t help you much because they are probably wrong. Try this instead:
Follow steps 1–3 of the instructions listed in the “Internet Purchase” section to access the Subscription Center.
Click the link labeled Unregistered User and follow the instructions to register your copy of Cafe and access the download area of the Subscription Center.
![]()
![]()
Now that you have installed or upgraded to the most current version, it’s time to learn about Cafe’s tool set. This section familiarizes you with the basics of the tools that control Cafe itself: the Toolbar and the Workspace. Each section also shows you how to customize the controls to match the way you prefer to work.
![]()
![]()
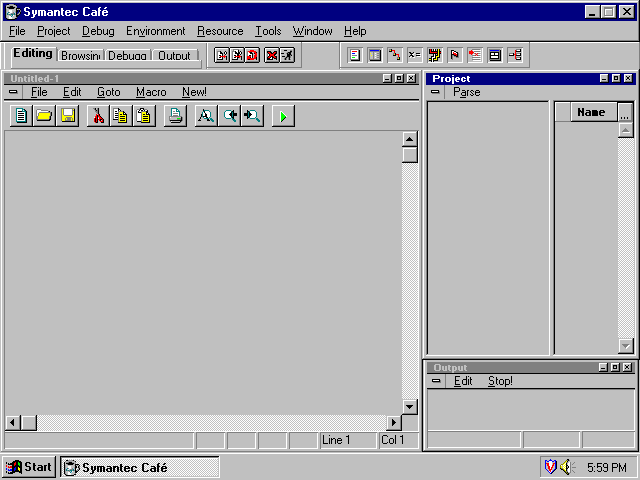
The first window that opens when Cafe is started is the toolbar (or main window), as shown in figure 52.2. The toolbar, which opens along and across the top of the desktop, provides access to, and control of, the other components of Cafe. The remaining desktop area is left available for the Workspace.
Cafe’s toolbar provides a central point of control for Cafe’s components.
Looking at figure 52.2, you can see that the toolbar is divided into four sections:
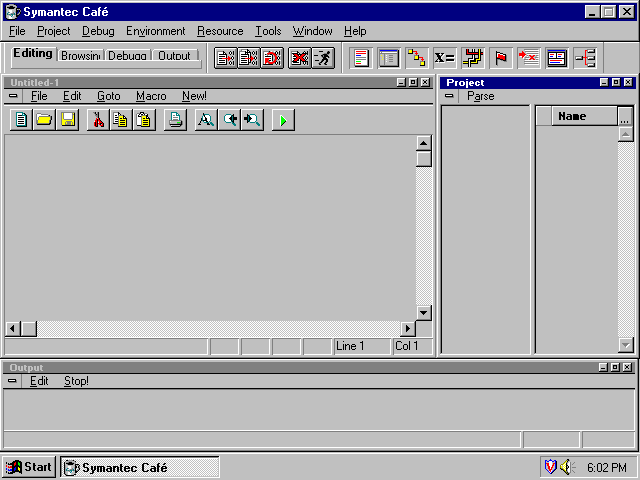
The menu bar should be familiar to anyone who has ever used a Windows-based application. Listed across the menu bar (shown in fig. 52.3) are the major menu items of the Cafe main menu. When you click an item, the item’s drop-down submenu appears. Most of the menu items and their submenus are self-explanatory.
Cafe’s menu bar enables you to access each of Cafe’s major controls and their submenus.
![]()
![]()
The Workspace Toolbox (see fig. 52.4) appears as a set of labeled file folder tabs. Each tab represents a pre-defined set of attributes that determine how the Workspace will be configured. Four preset tabs—Editing, Browsing, Debugging, and Output—are delivered with Cafe. As you see later in the Workspace section, each of the tabs can be customized and additional tabs can be created.
Cafe’s Workspace Toolbox enables you to choose a Workspace configuration by clicking the folder tabs.
Made up of five icon buttons, the Build Toolbox (see fig. 52.5) gives you control over the building and compiling of Java projects and programs.
The Build Toolbox is where you find the buttons that let you build, compile, or test your Java code.
Moving from left to right, the buttons on the Build Toolbox include:
![]()
![]()
The Views Toolbox provides a drag-and-drop method of opening Cafe component windows on your desktop. First, look at the Views Toolbox in figure 52.6 and see what each icon does.
Quick access to each of Cafe’s component windows is provided by the icons on the Views Toolbox.
Again moving from left to right, the icons on the View Toolbox include:
The icons on the Views Toolbox are not buttons; single-clicking them will do nothing. There are two ways to use the icons:
Double-clicking the View icons launches the component but the component’s window (called a View) may open on top of another component’s window. Use the drag-and-drop method if you want the component window to open at a particular location within the Workspace. You identify the location by dragging and then dropping the View icon onto the Workspace where you want the upper-left corner of the component window.
![]()
![]()
Now that you know what features and controls are available on the Cafe toolbar, it’s time to learn how to customize the toolbar so that it works best for you.
All but one of the menu items on the menu bar are standard and integral to Cafe so you cannot
change them. The one exception is the Tools menu item. Cafe allows you add other
applications you might want to run to the pull-down submenu of the Tools menu. Follow
these steps to edit the Tools item of the menu bar:
From the menu bar, choose Tools, Settings to open the Tool Settings dialog box
as shown in figure 52.7.
Use this dialog to customize your Tools menu.
Click an existing Tools menu entry to move, delete, or modify it. If you are only modifying an existing entry, just type over the attributes you are changing and skip to step 4.
Click the appropriate button for Move Up, Move Down, Delete, or
Add.
Move Up. Moves the selected tool towards the top of the list.
Move Down. Moves the selected tool towards the bottom of the list.
Delete. Removes the tool from the list.
Add. Opens a standard Windows Add dialog box. Use the dialog box to browse for the
application you are adding. Once you find the application program, double-click it to bring it into
the Tool Settings dialog box.
Click OK to save your changes and exit, or click Cancel to discard your changes and exit.
Remember the terms floating, dockable, and iconographic from the introduction? Well, these terms all describe characteristics of the toolboxes.
Start Cafe and follow along:
Place the mouse pointer somewhere on the frame surrounding the Build Toolbox.
Using the mouse, click and drag the toolbox a few inches down from the toolbar as shown in figure 52.8.
Create a floating window by undocking a toolbox.
Congratulations, you’ve just undocked the Toolbox and changed it into a floating window! Floating windows always stay on top on other windows regardless of which window is active, so that they don’t disappear. While you have it undocked, trying moving the toolbox around. You can also re-size the toolbox windows by grabbing and dragging the toolbox window frame.
Now right-click the mouse on the Build Toolbox window frame. A pop-up menu, like the one in figure 52.9, appears.
Use this menu to change the settings of the toolbox.
The first entry on the pop-up menu, Dockable, controls how the toolbox window will behave when it is dropped onto the toolbar window. With Dockable selected (indicated by the check mark), the toolbox window re-integrates itself into the toolbar when dropped back onto the toolbar.
![]()
![]()
You can set the size of the icons, tabs, or buttons on the toolbox by selecting one of the next entries: Small, Medium, or Large.
The last entry, Reset Palette, restores any icons or buttons (but not tabs) that have been removed from the toolbox.
![]()
![]()
Drag the Build Toolbox back onto the toolbar window and drop it on the far left-hand side of the toolbar.
The toolbar should now look like figure 52.10.
Dropping the toolbox onto the left of the toolbar shifts the other toolbars to the right.
![]()
![]()
In previous sections of this chapter, you have seen many references to the Workspace and are probably wondering just what it is.
If you tried the Workspace toolbox in the previous section, you saw that clicking the different tabs of the Workspace toolbox changed the configuration of the Cafe views on your desktop. Each tab displayed a specific set of views in a specific layout. Several of the same views appear in multiple tabs but are presented in different locations and/or sizes depending on which tab is active.
These preset configurations of views, their sizes, and locations, are called Workspaces. A Workspace can occupy all of your desktop that is not covered by the Cafe toolbar. Because the Workspace is wide open in this manner, Cafe lets you arrange its views in a way that best matches your work style.
You can create, clone, delete, rename, or re-configure the Cafe Workspaces.
![]()
![]()
![]()
![]()
Let’s start by re-configuring the Editing workspace:
Click the Editing tab of the Workspace toolbox. Your desktop should look something like the one shown in figure 52.11. Don’t worry if it is not exactly the same because you will be changing it.
A Source Editor window, a Project Manager window, and an Output window make up the View configuration of the Editing workspace.
Re-position and re-size the views to match the example shown in figure 52.12 or in any way you prefer. Use standard Windows techniques (such as grabbing and dragging the window frame to resize it and so on) to manipulate the views.
Save the Editing workspace configuration by choosing Environment, Workspace,
Save Workspace Set.
In this example of the Editing workspace, the Source Editor window has been shortened to match the height of the Project Manager window, and the Output window has been stretched to the full width of the screen.
See? It’s really that simple. You can also create your own workspace (either from scratch or by cloning an existing workspace) for special tasks or just to have an alternate configuration available. Now try creating a new Workspace:
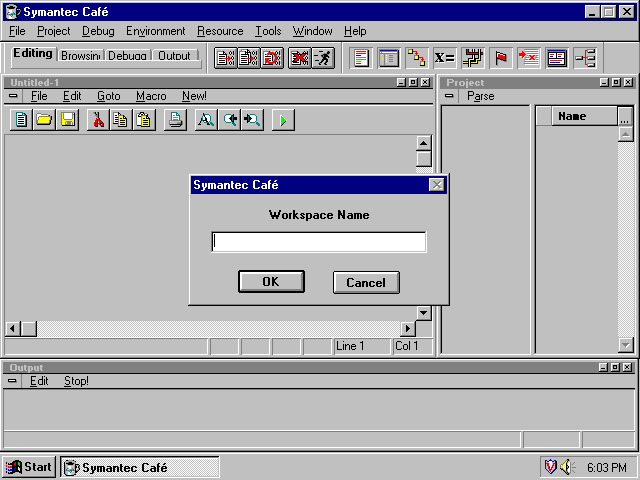
Choose Environment, Workspace, New (or Clone if you want to
use the current Workspace as a template). The Workspace Name dialog box appears (see fig.
52.13).
Enter a name for a new or cloned workspace.
Type in the name of your new Workspace and click OK.
Configure the new Workspace using the techniques you learned earlier in this chapter. You may want to re-dock the floating toolboxes, open views, size and position them, and more.
After you finish configuring the Workspace, remember to save its settings. (See step 3 of the section “Reconfiguring a Workspace” for details.)
To be truly useful, a workspace’s name alone should provide an instant clue to the configuration and function of that workspace. If you have made major changes to a workspace configuration (or if you would just prefer a different name), you can rename the workspace to better reflect its purpose. To rename a workspace:
Select the workspace to be renamed by clicking its tab in the Workspace toolbox.
Choose Environment, Workspace, Rename to call up the Workspace
Name Dialog box (refer to fig. 52.13).
Type in the new name for the workspace and click OK to apply the new name.
Deleting a workspace is even easier than creating, renaming, or re-configuring one. Just follow these steps:
Select the workspace to be deleted by clicking its tab in the Workspace Toolbox. Be sure that you have selected the right one, because workspaces are deleted without confirmation.
Choose Environment, Workspace, Delete; the workspace is gone!
To work on a project within Cafe effectively you need several files:
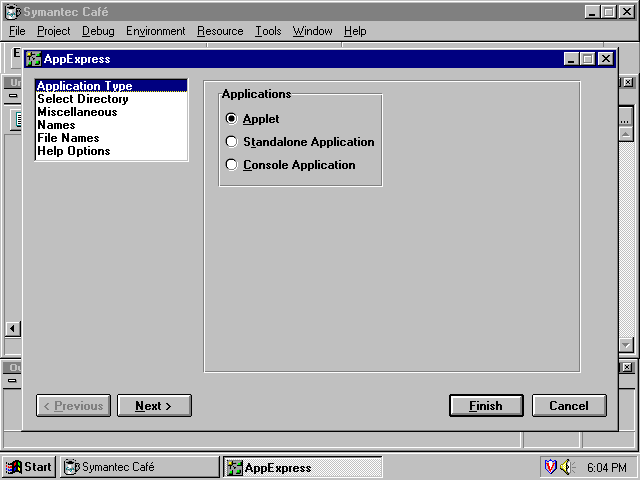
To create these files and establish a framework for working within Cafe, you use the AppExpress. AppExpress is an easy-to-follow set of dialog boxes that lead you through the creation of a Cafe project.
Choose Tools, AppExpress to call up the AppExpress dialog box (shown in fig.
52.14).
Use the AppExpress Dialog Box to create a Java project within Cafe.
Now step through each page of the AppExpress by filling in the information and clicking the N
ext button.
![]()
![]()
Once you reach the Help Options screen, click the Finish button to apply your choices and
to create the project. Prior to clicking the Finish button, you can click the Previous
button to page back through the dialog and make changes or just review your choices. At any stage
of the dialog, you can click the Cancel button to close the AppExpress dialog box and cancel the
creation of the project.
![]()
![]()
Every programmer knows that manually tracking the parts of a project adds unnecessary time and effort to the project. Similarly, a weak editor reduces programmer productivity when the programmer has to fight to write the code. This section introduces you to Cafe’s answer to these problems—the Project Manager and the Source, Class, and Hierarchy Editors.
![]()
![]()
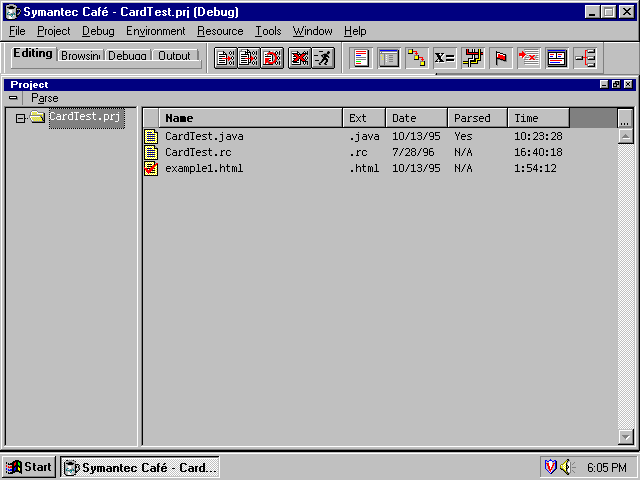
When you ran the AppExpress, you created the files needed by Cafe to effectively work on the new project. The Cafe Project Manager helps you organize the member files of your project and lets you control the editors. Figure 52.15 shows Cafe’s Project Manager with one of the sample Java applets loaded.
Organize your project’s files in the Project Manager.
The folder in the left pane of the Project Manager window represents the current project. Right-clicking the project folder invokes the pop-up menu for the project management functions such as Create Subproject, Build, Rebuild All, Parse All, Edit Project, and Settings. The Project Settings option opens the Project Settings dialog box. Most of the project settings won’t need to changed, especially if you used AppExpress to create the project. One setting you will want to change once your program is completed is the Debug/Release property. Set to Debug, Cafe compiles your programs with additional hooks for the Cafe Debugger to use. You should set this to Release and re-compile before putting your applet/application into a production environment.
The files listed in the right pane are, of course, the files that make up your project. Each file lists its name, file extension, a parsed indicator, and date and time modified. You can sort the files by any of the columns shown by clicking the column heading button.
For example, to sort the files shown in figure 52.15 by file extension, click the column heading
button marked Ext. Right-clicking this side of the Project Manager window invokes the pop-up
menu for the file management functions Compile, Mark as Main, Remove,
Attributes menu, Don’t Show menu, and Settings.
![]()
![]()
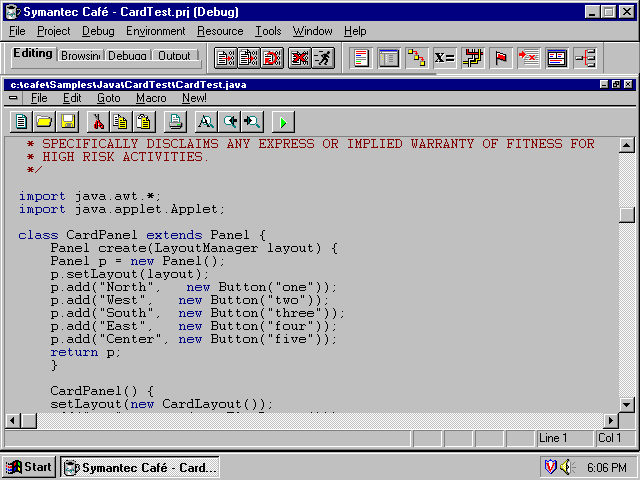
The Cafe Source Editor is a true programmer’s editor. Along with the standard new, open, save, cut, paste, search and replace, and print functions available in most editors, Cafe offers powerful tools such as macros, color-coding of text, automatic indenting, and file comparison. Figure 52.16 shows the Cafe Source Editor in its full glory.
Editing is easy using Cafe’s powerful Source Code Editor.
Across the top of the Source Editor window is a menu bar with the self-explanatory File,
Edit, Goto, Macro, and New! menu items. As usual, clicking a
menu item activates its drop-down submenu. Below the menu bar is a button bar with icon buttons
for each of the most often used functions available through the menu bar.
Notice the different colors of the text in the Source Editor: comments are red, Java keywords are blue, and all other text is black. Also take note of the indenting. The color-coding and indenting are both done automatically while you type your code. This makes finding syntax errors such as improperly closed comment blocks and misspelled keywords a snap.
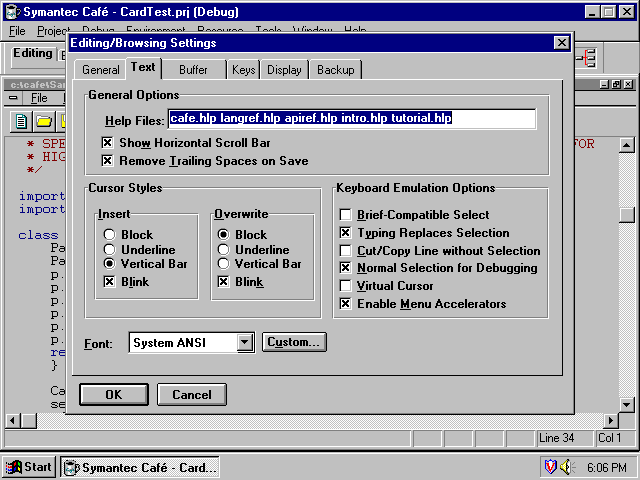
The Source Editor’s properties like text colors, auto-save, and undo buffer size can be accessed
and customized through the Editing/Browsing Settings dialog box (see fig. 52.17). You call up this
dialog box by choosing Edit, Text Settings.
Adjust the editor’s properties to suit your needs.
By now you should be familiar enough with Cafe in particular and source editors in general that
reviewing every feature here would not be especially helpful. However, there is one feature that is
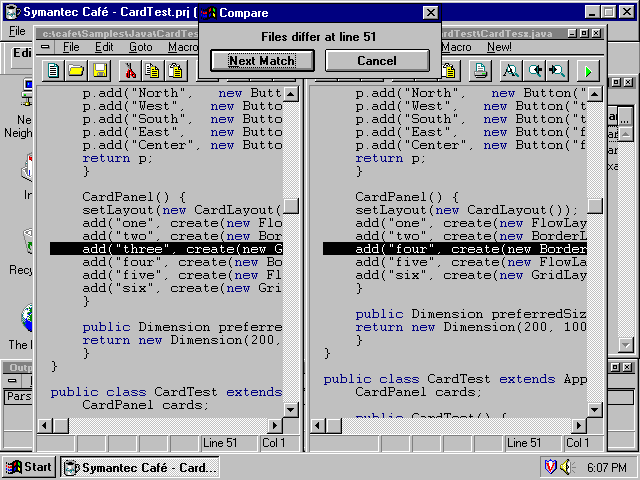
worth special mention—the Compare facility. The Compare Files dialog box shown in figure 52.18
is invoked by choosing File, Compare.
Specify the files to be compared in this dialog box.
Type in (or browse) the names of the files to be compared, specify how you would like the output displayed (horizontal or vertical) and which line numbers to start the compare with, and click OK. See figure 52.19 for an example of the compare result.
Source lines that differ are highlighted in this sample comparison.
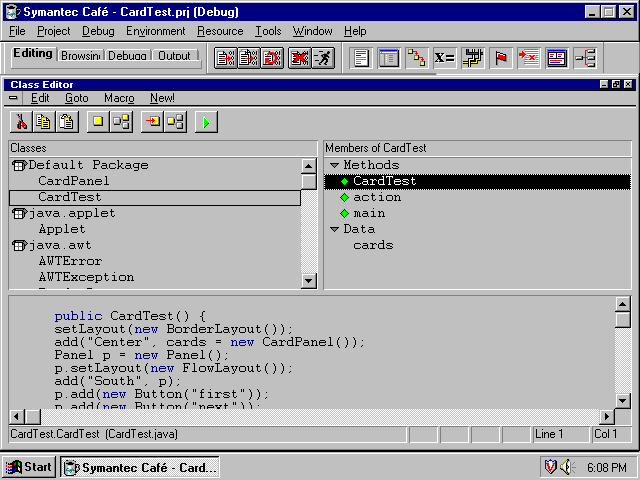
Wouldn’t it be great if you could edit the relationship, members, and source code of a Java class all from one place? Yes, it would and Cafe’s Class Editor, shown in figure 52.20, lets you do just that.
Edit a Java class’s relationships, members, and source in one window—the Class Editor.
The Class Editor’s three pane layout displays the classes and their relationships in the upper left pane, the class members in the upper right pane, and the class source code in the bottom pane. Double-click a class name in the Classes pane to display the methods and data in the Members pane. The methods and data are arranged in a collapsible hierarchy. Double-click a method or data item to display the Java source code for that method or data item.
![]()
![]()
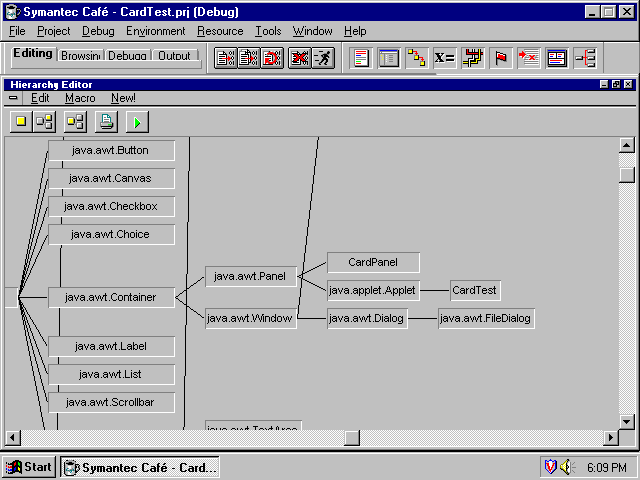
With all of the other Cafe tools and the wide amount of Java base class documentation, the Hierarchy Editor doesn’t really seem necessary. But if you are working with a large project and you want a tool to manage your project’s class relationships, the Hierarchy Editor, shown in figure 52.21, is it. Fully parsed Java base classes and your project's classes are graphically displayed in a scrollable window that shows each class name with lines connecting them by ancestry.
Within the Hierarchy Editor you can open a class in the Class Editor by double-clicking its name. To add a derived, top, or sibling class, or to connect to a base class, right-click the class name and choose from the pop-up menu.
Visualize and edit class relationships with the Hierarchy Editor.
Cafe Studio’s ability to visually create GUIs by simply pointing and clicking and dragging and dropping without having to hand craft any Java source code is one of Cafe’s biggest selling points.
Cafe Studio is the easiest to learn, most user-friendly, and most intuitive component of Cafe. The online Help files for Cafe Studio are very well organized and complete.
But Cafe Studio is also virtually impossible to find and start.
Because of Cafe Studio’s ease-of-use and better than average documentation, this section does not provide great detail on Cafe Studio itself. Instead, this section tells you about the “gotchas” of Cafe Studio and gives you the work-arounds. And of course, how to start Cafe Studio.
Go ahead and try to find and start up Cafe Studio. Did you try? Good job if you found and started it. Don't feel bad if you couldn’t; it’s hidden very well.
![]()
![]()
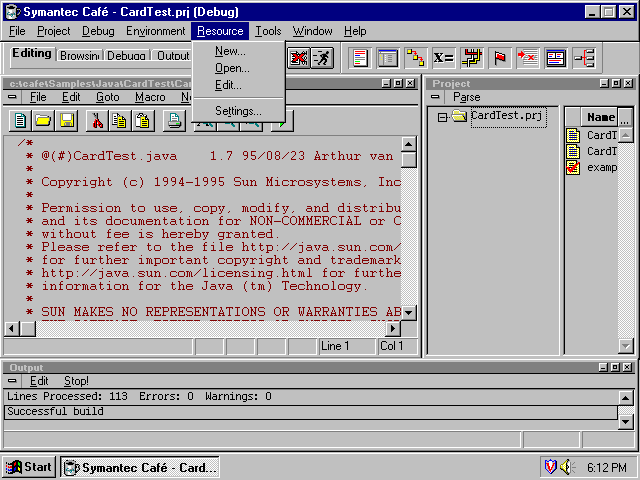
There are actually two ways to access Cafe Studio. First is through Cafe itself. With a project open
in Cafe, choose Resource to open the Resource submenu as shown in figure 52.22.
Access Cafe Studio through the Resource submenu.
Choose one of these entries from the Resource submenu:
If you chose Open (and answered the Open File dialog box) or Edit, you should
see the Cafe Studio Resource Browser as shown in figure 52.23.
Start designing with the Cafe Studio Resource Browser.
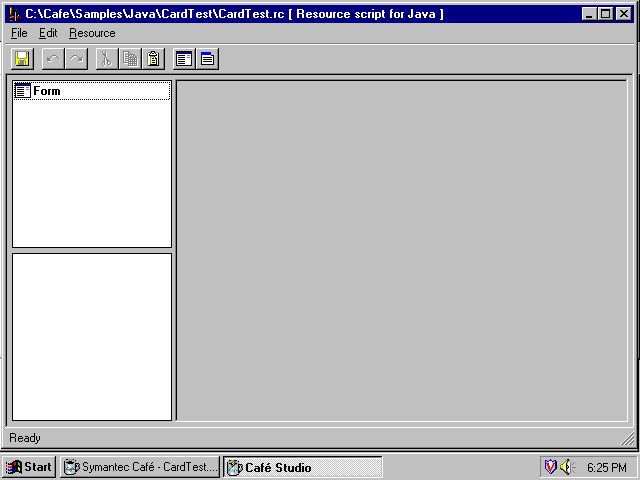
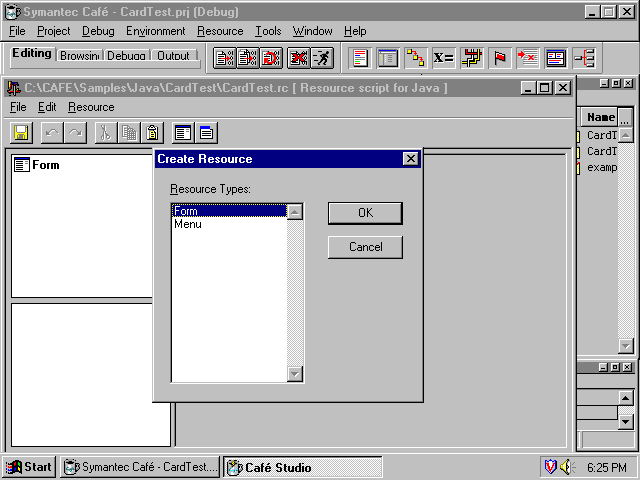
If you chose New, you should see the same Cafe Studio Resource Browser with a Create
Resource dialog box (see fig. 52.24).
Create a new GUI resource with the Create Resource dialog box.
The second way to start Cafe Studio is to run it as a standalone application apart from Cafe. To do
this using Windows Explorer, double-click the Cafe Studio executable found in the CAFE\BIN
directory. Or you can invoke it from the Run selection of the Windows 95 taskbar.
![]()
![]()
Here are a few of the known “gotchas” in Cafe Studio and how to work around them:
Using the Cafe Debugger may appear difficult at first, but once you learn the basics you should have no trouble at all. This last section provides an overview of Cafe’s Debugger by leading you through a brief demonstration. Pay close attention because there will be a test—the first time you try debugging on your own!
![]()
![]()
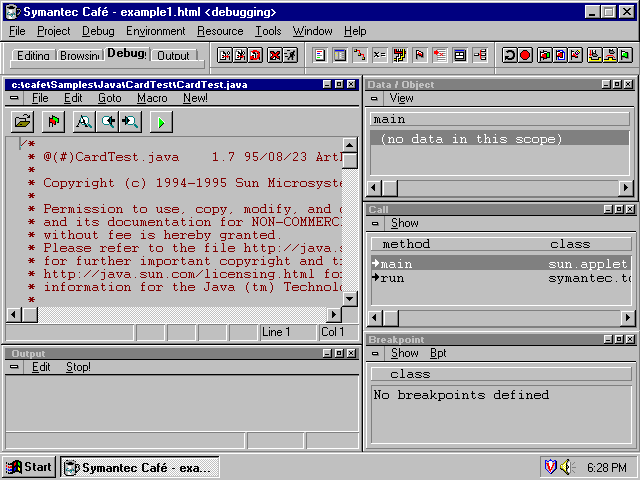
You begin debugging a project by choosing Debug, Start/Restart Debugging or by
pressing the F4 key. Cafe loads its Debugger and switches to the Debugging Workspace, as
shown in figure 52.25.
Exterminate bugs with the Cafe Debugger.
If you look carefully at figure 52.25, you see that a new toolbox is on the toolbar. This is the Debug Toolbox, shown in figure 52.26.
The buttons on the Debug Toolbox enable you to control the Cafe Debugger.
Let’s see what each button on the Debug Toolbox does:
Except for Restart Debugging, none of the Debug toolbox buttons are active unless your program is executing. You must start (or restart) debugging before they will have any effect.
![]()
![]()
Now that you have the Debugger running and know more about the Debug toolbox, set a breakpoint and step through some code. First, set the breakpoint:
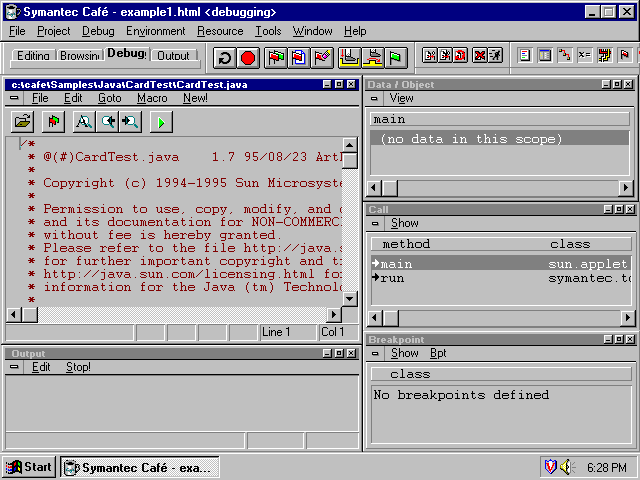
Select the source code line within the Source Editor window using the mouse.
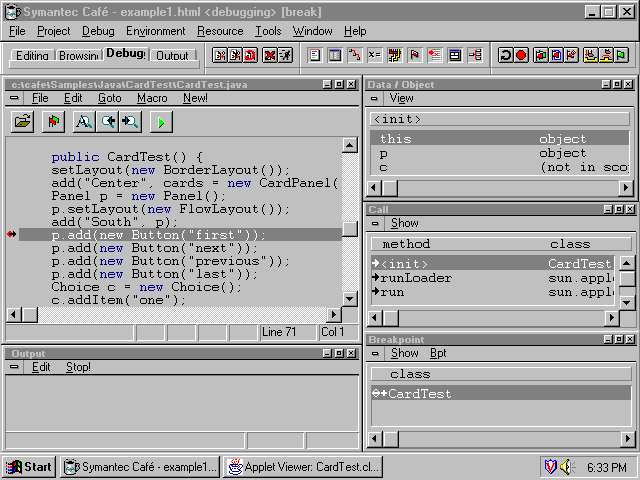
Click the Set Breakpoint button from the Debug Toolbox. The red dot to the left of the code line indicates that the breakpoint is set, as shown in figure 52.27.
CardTest.java with debugging breakpoint set.
Now click the Go Until Breakpoint button to execute the program up to, but not including, the first breakpoint. The next line of code to be executed is marked by a small black arrow to the left of the line (see fig. 52.28). Notice that the Appletviewer starts up but because you set the breakpoint before any paint or show operation, Appletviewer has nothing to display.
Debugger has stopped at the breakpoint.
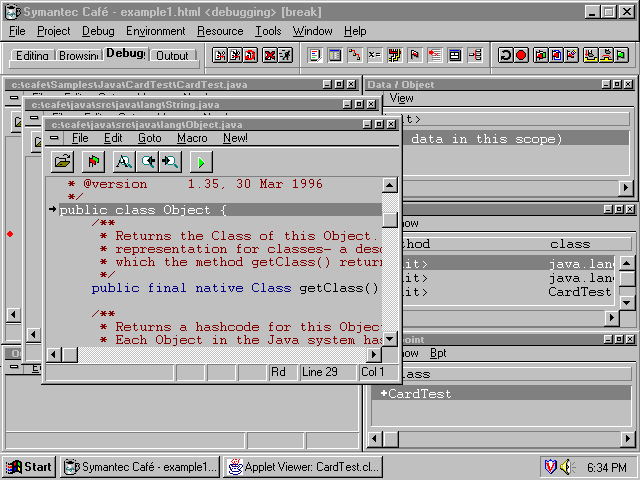
To execute the next line of code, click the Step Into button of the Debug toolbox. Each click of the Step Into button executes another line of code.
Take a look at figure 52.29. There are now three Source Editor windows cascading towards the bottom right of the screen. Look closely at the file names in the title bar of each Source Editor window. These files are the java.lang package’s source code itself! Thanks to Cafe’s background parsing, you can step through the Java package sources included within your code as well as your code. Unless you plan to modify the Java packages, or you really want to know how they work, this feature won’t help you too much. You can avoid stepping through all the Java package code by setting more breakpoints and clicking the Go Until Breakpoint button from the Debug Toolbox.
Source Editor windows cascade as you step through the java.lang package source code.
Go ahead and step through some lines of code. Watch these areas of the Debug workspace as you do:
![]()
![]()
![]()
| Previous Chapter | Next Chapter |
|Table of Contents | Book Home Page |
| Que Home Page | Digital Bookshelf | Disclaimer |
To order books from QUE, call us at 800-716-0044 or 317-361-5400.
For comments or technical support for our books and software, select Talk to Us.
© 1996, QUE Corporation, an imprint of Macmillan Publishing USA, a Simon and Schuster Company