
by Mark Wutka
Java's methods for manipulating images are different from some of the more conventional graphics systems. In order to support network-based operations, Java has to support an imaging paradigm that supports the gradual loading of images. You don't want your applet to have to sit and wait for all the images to download. Java's Producer-Consumer model takes the gradual loading of images into account. Java also uses the concept of filters to allow you to change the image as it passes from producer to consumer. It may seem like a strange way to deal with images at first, but it is really very powerful.
Java's model for manipulating images is more complex than other models. Java uses the concept of image producers and image consumers. An example of an image producer might be an object responsible for fetching an image over the network, or it might be a simple array of bytes that represent an image. The image producer can be thought of as the source of the image data. Image consumers are objects that make use of the image data.
Image consumers are, typically, low-level drawing routines that display the image on-screen. The interesting thing about the producer-consumer model is that the producer is "in control." The ImageProducer uses the setPixels method in the ImageConsumer to describe the image to the consumer.
The best way to illustrate this mechanism is to trace the process of loading an image over the network. First, the ImageProducer starts reading the image. The first thing it reads from the image is the width and height of the image. It notifies its consumers (notice that a producer can serve multiple consumers) of the dimension of the image using the setDimensions method. Figure 33.1 illustrates the relationship between an ImageProducer and an ImageConsumer.
The ImageProducer reads the image dimensions from the image file and passes the information to the ImageConsumer.
Next, the producer will read the color map for the image. From this color map, the producer determines what kind of color model the image uses, and calls the setColorModel method in each consumer. Figure 33.2 illustrates how the producer passes color information to the consumer.
The producer uses the setColorModel method to relay color information to the consumer.
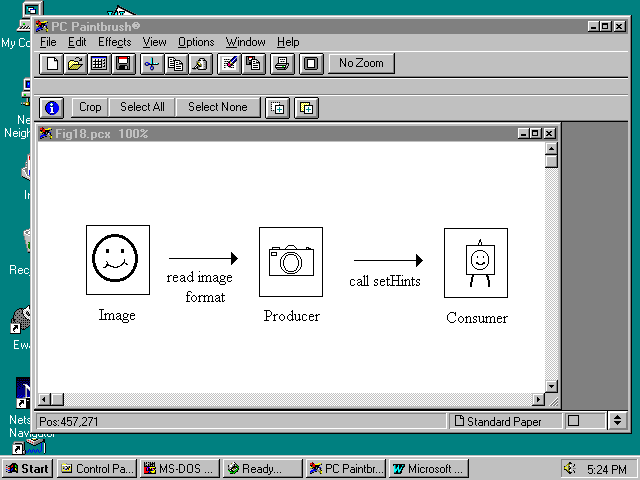
The producer calls the setHints method in each consumer to tell the consumers how it intends to deliver the image pixels. This enables the consumers to optimize their pixel handling, if possible. Some of the values for the hints are ImageConsumer.RANDOMPIXELORDER, ImageConsumer.TOPDOWNLEFTRIGHT, ImageConsumer.COMPLETESCANLINES, ImageConsumer.SINGLEPASS, and ImageConsumer.SINGLEFRAME. Figure 33.3 illustrates how the producer passes hints to the consumer.
The producer passes hints to the consumer to indicate how it will send pixels.
Now, the producer finally starts to "produce" pixels, calling the setPixels method in the consumers to deliver the image. This may be done in many calls, especially if the consumers are delivering one scan line at a time for a large image. Or it may be one single call if the consumers are delivering the image as a single pass (ImageConsumer.SINGLEPASS). Figure 33.4 shows the producer passing pixel information to the consumer.
The producer uses the setPixels method to pass pixel information to the consumer.
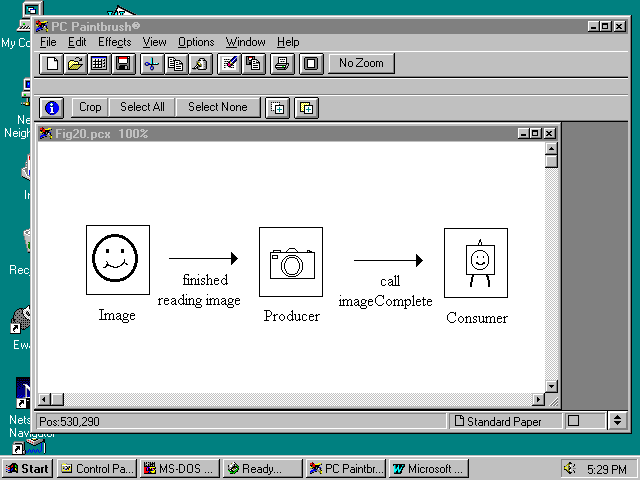
Finally, the producer calls the imageComplete method in the consumer to indicate that the image has been delivered. If there is a failure in delivery—for instance, the network went down as it was being transmitted— then the imageComplete method will be called with a parameter of ImageConsumer.IMAGEERROR or ImageConsumer.IMAGEABORT. Another possible status is that this image is part of a multi-frame image (a form of animation) and there are more frames to come. This would be signaled by the ImageConsumer.SINGLEFRAMEDONE parameter. When everything is truly complete, imageComplete is called with the ImageConsumer.STATICIMAGEDONE parameter. Figure 33.5 shows the producer wrapping up the image transfer to the consumer.
The producer uses the imageComplete method to tell the consumer it is through transferring the image.
This method enables Java to load images efficiently; it does not have to stop and wait for them all to load before it begins. The ImageObserver interface is related to the producer-consumer interface as a sort of "interested third party." It enables an object to receive updates whenever the producer has released some new information about the image.
You may recall that when you used the drawImage method you passed this as the last parameter. You were actually giving the drawImage method a reference to an ImageObserver. The Applet class implements the ImageObserver interface. The ImageObserver interface contains a single method called imageUpdate:
boolean imageUpdate(Image img, int flags, int x, int y,
int width, int height)
Not all the information passed to the imageUpdate method is valid all the time. The flags parameter is a summary of flags that tell what information is now available about the image. The possible flags are as follows:
These flags are usually added together, so an imageUpdate method might test for the WIDTH flag with the following:
if ((flags & ImageObserver.WIDTH) != 0) {
// width is now available
}
The Java image model also enables you to filter images easily. The concept of a filter is similar to the idea of a filter in photography. It is something that sits between the image consumer (the film) and the image producer (the outside world). The filter changes the image before it is delivered to the consumer. The CropImageFilter is a pre-defined filter that crops an image to a certain dimension (it only shows a portion of the whole image). You create a CropImageFilter by passing the x, y, width, and height of the cropping rectangle to the constructor:
public CropImageFilter(int x, int y, int width, int height)
Once you have created an image filter, you can lay it on top of an existing image source by creating a FilteredImageSource:
public FilteredImageSource(ImageProducer imageSource, ImageFilter filter)
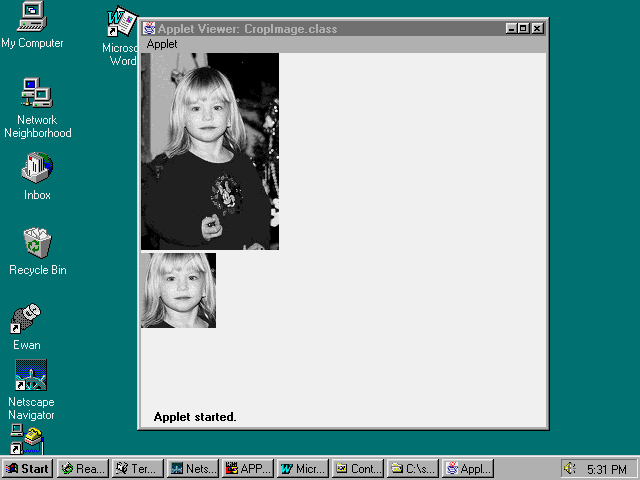
The applet in listing 33.1 takes an image and applies a CropImageFilter to it to only display a part of the image. Figure 33.6 contains the output from this applet; it shows a full image, and a cropped version of that image.
Listing 33.1 Source Code for CropImage.java
import java.awt.*;
import java.awt.image.*;
import java.applet.*;
// Example 22B.15 - CropImage Applet
//
// This applet creates a CropImageFilter to create a
// cropped version of an image. It displays both the original
// and the cropped images.
public class CropImage extends Applet
{
private Image originalImage;
private Image croppedImage;
private ImageFilter cropFilter;
public void init()
{
// Get the original image
originalImage = getImage(getDocumentBase(), "samantha.gif");
// Create a filter to crop the image in a box starting at (25, 30)
// that is 75 pixels wide and 75 pixels high.
cropFilter = new CropImageFilter(25, 30, 75, 75);
// Create a new image that is a cropped version of the original
croppedImage = createImage(new FilteredImageSource(
originalImage.getSource(), cropFilter));
}
public void paint(Graphics g)
{
// Display both images
g.drawImage(originalImage, 0, 0, this);
g.drawImage(croppedImage, 0, 200, this);
}
}
The CropImageFilter allows you to display only a portion of an image.
One possible type of image producer is an array of integers representing the color values of each pixel. The MemoryImageSource class is just that. You create the memory image, then create a MemoryImageSource to act as an image producer for that memory image. Next, you create an image from the MemoryImageSource. There are a number of constructors for MemoryImageSource. In all of them, you must supply the width and height of the image, the array of pixel values, the starting offset of the first pixel in the array, and the number of positions that make up a scan line in the image. The pixel values are normally the RGB values for each pixel; however, if you supply your own color model, the meaning of the pixel values is determined by the color model. The scanline length is usually the same as the image width.
Sometimes, however, your pixel array may have extra padding at the end of the scanline, so you may have a scanline length larger than the image width. You cannot have a scanline length shorter than the image width. You can also pass a table of properties for the image that will be passed to the image consumer. You will only need the properties if you have an image consumer that requires them. The consumers that ship with the JDK do not require any properties. The constructors for the MemoryImageSource are:
public MemoryImageSource(int width, int height, ColorModel model,
byte[] pixels, int startingOffset, int scanlineLength)
public MemoryImageSource(int width, int height, ColorModel model,
byte[] pixels, int startingOffset, int scanlineLength, Hashtable properties)
public MemoryImageSource(int width, int height, ColorModel model,
int[] pixels, int startingOffset, int scanlineLength)
public MemoryImageSource(int width, int height, ColorModel model,
int[] pixels, int startingOffset, int scanlineLength, Hashtable properties)
public MemoryImageSource(int width, int height, int[] pixels,
int startingOffset, int scanlineLength)
public MemoryImageSource(int width, int height, int[] pixels,
int startingOffset, int scanlineLength, Hashtable properties)
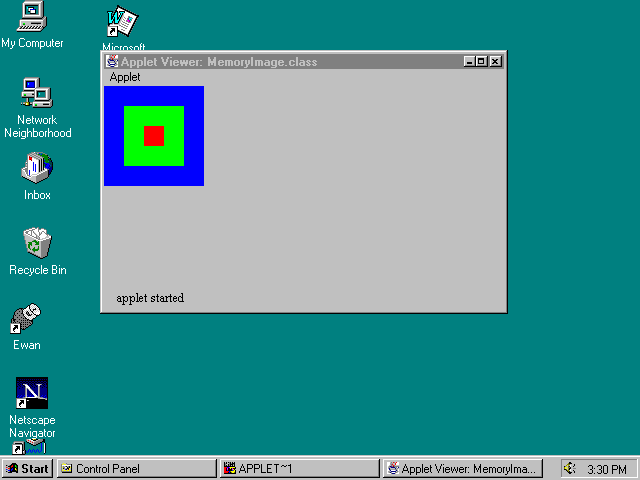
The applet in listing 33.2 creates a memory image, a MemoryImageSource, and finally draws the image in the drawing area. Figure 33.7 shows the output from this applet.
Listing 33.2 Source Code for MemoryImage.java
import java.applet.*;
import java.awt.*;
import java.awt.image.*;
// Example 22B.16 - MemoryImage Applet
//
// This applet creates an image using an array of
// pixel values.
public class MemoryImage extends Applet
{
private final static int b = Color.blue.getRGB();
private final static int r = Color.red.getRGB();
private final static int g = Color.green.getRGB();
// Create the array of pixel values. The image will be 10x10
// And resembles a square bullseye with blue around the outside,
// green inside the blue, and red in the center.
int pixels[] = {
b, b, b, b, b, b, b, b, b, b,
b, b, b, b, b, b, b, b, b, b,
b, b, g, g, g, g, g, g, b, b,
b, b, g, g, g, g, g, g, b, b,
b, b, g, g, r, r, g, g, b, b,
b, b, g, g, r, r, g, g, b, b,
b, b, g, g, g, g, g, g, b, b,
b, b, g, g, g, g, g, g, b, b,
b, b, b, b, b, b, b, b, b, b,
b, b, b, b, b, b, b, b, b, b};
Image myImage;
public void init()
{
// Create the new image from the pixels array. The 0, 10 means start
// reading pixels from array location 0, and there is a new row of
// pixels every 10 locations.
myImage = createImage(new MemoryImageSource(10, 10,
pixels, 0, 10));
}
public void paint(Graphics g)
{
// Draw the image. Notice that the width and height we give for the
// image is 10 times its original size. The drawImage method will
// scale the image automatically.
g.drawImage(myImage, 0, 0, 100, 100, this);
}
}
The MemoryImageSource class allows you to create your own images from pixel values.
The PixelGrabber class is sort of an inverse of the MemoryImageSource. Rather than taking an array of integers and turning it into an image, it takes an image and turns it into an array of integers. The PixelGrabber acts as an ImageConsumer. You create a PixelGrabber, give it the dimensions of the image you want and an array in which to store the image pixels, and it gets the pixels from the ImageProducer.
To grab pixels, you must first create a PixelGrabber by passing the image you want to grab, the x, y, width, and height of the area you are grabbing, an array to contain the pixel values, and the offset and scanline length for the array of pixel values:
public PixelGrabber(Image image, int x, int y, int width, int height,
int[] pixels, int startingOffset, int scanlineLength)
You can also supply an image producer instead of an image:
public PixelGrabber(ImageProducer producer, int x, int y, int width, int height,
int[] pixels, int startingOffset, int scanlineLength)
To initiate the pixel grabbing, call the grabPixels method:
public boolean grabPixels() throws InterruptedException
starts grabbing pixels and waits until it gets all the pixels. If the pixels are grabbed successfully, it returns true. If there was an error or an abort, it returns false.
public boolean grabPixels(long ms) throws InterruptedException
starts grabbing pixels and waits a maximum of ms milliseconds for all the pixels. If the pixels are grabbed successfully, it returns true. If there was a timeout, an error, or an abort, it returns false.
You can check on the status of a pixel grab with the status method:
public synchronized int status()
The value returned by status contains the same information as the flags parameter in the imageUpdate method in ImageObserver. Basically, if the ImageObserver.ABORT bit is set in the value, the pixel grab is aborted, otherwise it should be okay.
The PixelGrabber is useful if you want to take an existing image and modify it. Listing 33.3 is an applet that uses the PixelGrabber to get the pixels of an image into an array. It then enables you to color sections of the image by picking a crayon and touching the area you want to color. To redisplay the image, it uses the MemoryImageSource to turn the array of pixels back into an image. The applet runs pretty slowly on a 486/100, so you need a lot of patience. It requires the Shape class.
Listing 33.3 Source Code for Crayon.java
import java.applet.*;
import java.awt.*;
import java.awt.image.*;
// Example 22B.17 - Crayon Applet
//
// The Crayon applet uses the PixelGrabber to create an array of pixel
// values from an image. It then allows you to paint the image using
// a set of crayons, and then redisplays the image using the
// MemoryImageSource.
// If you want to use other images with this applet, make sure that
// the lines are done in black, since it specifically looks for black
// as the boundary for an area.
// Also, beware, this applet runs very slowly on a 486/100
public class Crayon extends Applet
{
private Image coloringBook; // the original image
private Image displayImage; // the image to be displayed
private int imageWidth, imageHeight; // the dimensions of the image
// the following two arrays set up the shape of the crayons
int crayonShapeX[] = { 0, 2, 10, 15, 23, 25, 25, 0 };
int crayonShapeY[] = { 15, 15, 0, 0, 15, 15, 45, 45 };
// We use the Shape class defined earlier so we can move the crayons
// to a new location easily.
private Shape crayons[];
// The color class doesn't provide a default value for brown, so we add one.
private Color brown = new Color(130, 100, 0);
// crayonColors is an array of all the colors the crayons can be. You can
// add new crayons just by adding to this array.
private Color crayonColors[] = {
Color.blue, Color.cyan, Color.darkGray,
Color.gray, Color.green, Color.magenta,
Color.orange, Color.pink, Color.red,
Color.white, Color.yellow, brown };
private Color currentDrawingColor; // the color we are coloring with
private int imagePixels[]; // the memory image of the picture
boolean imageValid = false; // did we read the image in o.k.?
// blackRGB is just used as a shortcut to get to the black pixel value
private int blackRGB = Color.black.getRGB();
public void init()
{
int i;
MediaTracker tracker = new MediaTracker(this);
// Get the image we will color
coloringBook = getImage(getDocumentBase(), "smileman.gif");
// tell the media tracker about the image
tracker.addImage(coloringBook, 0);
// Wait for the image, if we get an error, flag the image as invalud
try {
tracker.waitForID(0);
imageValid = true;
} catch (Exception oops) {
imageValid = false;
}
// Get the image dimensions
imageWidth = coloringBook.getWidth(this);
imageHeight = coloringBook.getHeight(this);
// Copy the image to the array of pixels
resetMemoryImage();
// Create a new display image from the array of pixels
remakeDisplayImage();
// Create a set of crayons. We determine how many crayons to create
// based on the size of the crayonColors array
crayons = new Shape[crayonColors.length];
for (i=0; i < crayons.length; i++)
{
// Create a new crayon shape for each color
crayons[i] = new Shape(crayonShapeX,
crayonShapeY, crayonShapeX.length);
// The crayons are lined up in a row below the image
crayons[i].moveShape(i * 30,
imageHeight + 10);
}
// Start coloring with the first crayon
currentDrawingColor = crayonColors[0];
}
// resetMemoryImage copies the coloringBook image into the
// imagePixels array.
private void resetMemoryImage()
{
imagePixels = new int[imageWidth * imageHeight];
// Set up a pixel grabber to get the pixels
PixelGrabber grabber = new PixelGrabber(
coloringBook.getSource(),
0, 0, imageWidth, imageHeight, imagePixels,
0, imageWidth);
// Ask the image grabber to go get the pixels
try {
grabber.grabPixels();
} catch (Exception e) {
// Ignore for now
return;
}
// Make sure that the image copied correctly, although we don't
// do anything if it doesn't.
if ((grabber.status() & ImageObserver.ABORT) != 0)
{
// uh oh, it aborted
return;
}
}
// getPixel returns the pixel value for a particular x and y
private int getPixel(int x, int y)
{
return imagePixels[y * imageWidth + x];
}
// setPixel sets the pixel value for a particular x and y
private void setPixel(int x, int y, int color)
{
imagePixels[y*imageWidth + x] = color;
}
// floodFill starts at a particular x and y coordinate and fills it, and all
// the surrounding pixels with a color. The doesn't paint over black pixels,
// so they represent the borders of the fill.
// The easiest way to code a flood fill is by doing it recursively - you
// call flood fill on a pixel, color that pixel, then it calls flood fill
// on each surrounding pixel and so on. Unfortunately, that usually causes
// stack overflows since recursion is pretty expensive.
// This routine uses an alternate method. It makes a queue of pixels that
// it still has to fill. It takes a pixel off the head of the queue and
// colors the pixels around it, then adds those pixels to the queue. In other
// words, a pixel is really added to the queue after it has been colored.
// If a pixel has already been colored, it is not added, so eventually, it
// works the queue down until it is empty.
private void floodFill(int x, int y, int color)
{
// If the pixel we are starting with is already black, we won't paint
if (getPixel(x, y) == blackRGB)
{
return;
}
// Create the pixel queue. Assume the worst case where every pixel in the
// image may be in the queue.
int pixelQueue[] = new int[imageWidth * imageHeight];
int pixelQueueSize = 0;
// Add the start pixel to the queue (we created a single array of ints,
// even though we are enqueuing two numbers. We put the y value in the
// upper 16 bits of the integer, and the x in the lower 16. This gives
// a limit of 65536x65536 pixels, that should be enough.)
pixelQueue[0] = (y << 16) + x;
pixelQueueSize = 1;
// Color the start pixel
setPixel(x, y, color);
// Keep going while there are pixels in the queue
while (pixelQueueSize > 0)
{
// Get the x and y values of the next pixel in the queue
x = pixelQueue[0] & 0xffff;
y = (pixelQueue[0] >> 16) & 0xffff;
// Remove the first pixel from the queue. Rather than move all the
// pixels in the queue, which would take forever, just take the one
// off the end and move it to the beginning (order doesn't matter here).
pixelQueueSize--;
pixelQueue[0] = pixelQueue[pixelQueueSize];
// If we aren't on the left side of the image, see if the pixel to the
// left has been painted. If not, paint it and add it to the queue
if (x > 0) {
if ((getPixel(x-1, y) != blackRGB) &&
(getPixel(x-1, y) != color))
{
setPixel(x-1, y, color);
pixelQueue[pixelQueueSize] =
(y << 16) + x-1;
pixelQueueSize++;
}
}
// If we aren't on the top of the image, see if the pixel above
// this one has been painted. If not, paint it and add it to the queue
if (y > 0) {
if ((getPixel(x, y-1) != blackRGB) &&
(getPixel(x, y-1) != color))
{
setPixel(x, y-1, color);
pixelQueue[pixelQueueSize] =
((y-1) << 16) + x;
pixelQueueSize++;
}
}
// If we aren't on the right side of the image, see if the pixel to the
// right has been painted. If not, paint it and add it to the queue
if (x < imageWidth-1) {
if ((getPixel(x+1, y) != blackRGB) &&
(getPixel(x+1, y) != color))
{
setPixel(x+1, y, color);
pixelQueue[pixelQueueSize] =
(y << 16) + x+1;
pixelQueueSize++;
}
}
// If we aren't on the bottom of the image, see if the pixel below
// this one has been painted. If not, paint it and add it to the queue
if (y < imageHeight-1) {
if ((getPixel(x, y+1) != blackRGB) &&
(getPixel(x, y+1) != color))
{
setPixel(x, y+1, color);
pixelQueue[pixelQueueSize] =
((y+1) << 16) + x;
pixelQueueSize++;
}
}
}
}
// remakeDisplayImage takes the array of pixels and turns it into an
// image for us to display
private void remakeDisplayImage()
{
displayImage = createImage(new MemoryImageSource(
imageWidth, imageHeight, imagePixels, 0, imageWidth));
}
// The paint method is written with the assumption that the screen has
// not been cleared ahead of time, that way we can create an update
// method that doesn't clear the screen, but doesn't need an off-screen
// image.
public void paint(Graphics g)
{
int i;
// If we got the image successfully, draw it, otherwise, print a message
// saying we couldn't get it
if (imageValid)
{
g.drawImage(displayImage, 0, 0, this);
}
else
{
g.drawString("Unable to load coloring image.", 0, 50);
}
// Draw the crayons
for (i=0; i < crayons.length; i++)
{
// Draw each crayon in the color it represents
g.setColor(crayonColors[i]);
g.fillPolygon(crayons[i]);
// Get the box that would enclose the crayon
Rectangle box = crayons[i].getBoundingBox();
// If the crayon is the current one, draw a black box around it, if not,
// draw a box the color of the background around it (in case the current
// crayon has changed, we want to make sure the old box is erased).
if (crayonColors[i] == currentDrawingColor)
{
g.setColor(Color.black);
}
else
{
g.setColor(getBackground());
}
// Draw the box around the crayon
g.drawRect(box.x, box.y, box.width, box.height);
}
}
// Override the update method to call paint without clearing the screen
public void update(Graphics g)
{
paint(g);
}
public boolean mouseDown(Event event, int x, int y)
{
int i;
// Check each crayon to see of the mouse was clicked inside of it. If so,
// change the current color to that crayon's color. We use the "inside"
// method to see if the mouse x,y is within the crayon shape. Pretty handy!
for (i=0; i < crayons.length; i++)
{
if (crayons[i].inside(x, y))
{
currentDrawingColor = crayonColors[i];
repaint();
return true;
}
}
// If the mouse wasn't clicked on a crayon, see if it was clicked within
// the image. This assumes that the image starts at 0, 0.
if ((x < imageWidth) && (y < imageHeight))
{
// If the image was clicked, fill that section of the image with the
// current crayon color
floodFill(x, y, currentDrawingColor.getRGB());
// Now re-create the display image since we just changed the pixels
remakeDisplayImage();
repaint();
return true;
}
return true;
}
}
The image producer-consumer model also makes use of a ColorModel class. As you have seen, the images passed between producers and consumers are made up of arrays of integers. Each integer represents the color of a single pixel. The ColorModel class contains methods to extract the red, green, blue, and alpha components from a pixel value. You are familiar with the red, green, and blue color components from the discussion in Chapter 28, but the alpha component may be something new to you.
[lbr][en]See “The Color Class,” p. xx (Ch. 28)
![]()
![]()
Any time you need a color model and you are satisfied with using the RGBdefault model, you can use getRGBdefault:
public static ColorModel getRGBdefault()
You can extract the red, green, blue, and alpha components of a pixel using these methods:
public abstract int getRed(int pixel)
public abstract int getGreen(int pixel)
public abstract int getBlue(int pixel)
public abstract int getAlpha(int pixel)
You can find out the number of bits per pixel in a color model using getPixelSize:
public int getPixelSize()
Since many other AWT components prefer colors in RGB format, you can ask the color model to convert a pixel value to RGB format with getRGB:
public int getRGB(int pixel)
The DirectColorModel class stores the red, green, blue, and alpha components of a pixel directly in the pixel value. The standard RGB format is an example of a direct color model. The format of the pixel is determined by a set of bitmasks that tell the color model how each color is mapped into the pixel. The constructor for the DirectColorModel takes the number of bits per pixel, the red, green, and blue bit masks, and an optional alpha mask as parameters:
public DirectColorModel(int bits, int redMask, int greenMask,
int blueMask)
public DirectColorModel(int bits, int redMask, int greenMask,
int blueMask, int alphaMask)
You can query the mask values using the following methods:
public final int getRedMask()
public final int getGreenMask()
public final int getBlueMask()
public final int getAlphaMask()
The bits in each mask must be contiguous, that is, they must all be adjacent. You can't have a blue bit sitting between two red bits. The standard RGB format is 0xaarrggbb where aa is the hex value of the alpha component, and rr, gg, bb represent the hex values for the red, green and blue components, respectively. This would be represented in a direct color model as:
DirectColorModel rgbModel = new DirectColorModel(32,
0xff0000, 0x00ff00, 0x0000ff, 0xff000000)
Unlike the DirectColorModel, the IndexColorModel class stores the actual red, green, blue, and alpha components of a pixel in a separate place from the pixel. A pixel value is an index into a table of colors. You can create an IndexColorModel by passing the number of bits per pixel, the number of entries in the table, and the red, green, and blue color components to the constructor. You can optionally pass either the alpha components or the index value for the transparent pixel:
public IndexColorModel(int bitsPerPixel, int tableSize,
byte[] red, byte[] green, byte[] blue)
public IndexColorModel(int bitsPerPixel, int tableSize,
byte[] red, byte[] green, byte[] blue, int transparentPixel)
public IndexColorModel(int bitsPerPixel, int tableSize,
byte[] red, byte[] green, byte[] blue, byte[] alpha)
Instead of passing the red, green, and blue components in separate arrays, you can pass them as one big array of bytes. The IndexColorModel class assumes that every three bytes represents a color (every four if you tell it you are sending it alpha components). The color components should be stored in the order red, green, blue. If you specify an alpha component, it should come after the blue component. That may be counter-intuitive since the standard RGB format has the alpha component first. The constructors for the packed format of colors are:
public IndexColorModel(int bitsPerPixel, int tableSize,
byte[] packedTable, boolean includesAlpha)
public IndexColorModel(int bitsPerPixel, int tableSize,
byte[] packedTable, boolean includesAlpha, int transparentPixel)
Notice that you can actually have both a transparent pixel and alpha components using this last format!
You can retrieve a copy of the red, green, blue, and alpha tables with the following methods:
public final void getReds(byte[] redArray)
public final void getGreens(byte[] greenArray)
public final void getBlues(byte[] blueArray)
public final void getAlphas(byte[] alphaArray)
Each method copies the component values from the table into the array you pass it. Make sure that the array is at least as large as the table size. The getMapSize method returns the size of the table:
public final int getMapSize()
The getTransparentPixel method returns the index value of the transparent pixel, or it returns -1 if there is no transparent pixel:
public final int getTransparentPixel()
The java.awt.image package comes with two standard image filters—the CropImageFilter and the RGBImageFilter. The RGBImageFilter allows you to manipulate the colors of an image without changing the image itself. When you create your own custom RGBImageFilter, you only need to create a filterRGB method:
public abstract int filterRGB(int x, int y, int rgb)
For each pixel in an image, the filterRGB method is passed the pixel's x and y coordinates and its current RGB value. It returns the new RGB value for the pixel.
Because some images are defined with an index color model, you can set your filter to only filter the index color model. This is handy if the color adjustment has nothing to do with the x,y position of the pixel. If you are only filtering rgb values from the index, the x and y coordinates passed to filterRGB will be -1,-1. To indicate that you are willing to filter the index instead of the whole image, set the canFilterIndexColorModel variable to true:
protected boolean canFilterIndexColorModel
You can override the filterIndexColorModel method if you want to change the behavior of the index color model filtering:
public IndexColorModel filterIndexColorModel(IndexColorModel oldCM)
The IndexColorModel returned by this method is the new index color model that will be used by the image.
If you only want to change the color model for an image, you can use the RGBImageFilter to substitute one color model for another:
public void substituteColorModel(ColorModel oldCM, ColorModel newCM)
This method is used by the RGBImageFilter when filtering an index color model. It creates a new color model by filtering the colors of the old model through your filterRGB method, then sets up a substitution from the old color model to the new color model. When a substitution is set up, the filterRGB method is not called for individual pixels. This allows you to change the colors very quickly.
Listing 33.4 shows a simple gray color model class that takes the red, green and blue values from another color model and converts them all to gray. It takes the maximum value of the red, green, and blue components and uses it for all three components. The gray color model leaves the alpha value untouched.
Listing 33.4 Source code for GrayModel.java
import java.awt.image.*;
// This class implements a gray color model
// scheme based on another color model. It acts
// like a gray filter. To compute the amount of
// gray for a pixel, it takes the max of the red,
// green and blue components and uses that value
// for all three color components.
public class GrayModel extends ColorModel
{
ColorModel originalModel;
public GrayModel(ColorModel originalModel)
{
super(originalModel.getPixelSize());
this.originalModel = originalModel;
}
// The amount of gray is the max of the red, green and blue
protected int getGrayLevel(int pixel)
{
return Math.max(originalModel.getRed(pixel),
Math.max(originalModel.getGreen(pixel),
originalModel.getBlue(pixel)));
}
// Leave the alpha values untouched
public int getAlpha(int pixel)
{
return originalModel.getAlpha(pixel);
}
// Since gray requires red, green and blue to be the same,
// use the same gray level value for red, green and blue
public int getRed(int pixel)
{
return getGrayLevel(pixel);
}
public int getGreen(int pixel)
{
return getGrayLevel(pixel);
}
public int getBlue(int pixel)
{
return getGrayLevel(pixel);
}
// Normally, this method queries the red, green, blue and
// alpha values and returns them in the form 0xaarrggbb. To
// keep from computing the gray level 3 times, we just override
// this method, get the gray level once, and return it as the
// red, green, and blue, and add in the original alpha value.
public int getRGB(int pixel)
{
int gray = getGrayLevel(pixel);
return (getAlpha(pixel) << 24) + (gray << 16) +
(gray << 8) + gray;
}
}
Listing 33.5 shows an RGB image filter that sets up a simple substitution of the gray model for the original color model.
Listing 33.5 Source code for GrayFilter.java
import java.awt.image.*;
// This class sets up a very simple image graying
// filter. It takes the original color model and
// sets up a substutition to a GrayModel
public class GrayFilter extends RGBImageFilter
{
public GrayFilter()
{
canFilterIndexColorModel = true;
}
// When the color model is first set, create a gray
// model based on the original model and set it up as
// the substitute color model
public void setColorModel(ColorModel cm)
{
substituteColorModel(cm, new GrayModel(cm));
}
// This method has to be present, but it will never be called
// because we are doing a color model substitution.
public int filterRGB(int x, int y, int pixel)
{
return pixel;
}
}
Listing 33.6 shows a simple applet that displays an image using the gray filter.
Listing 33.6 Source code for Grayer.java
import java.awt.*;
import java.awt.image.*;
import java.applet.*;
// This applet displays a grayed-out image by using
// a GrayFilter rgb image filter.
public class Grayer extends Applet
{
private Image origImage;
private Image grayImage;
private GrayFilter colorFilter;
public synchronized void init()
{
// Get the name of the image to use
String gifName = getParameter("image");
// Fetch the image
origImage = getImage(getDocumentBase(), gifName);
System.out.println(origImage);
// Create the gray filter
colorFilter = new GrayFilter();
// Create a grayed-out version of the original image
grayImage = createImage(new FilteredImageSource(
origImage.getSource(),
colorFilter));
MediaTracker mt = new MediaTracker(this);
mt.addImage(grayImage, 0);
try {
mt.waitForAll();
} catch (Exception ignore) {
}
}
public synchronized void paint(Graphics g)
{
g.drawImage(grayImage, 0, 0, this);
}
public void update(Graphics g)
{
paint(g);
}
}
The technique of color cycling is a little-known animation technique where an image is animated by changing its color palette without changing the actual image. This can take a number of forms—from simulating flowing water to changing text. You can use this technique on images that have been created with an index color model. The idea is that you change the values in a color table and redraw the image with the new color table. If you continually loop through a set of colors, the image appears animated even though the image data itself hasn't changed.
![]()
![]()
Listing 33.7 shows an RGB image filter that cycles the colors in an index color model.
Listing 33.7 Source code for CycleFilter.java
import java.awt.*;
import java.awt.image.*;
//
// This class cycles the colors in an index color model.
// When you create a CycleFilter, you give the offset in
// the index color model and also the number of positions
// you want to cycle. Then every time you call cycleColors,
// it increments the cycle position. You then need to re-create
// your image and its colors will be cycled.
//
// This filter will only work on images that have an indexed
// color model.
public class CycleFilter extends RGBImageFilter {
// The offset in the index to begin cycling
protected int cycleStart;
// How many colors to cycle
protected int cycleLen;
// The current position in the cycle
protected int cyclePos;
// A temporary copy of the color components being cycled
protected byte[] tempComp;
public CycleFilter(int cycleStart, int cycleLen)
{
this.cycleStart = cycleStart;
this.cycleLen = cycleLen;
tempComp = new byte[cycleLen];
cyclePos = 0;
// Must set this to true to allow the shortcut of filtering
// only the index and not each individual pixel
canFilterIndexColorModel = true;
}
// cycleColorComponent takes an array of bytes that represent
// either the red, green, blue, or alpha components from the
// index color model, and cycles them based on the cyclePos.
// It leaves the components that aren't part of the cycle intact.
public void cycleColorComponent(byte component[])
{
// If there aren't enough components to cycle, leave this alone
if (component.length < cycleStart + cycleLen) return;
// Make a temporary copy of the section to be cycled
System.arraycopy(component, cycleStart, tempComp,
0, cycleLen);
// Now for each position being cycled, shift the component over
// by cyclePos positions.
for (int i=0; i < cycleLen; i++) {
component[cycleStart+i] = tempComp[(cyclePos+i) %
cycleLen];
}
}
// cycleColors moves the cyclePos up by 1.
public void cycleColors()
{
cyclePos = (cyclePos + 1) % cycleLen;
}
// Can't really filter direct color model RGB this way, since we have
// no idea what rgb values get cycled, so just return the original
// rgb values.
public int filterRGB(int x, int y, int rgb)
{
return rgb;
}
// filterIndexColorModel is called by the image filtering mechanism
// whenever the image uses an indexed color model and the
// canFilterIndexColorModel flag is set to true. This allows you
// to filter colors without filtering each and every pixel
// in the image.
public IndexColorModel filterIndexColorModel(IndexColorModel icm)
{
// Get the size of the index color model
int mapSize = icm.getMapSize();
// Create space for the red, green and blue components
byte reds[] = new byte[mapSize];
byte greens[] = new byte[mapSize];
byte blues[] = new byte[mapSize];
// Copy in the red components and cycle them
icm.getReds(reds);
cycleColorComponent(reds);
// Copy in the green components and cycle them
icm.getGreens(greens);
cycleColorComponent(greens);
// Copy in the blue components and cycle them
icm.getBlues(blues);
cycleColorComponent(blues);
// See if there is a transparent pixel. If not, copy in the alpha
// values, just in case the image should be partially transparent.
if (icm.getTransparentPixel() == -1) {
// Copy in the alpha components and cycle them
byte alphas[] = new byte[mapSize];
icm.getAlphas(alphas);
cycleColorComponent(alphas);
return new IndexColorModel(icm.getPixelSize(),
mapSize, reds, greens, blues, alphas);
} else {
// If there was a transparent pixel, ignore the alpha values and
// set the transparent pixel in the new filter
return new IndexColorModel(icm.getPixelSize(),
mapSize, reds, greens, blues,
icm.getTransparentPixel());
}
}
}
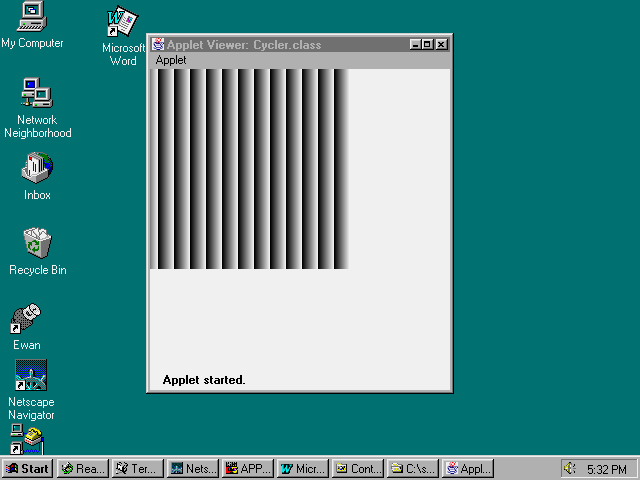
To use the CycleFilter, you have to set up an applet that continually calls cycleColors in the CycleFilter and then redraws an image. Listing 33.8 shows an example applet that creates a simple memory image with an index color model and uses the CycleFilter to cycle the colors. Figure 33.8 shows the output image generated by the Cycler applet.
Listing 33.8 Source code for Cycler.java
import java.awt.*;
import java.awt.image.*;
import java.applet.*;
// This applet creates a series of moving
// lines by creating a memory image and cycling
// its color palette.
public class Cycler extends Applet implements Runnable
{
protected Image origImage; // the image before color cycling
protected Image cycledImage; // image after cycling
protected CycleFilter colorFilter; // performs the cycling
protected Thread cycleThread;
protected int delay = 50; // milliseconds between cycles
protected int imageWidth = 200;
protected int imageHeight = 200;
public void init()
{
// Create space for the memory image
byte pixels[] = new byte[imageWidth * imageHeight];
// We're going to cycle through 16 colors, but leave position 0 alone in
// the index color model we create, so allow room for 17 slots
byte red[] = new byte[17];
byte green[] = new byte[17];
byte blue[] = new byte[17];
// Fill slots 1-16 with varying shades of gray (when the red, green
// blue values are all equal you get shades of gray ranging from
// black when all values are 0, to white when all values are 255).
for (int i=0; i < 16; i++) {
red[i+1] = (byte) (i * 16);
green[i+1] = (byte) (i * 16);
blue[i+1] = (byte) (i * 16);
}
// Create an index color model for that supports 8 bit indices, only 17
// colors, and uses the red, green, and blue arrays for the color values
IndexColorModel colorModel = new IndexColorModel(8, 17,
red, green, blue);
// Now create the image, just go from top to bottom, left to right
// filling in the colors from 1-16 and repeating.
for (int i=0; i < imageHeight; i++) {
for (int j=0; j < imageWidth; j++) {
pixels[i*imageWidth + j] =
(byte) ((j % 16)+1);
}
}
// Create the uncycled image
origImage = createImage(new MemoryImageSource(imageWidth,
imageHeight,
colorModel, pixels, 0, imageWidth));
// Create the filter for cycling the colors
colorFilter = new CycleFilter(1, 16);
// Create the first cycled image
cycledImage = createImage(new FilteredImageSource(
origImage.getSource(),
colorFilter));
}
// Paint simply draws the cycled image
public synchronized void paint(Graphics g)
{
g.drawImage(cycledImage, 0, 0, this);
}
// Flicker-free update
public void update(Graphics g)
{
paint(g);
}
// Cycles the colors and creates a new cycled image. Uses media
// tracker to ensure that the new image has been created before
// trying to display. Otherwise, we can get bad flicker.
public synchronized void doCycle()
{
// Cycle the colors
colorFilter.cycleColors();
// Flush clears out a loaded image without having to create a
// while new one. When we use waitForID on this image now, it
// will be regenerated.
cycledImage.flush();
MediaTracker myTracker = new MediaTracker(this);
myTracker.addImage(cycledImage, 0);
try {
// Cause the cycledImage to be regenerated
if (!myTracker.waitForID(0, 1000))
{
return;
}
} catch (Exception ignore) {
}
// Now that we have reloaded the cycled image, ask that it
// be redrawn.
repaint();
}
// Typical threaded applet start and stop
public void start()
{
cycleThread = new Thread(this);
cycleThread.start();
}
public void stop()
{
cycleThread.stop();
cycleThread = null;
}
public void run()
{
// Continually cycle colors and wait.
while (true)
{
doCycle();
try {
Thread.sleep(delay);
} catch (Exception hell) {
}
}
}
}
The Cycler applet performs animation by cycling the color palette.
Once you are comfortable with Java’s imaging model, you can create many wonderful images. You can write image filters to perform a wide variety of effects. You can use the MemoryImageSource and PixelGrabber to make an image editor, or a paint program. You can even use image transparency to make interesting image combinations. Whatever image manipulation you need to do, Java should be able to handle it.
![]()
![]()
![]()
| Previous Chapter | Next Chapter |
|Table of Contents | Book Home Page |
| Que Home Page | Digital Bookshelf | Disclaimer |
To order books from QUE, call us at 800-716-0044 or 317-361-5400.
For comments or technical support for our books and software, select Talk to Us.
© 1996, QUE Corporation, an imprint of Macmillan Publishing USA, a Simon and Schuster Company